RSS

Sunday, March 23, 2014

Snickerdoodle Protein Shake

A healthy sweet?  Now that's what I call an oxymoron.

I've had it!  This post officially marks a change in my lifestyle.  I've decided that I need to do something different.  I'm like a drug addict; except for the fact that my drug is sugar; which studies have shown can actually be just as addictive as cocaine.  I know that I've blogged about eating healthy, which I do, but if I'm 100% honest, I've caved to my sweets cravings numerous times since the beginning of the year.  This is never a huge deal for me though, because I work out a lot, but I'm finally sick and tired of it.

It's for this reason that I tried giving up sweets (mostly chocolate) for lent, but honestly, that lasted all of 3 or 4 days; which to me is absolutely pathetic!  I personally know that I have more will power than that, but for some reason its been lacking lately and I'm over it.  I've finally come to the realization that I just need to cut out sugar all together.  I can't fool myself any longer and say that I can have only one little bite of something sweet; that's just not true (at least for me).  It'd be like giving a drug addict one little dose of crack and saying that they'll be fine.  It can't be done.  So, to give you an idea about how bad my addiction can sometimes be, let me just say that I can easily eat an entire package of Oreo cookies in one sitting and I'm not even joking.  It's shameful!

In addition to this, the really sad part is that I workout like crazy.  I'm talking 3-4 times a day, for an hour or more.  If I'd just eat clean in addition to exercising, I know I'd show better results.  I seem to go through spurts though.  I've been on and off the bandwagon so many times, (as you can probably tell from previous posts), but this time I'm really going to make it work.

One of the main reasons I'm so dedicated to focusing on nutrition is because back in October, after 9 years of teaching, I finally decided to leave the profession and now I've figured out will be next.  I'm going to become a personal trainer; which I guess is kind of like a teacher, only you don't have to deal with all the politics.  I've been fortunate enough, through my husband's job, to work with personal trainers for the past 3 years and have really been into physical fitness for the past 5-6.  I'm what some might call a fitness fanatic and have lost around a total of 40 pounds; although depending on my food consumption, that number can sometimes change, which is why I'm determined to be healthy in all areas of my life.  

Therefore, I've decided that I need to focus on dedicating my life to practicing what I preach.  I know what sugary and non-healthy foods can do to ones body, especially my own.  It doesn't take long either for all that sugar to change my physical appearance and vice versa.

1 Month Transformation after eating right and exercising
The picture on the left is the beginning of the month, the center photo is the middle of the month, and the right photo is day 30.
You can definitely see the weight loss in the face, arms, legs, hips, and thighs.

I often use this photo as my reminder of what sugar and unhealthy habits do to my body (It was taken last June).  Due to this, I'm currently on day 6 of no sugar or sweets and I'm once again feeling great!  In fact, other than an occasional protein bar (I love Questbars), or a Greek yogurt, I've had no packaged foods.  Day 2 was especially difficult though and here's why: I had little to no energy, ended up crashing in the afternoon, and almost ended up caving, mostly because I knew that something with sugar would give me the temporary rush I needed.  It was difficult, but I'm happy to announce that I stayed strong, making it over the hump and through the withdrawals, and now I plan to continue going.  

Don't ever give up, it's all about determination and willpower!

With that in mind, let's get to today's recipe.  I've been really into making protein shakes lately and not only was this particular one delicious, but it's healthy and is a great energy booster.  Enjoy!  There will definitely be more to come soon!

Snickerdoodle Protein Shake

Ingredients:
1 scoop vanilla protein powder
1 cup unsweetened vanilla almond milk (I use almond breeze, 40 calories per cup)
¼ cup water
1 tsp. sugar free Vanilla Caramel Coffee Mate Creamer
1 tsp. ground cinnamon
6-8 ice cubes
*Optional – 1 tsp. Just Great Stuff (Organic powdered peanut butter; 45 calories a serving, which is 2 TBSP, compared to the traditional 190 calories a serving for 2 TBSP)

Directions:
Add all the ingredients into a blender and pulse until the ice has been pureed.  Pour into a glass and garnish with a little extra cinnamon.  Enjoy!

Source: Slightly adapted from Maybe I Will

Wednesday, March 12, 2014

Cinnamon-Vanilla Protein Packed Pancakes


I feel like I've died and gone to heaven!!!!

One of my all-time favorite foods, has always been, and will always be, pancakes!  I absolutely LOVE pancakes!  So much so, that a friend of mine actually had to pay for my breakfast once because he bet me that there was no way I could eat the huge stack of pancakes that came with my morning meal.  Sadly, he underestimated my love.

My love of pancakes started when I was young.  Growing up I can remember staying the night with my grandparents and in the morning my grandpa would make us all pancakes!  To this day, I still have never had a pancake that even comes close in comparison to his.  They're definitely my all time favorite and I miss them a ton.  Actually, I miss pancakes in general; or at least I did, until yesterday.  You see, once I started really watching what I ate, I kind of decided to give them up.  To me, pancakes just have too many empty carbs. (even though they're delicious).

However, I'm always on the lookout for a lower carb. version and the other day I just so happened to stumble across one that looked interesting; mostly because it contained no flour.  I decided right away to give it a try, and oh my gosh, I am absolutely addicted!  I already plan to make them for lunch again today!  Looking at the recipe, you might think, "how is it possible that it will form pancakes?", but I promise you, it does.

Nutrition:  The recipes makes 1 serving, which equals about 10 pancakes, depending on the size you make them.  Each serving is around 170 calories (depending on your protein powder choice), 34 grams of protein, and 3 grams of carbs.

I topped mine with a tiny bit of Log Cabin sugar free maple syrup; which only added about another 10 calories.  Absolutely delicious, and very filling!


Cinnamon-Vanilla Protein Packed Pancakes

Ingredients:
3 egg whites
1 scoop vanilla protein powder (I use Whey Gold Vanilla Crème)
¼ tsp. cinnamon
1 tsp. baking powder
1 ½ - 2 TBSP. water

Directions:
In a Nutribullet, magic bullet, or something similar, combine all the ingredients.

Heat a skillet, on the stove, over a medium heat and spray with non-stick cooking spray.  (I always use Organic Olive Oil Pam)  Pour in some of the batter and let cook.  You will know it’s time to flip them over once the pancakes start to puff up and bubble a little.  Repeat this process until all the batter has been used.


Enjoy!


Source: Adapted from Muscle and Fitness Magazine

Tuesday, March 4, 2014

Jalapeno Popper Wontons


Happy Mardi Gras and "Fat Tuesday" everyone.  I guess that means it's time to overindulge and then of course, give it all up tomorrow!!!

I like to tell myself that one of these days, I'll go to New Orleans and partake in the festivities.  I've been there once before and had a good time; it just wasn't during Mardi Gras.  I think it'd definitely be fun though, which leads me to today's funny story, or at least it's funny now, but maybe not at the time.....

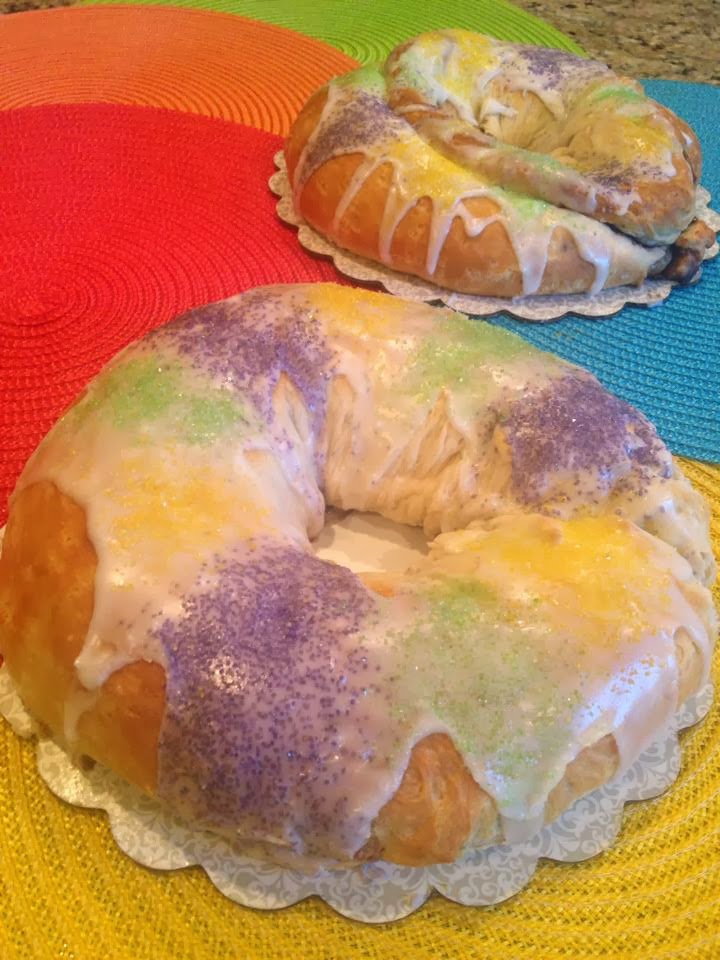
With it being Mardi Gras, I attempted to make my first traditional 'King Cake', for a party, and believe me when I say that it did not go well.  I usually consider myself a pretty good cook/baker, but for some reason, I  just could not get the pastry dough to rise.  I originally made one cake on Saturday night, but was not satisfied because it did not turn out the way I wanted (it seemed doughy).  Therefore, I tried making 2 more batches on Sunday morning, and neither one of those rose.  I was definitely getting frustrated (poor Jeff), and about to make a 3rd attempt when I figured I should get some new yeast.  Jeff was nice enough to run to the store for me, and then I tried again.  Long story short, I attempted to make a total of 8 King Cakes, and still was not 100% satisfied with the final result.  I've determined that anyone who can make them look pretty is amazing to me.  I apparently am not meant to live in New Orleans and definitely am not meant to make these on a regular basis or ever again.


That's enough of my kitchen failures though, so let's move on to my successes......

With it being "Fat Tuesday" and all, I decided the other night that I wanted to cook something for Jeff using a method I typically avoid, which is deep frying.  So what did I deep fry?  Jalapeno popper wontons to be exact.  This dish is traditionally meant to be more of an appetizer, but seeing that I wasn't going to be having any, it was more than enough for Jeff to eat as a main meal.  In fact, he actually had leftovers to take for lunch.  Mostly because this recipe yields about 30-40 wontons; which he added, were absolutely delicious!

Enjoy!

Jalapeno Popper Wontons

Ingredients:
Wonton wrappers
1 (8 oz.) package of cream cheese (I always use 1/3rd less fat)
3 jalapenos, minced (seeds removed)
2/3 cup shredded cheddar cheese
Dash of garlic powder (not too much) - optional
Dash of cayenne pepper - optional
Vegetable oil, for frying
Sea Salt, for garnish

Directions:
In a small to medium bowl and using a hand held mixer, beat the cream cheese until smooth in texture.  Add in the jalapenos and cheddar cheese (plus garlic powder and cayenne pepper; if you desire) and mix on a low speed until just incorporated.

Lay out a few wonton wrappers at a time, and add about a teaspoon of filling onto the center of each wrapper.  Using your fingers, fold the wrappers over, to form a triangle and smear a little water around the edges to seal the two sides together.

Heat the vegetable oil over a medium heat, until it reaches around 350 degrees.  Fry the wontons in small batches until they turn a nice golden brown.  You may need to flip them over while in the oil, just be careful as you do so.  Remove the wontons with a slotted spoon and place on a plate lined with paper towel to remove the excess oil.  Garnish with the sea salt while they are still hot.


Once they have slightly cooled, serve and enjoy!

Source: Slightly adapted from Taste and Tell

Sunday, February 23, 2014

Chocolate Chip Cinnamon Roll Scones (aka....The Death of Me)


 Oh no!  I have a confession to make.  I may have fallen off my food challenge for the month, but hey, I'm only human.  I'm not going to beat myself up over it though, because let's face it, things happen and as long as you don't let it define you, it's ok.  I'm proud to say that I'm back on track now.  I even bought a few boxes of Girl Scout cookies, to bake with, and haven't even opened them.  Now that's will power.

So what was the death of me?  Why exactly did I fall off the bandwagon, especially when I was going strong?  That's easy.....I made the biggest mistake I possibly could.  I baked Jeff these delicious looking chocolate chip cinnamon roll scones.  I thought I was being nice, and doing a good thing, so that he wouldn't just have to eat Pop Tarts for breakfast throughout the week.  Little did I know that they'd be my downfall.

I stayed strong for awhile.  When the scones were in the oven baking, they smelled delicious, when they came out of the oven they looked even better, and when I added the frosting and garnish of chocolate chips, that's when I really knew I was in trouble.  Yet I stayed strong.  It wasn't until the following day, when I was hungry, that I decided to cut one of the scones in half so that I could have it with my coffee.  And yes, that's right, I was still going to be good, so I cut it in half, but who was I kidding?  It was delicious that I ended up eating the other half too.

So, consider yourself warned.  Bake these scones at your own risk, but I promise you, they're definitely worth it if you decide to slip!

Chocolate Chip Cinnamon Roll Scones

Makes about 16 scones
Ingredients:

Filling:
8 TBSP. (1 stick) butter, room temperature
½ cup, firmly packed brown sugar
1 TBSP. cinnamon

Dough:
4 cups all-purpose flour
1/3 cups granulated sugar
2 TBSP. baking powder
¼ - ½ tsp. salt
8 TBSP. cold butter, cut into slices
1 cup mini chocolate chips
1 + ½ - ¾ cup half and half

Icing:
4 oz. cream cheese (I always use 1/3rd less fat), softened
4 TBSP. butter, room temperature
2 cups confectioner’s sugar
½ tsp. vanilla extract
1-3 tsp. milk

Directions:
For the Filling:
In a small bowl, using a hand held mixer, mix together the butter, brown sugar, and cinnamon until smooth and creamy in appearance.

Dough:
In a large bowl whisk together the flour, sugar, baking powder, and salt.  Next, cut in the butter slices until the mixture is crumbly in appearance.  You can use forks, knives, or a pastry blender for this.  Don’t judge, but I always end up using my fingers, because honestly, that’s what works the best for me.  Once ready, add in the chocolate chips and whisk around until they are evenly distributed.

Pour in 1 ¼ cup of the half and half and stir around with a wooden spoon until the ingredients start to come together.  Slowly add in the rest of the half and half, as needed (You might not need it all).  The ingredients should not be soggy in appearance, but instead, should form dryer looking dough.  *After the initial stirring of ingredients, I always use my hands to knead the dough together.*

Place the dough on a lightly floured work surface, or baking mat and roll out into a rectangle, about ¼ inch thick.  


After that, spread the cinnamon filling evenly out over the top of the dough.  Make sure that you leave room around the edges so that the filling doesn't overflow once you roll it up.  


Beginning with one of the long sides of the dough, roll it up to form a log.


Place the prepared dough into the refrigerator while you preheat the oven.  This will make the dough easier to cut into slices.

Preheat oven to 375 degrees and line a baking sheet with parchment paper or a silicone baking mat; set aside.

Once the oven is preheated, remove the dough log from the fridge and cut off the little ends (you could choose to discard them, but that’s yummy goodness you’d be throwing out, so why not bake them and enjoy).  Slice the dough into about 1-inch thick pieces and place them onto the prepared baking sheet(s). 


Place the baking sheet(s) into the oven and let bake for 20-22 minutes or until the scones are lightly golden around the edges.  Make sure to rotate pans halfway through baking.  Remove the baking sheets from the oven and let cool for 5-10 minutes.  After that, remove the scones to a wire rack and allow to cool completely.

For the Icing:
In a medium bowl, beat together the cream cheese and butter, using a hand held mixer.  Once ready, it should be smooth and creamy in texture.  Now, add in the sugar, vanilla, and 1 tsp. of the milk.  Begin by beating on low and increase the speed as needed.  Add in more milk until you reach your desired consistency of icing.  I liked mine a little thick, so I stuck to only 1 tsp. of milk.

Place the icing into a pastry bag, or a ziplock bag, and cut off the tip.  Drizzle it over the scones and garnish with some extra mini chocolate chips. 


Goes great with a cup of coffee!  Enjoy!


Wednesday, February 19, 2014

Slow Cooker Chicken Taco Chili


I can't believe how fast the weekend went by and that it's already Wednesday again!  In fact, the whole second part of last week and even this week just seemed to disappear in a flash.  Last week, it was mostly due to the weather, but  this week it's just because I've been busy.  Believe it or not, it actually snowed here in North Carolina, and everything (I mean EVERYTHING) closed down.

Being from Michigan, I usually laugh when the meteorologists forecast snow.  Although I have to admit, at least for this time around, there was good reason for the panic.  However, I still find humor in the situation.  The storm that went through brought the most snow I've seen in the 9 years that we've been down here and the city doesn't have a good way to clear off the roads.  Due to this, people just abandon their cars on the side of the road and no one goes out.  After a day or so, when I finally decided myself that it was time to leave the house, my car actually slid backwards a little down the driveway due to the ice (and I'm someone who knows how to drive in the snow).  The only good thing about the snowstorm was due to the fact that everything was closed, I got  to spend an afternoon or two, relaxing with Jeff.  It was nice!

Now, before I get to today's post, I believe I promised that I'd share the last of my Valentine's Day surprise gifts, so here they are....

Day 12: I love the "WAY" you love me!


Day 13: I can't "PICTURE" my life without you!


Day 14: You make my heart "BUBBLE" over with happiness!


I hope that these little ideas help spark your own creative side.  The gifts don't just have to be for Valentine's Day either; you could always run with the idea and countdown, or up, to other things.

Let's move on though, and get to today's recipe which is for chicken taco chili, and yes, it tastes just as good as it sounds.  Plus, the meal is incredibly easy to make and will have your whole home smelling delicious!

I'm one who always loves and appreciates a good slow cooker meal, and this is definitely a keeper!  It's a perfect combination of flavors, and you can make it as hot or mild tasting as you like, depending on what degree of ingredients you choose to add.  Plus, this chili is also healthy!

It's not spring quite yet, so sit back, grab a spoon, and enjoy!  

Slow Cooker Chicken Taco Chili
Printer-Friendly Version

Ingredients:
3-4 large boneless skinless chicken breasts
½ an onion, chopped
1 16 oz. can black beans, drained
1 16 oz. can kidney beans
1 8 oz. can tomato sauce
14 oz. of corn
2 14.5 oz. cans of Rotel tomatoes with chilies (I used HOT, and pureed it in a Nutribullet to give it more of a salsa like texture)
1 packet taco seasoning (Once again, I use HOT)
1 TBSP. cumin
1 TBSP. chili powder
Dash of cayenne pepper (optional)
Chili peppers, chopped (optional)
¼ cup cilantro, chopped

Directions:
In your slow cooker, sprayed with a non-stick cooking spray, add in the onion, black beans, kidney beans, tomato sauce, corn, Rotel, taco seasoning, cumin, chili powder, cayenne pepper, and chili peppers (If you are including them).  Stir the ingredients around with a spoon until well combined.  Place your chicken breasts on top of the mixture and cook on HIGH for 6 hours, or LOW for 10.  About an hour before done, remove the chicken and shred it.  Once the chicken has been shredded, place it back into the slow cooker and stir around.  Make sure that all the pieces have been coated with the chili and let finish cooking.

Garnish with Fritos, tortilla chips, rice, or cheese.  The possibilities are endless!


Source: Skinny Taste

Wednesday, February 12, 2014

Sriracha Chicken Thighs


Jeff's a big fan of anything spicy and I know how much he likes sriracha sauce, so the other night for dinner, I decided to make him some sriracha chicken thighs.  Personally, I can't tell you what it tasted like, because it isn't my type of meal (for one thing, I'm not a big fan of chicken thighs, and for another, I don't really care for sriracha sauce), but Jeff tells me that the thighs turned out fantastic.  Therefore, I'm going to take his word and share the recipe.

Here it is!

Sriracha Chicken Thighs

Ingredients:
10 chicken thighs, skin on
Juice of 1 ½ - 2 oranges
1-2 TBSP. Sriracha sauce, depending on how hot you like it (I added a little more)
1 tsp. honey
3-4 TBSP. red onion, finely chopper
Dash of salt
Chopped parsley
Sesame seeds

Directions:
Preheat oven to 400 degrees and line a baking sheet with aluminum foil; set aside.

In a small bowl stir together the orange juice, sriracha sauce, honey, onion, and salt.  Taste to see if it’s too hot, or not hot enough.  If you want it hotter, add more sauce.  If it’s too hot, add a little more honey. (I just had to guess and hope it wasn’t too hot, because I’m not a fan of sriracha sauce)

Place the chicken thighs in a large ziplock bag and add in half the prepared sauce.  Seal the bag and toss around until the chicken pieces are coated.  Put the bag in the refrigerator and allow it to marinate for 30-40 minutes.

Once the chicken is ready, remove the thighs from the bag and place onto the prepared baking sheet.  DO NOT discard the marinade; you’ll be using it in a minute.  Place the baking sheet in the oven and allow the chicken to cook for 20 minutes.

While the chicken is cooking, prepare the glaze.  In a small sauce pan, over a medium-high heat, add in the leftover marinade with about 4-5 TBSP. of water.  This way, it can boil longer.  Once the marinade has appeared to reduce in size, add in the remainder of the original marinade and reduce in size again.  This will take a few minutes, so be patient and don’t give up.  By the time that it’s done, it will no longer be runny, but shouldn’t be quite as thick as jam.

When the chicken is done cooking, flip the thighs over and cook again for about another 15 minutes.  The skin should appear nice and brown.  When the additional 15 minutes are up, remove the chicken, spread on the glaze, and then place the chicken back in the oven for another 5 minutes.


After that, remove the chicken from the oven, sprinkle on the sesame seeds and chopped parsley, then serve.

Source: Boh Logging

Tuesday, February 11, 2014

Valentines Fun!

I'm going to take a break from sharing recipes with you today and instead quickly share a little bit of fun that I've been having so far this month.  For some reason I really felt like getting into Valentine's Day this year, which is a little unusual for me, mostly because I've never been a huge fan.  So, for the 14 days leading up to the so called "holiday", I've been leaving my husband Jeff, little gifts around the house.  The gifts are nothing really elaborate, just small sentiments to show him that I care and am always thinking of him.

Being an ex language arts teacher I always appreciate a good pun.  Therefore, I went out and purchased, or thought up, little gifts that I could create cute romantic puns for.  Please keep in mind that there are so many different sayings and wonderful gift ideas that you could create on your own, I'm just sharing mine to help get you started.

Everyday, since February 1st, I've been leaving one of these small items around the house for Jeff to find.

Day 1:  You're such a "Catch"!
(I forgot to take pictures, but the saying was stuck on a package of goldfish crackers)

Day 2: I "chew"s you, Valentine!
(Once again, I forgot to take a picture, but it was stuck to Jeff's favorite flavor of gum)

Day 3: I'm "nuts" about you!


Day 4: Thanks for "stick"ing by my side!


Day 5: You have o"Fish"ally stolen my heart!


Day 6: You and I are the perfect "mix"!


Day 7: Life would be un"bear"able without you!


Day 8: You are one "Hot Tamale"!


Day 9: You were "mint" for me!


Day 10: "Honey", you are the sweetest!


Day 11: I love you to "Pieces"!


Obviously these are not all of the gifts because it only goes to day 11.  There are still a few more days to go, but I can't post what I plan to give him quite yet, because I know he'll read this blog entry, and I want the remainder of the days to be a surprise.  I promise to update after the 14th.  That way, if you want to do something like this in the future, for someone you know, then you'll have some ideas.  Most importantly though, feel free to be creative and please share some of your ideas.  Like I said, I always enjoy a good pun!