RSS

Saturday, October 29, 2011

Parmesan and Cheddar Cheese Bread


There is nothing better than a terrific homemade loaf of bread.  Except for maybe a homemade loaf of bread that is filled and topped with melted cheese.  Ever since I got back from Michigan this past summer, I've been motivated to try making a delicious cheese bread.  While I was there, my best friend Christina, introduced me to this great local bakery, where we picked up a fresh loaf of cheddar jalapeno bread.  Ever since then, I've been craving more.  Unfortunately, I have not found any bakeries quite as good around me, which is why I decided to do the next best thing.....make it myself! 

I know that making homemade bread can sometimes be intimidating, because there are so many steps in the process.  It can also be quite time consuming, due to the fact that you have to wait for the yeast to rise.  However, this specific quick-bread recipe does not call for any yeast, meaning it couldn't be simpler to make!  In addition, it doesn't take long to assemble, which means that you have scrumptious bread in no time!

Parmesan and Cheddar Cheese Bread
Printer-Friendly Version

Ingredients:
3 ounces Parmesan cheese, shredded on the large holes of a box grater (about 1 cup)
3 cups all-purpose flour
1 Tbsp. baking powder
1/4 tsp. cayenne pepper
1 tsp. salt
1/8 tsp. ground black pepper
4 oz. extra-sharp cheddar, cut into 1/2-inch cubes (about 1 cup)
1 1/4 cups whole milk
3 Tbsp. unsalted butter, melted
1 large egg, lightly beaten
3/4 cup sour cream


Directions:
Move an oven rack to the center of the oven and preheat to 350 degrees.  Spray a 9x5 inch loaf pan with cooking spray and then sprinkle ½ the parmesan cheese evenly across the bottom.  Set aside.

In a large bowl, combine the flour, baking powder, cayenne pepper, salt and pepper.  Whisk together until well blended.  Add in the cubed cheddar squares and stir around, with a rubber spatula, until the cheese is well coated with flour.  (Make sure to break apart any clumps of cheese that stick together)  In a medium bowl, combine the milk, butter, egg, and sour cream.  Whisk the ingredients together, until well blended.  Using your rubber spatula, gently mix or fold the wet ingredients into the dry, until just combined.  It is important to make sure that you do not over mix!  The batter should appear thick.  Using your spatula, lightly scrape the batter into the loaf pan, making sure to level out the top.  Sprinkle the remaining parmesan cheese over the top of the bread.


Place the loaf pan in the oven for about 45-50 minutes, or until a toothpick inserted comes out clean and the bread has a deep golden brown color to it.  Cool in the pan, on a wire rack for about 10 minutes, and then turn the bread out of the pan and continue to let cool completely.

Cut, serve, and enjoy!  This bread is even better toasted!


Thursday, October 27, 2011

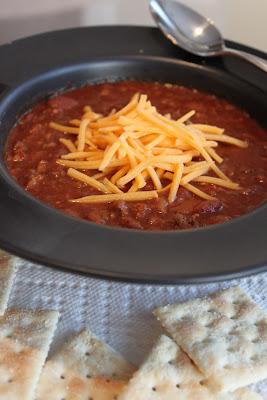
Hot and Spicy Chili

"Everyone gets to know each other in the pot." - Kevin, The Office

It's finally chili time!!!  Fall leaves are changing colors, football is on TV, the weather is cooling off, and November is almost here!!!  If those aren't good enough reasons to grab a bowl of chili, to help warm you up, then I don't know what is. 

Around my house, the motto goes, "the spicier the chili the better."  The great thing about this recipe though, is that for those of you who don't like too much spice, or like even more, you can add or subtract the amount of peppers you put in it.  You can also choose to add or subtract some of the other minor ingredients, but you definitely want to keep the spices and sauces the same.


Everytime that I get out my large pot to make chili, all I can think about is that great episode of "The Office."  If you're a fan, you most likely know the episode I'm referring too.  If not, one of the employees of the office, Kevin, stays up late one night to make a big pot of chili, and refers to it as, "the thing I do best."  He then proceeds to spill it all over the floor on his way into work.  It becomes such a sad, yet funny scene, because Kevin starts to whine and then scrambles around trying to scoop the chili back into pot using a clipboard.

Hot and Spicy Chili
Printer-Friendly Version

Ingredients:
1 pound ground beef
1 pound ground pork
2 Tbsp. olive oil
1 small onion, chopped (about 4 Tbsp. or more, if you like)
2 habanero peppers, seeded (I left the seeds in one) and minced
2 large jalapeno peppers, seeded (I left the seeds in one) and minced
3 cloves garlic, minced
2 Tbsp. chopped green onions
3 (15 oz.) cans chili beans (I use the Busch’s hot brand)
1 (6 oz.) can tomato paste
12 oz. tomato sauce
12 oz. bottle of lager-style beer
1 cup water
2 Tbsp. cornmeal
¼ cup chili powder
1 Tbsp. ground cumin
1 tsp. garlic powder
½ tsp. cayenne pepper
1 Tsp. salt
1 ½ tsp. ground black pepper
Cheddar cheese and additional onion for garnish

Directions:
In a large skillet, over medium-high heat, brown the ground beef and pork until crumbly and no longer pink.  Drain and set aside.

Heat the olive oil in a large pot, over medium heat.  Next, add in the onion, habanero peppers, jalapeno peppers, and garlic.  Continue to cook and stir until the onion has softened, about 3-5 minutes.  Now, add the drained meat to the pot, followed by the green onions, chili beans, tomato paste, tomato sauce, beer, and water.  Continue to stir until well combined.  Sprinkle with the cornmeal and then add the chili powder, cumin, garlic powder, cayenne pepper, salt, and black pepper.  Stir around.

Bring all the ingredients to a simmer (not a boil) over medium heat and then reduce the heat to low.  Let simmer together for at least 2 hours, stirring occasionally.  Remove the pot from the heat and let cool for awhile before placing in the refrigerator overnight.

Remove the chili from the refrigerator and reheat on medium until it begins to simmer.  Garnish with desired toppings.

Additional ideas for ingredients: green peppers, corn, pineapple, diced tomatoes, etc.

Adapted from: All Recipes

Saturday, October 22, 2011

Peanut Butter Cup Cookies


I know I've said in the past, that many of the recipes I've baked were either delicious or scrumptious, but when it comes to this particular cookie, there honestly are no words I can think of that could do it justice.

I've made these peanut butter cup cookies numerous times now, for many different occasions, and every time they've been a HUGE success!  I attribute this mostly to the fact that they contain pretty much everyone's favorite candy, M&M's and Reese's Peanut Butter Cups!  Add on top some toasted marshmallows and chocolate ganache and you've got a masterpiece!!!  Not to mention that it all sits in a peanut butter cookie!!!  Enjoy!  I bet you can't eat just one.


Peanut Butter Cup Cookies
Printer-Friendly Version

Makes around 24 cookies
Ingredients:
2 cups creamy peanut butter
2 cups sugar
2 eggs
24 mini Reese’s peanut butter cups, unwrapped
mini marshmallows

For chocolate ganache:
4 oz. bittersweet chocolate, finely chopped
1/2 cup heavy cream
2 tbsp. sugar
2 tbsp. water
mini M&Ms

Directions:
Preheat oven to 350 degrees.  In the bowl of a stand mixer, fitted with the whisk attachment, combine the peanut butter, sugar, and eggs and beat until well combined.  Place even rounds of dough into the wells of a mini muffin pan and gently press down, so that the dough fills the bottom of each well.  Make an indentation in the middle of the dough pieces (that way it will be easy to place the candy in later).  Bake for 13-15 minutes (it will not completely be done baking).  Remove the pan from the oven and press a peanut butter cup into the middle of each cookie.  Make sure that the peanut butter cup is level with the top of the cookie.  Now, place 4 mini marshmallows on the top of each cookie and return the pan to the oven for another 2-3 minutes.  At this point the marshmallows should look puffy.  Remove the pan from the oven and place on a wire rack to allow the cookies to cool.  It is very important that the cookies cool completely before trying to remove them from the pan!

Once the cookies have completely cooled, remove them from the pan and place them back onto the wire rack, making sure that there’s wax paper or aluminum foil below. 

Place the chopped chocolate into a small bowl.  In a small saucepan, slowly bring the cream, sugar, and water to a boil.  Pour the cream mixture over the chocolate and let sit for 30 seconds.  Slowly whisk the chocolate and cream together until it is smooth.  Let the mixture sit for awhile until it thickens to your desired consistency (this could take around 30 minutes).  Once ready, drizzle the ganache over the tops of the cookies and immediately sprinkle with mini M&M’s.

Source: Annie's Eats

Tuesday, October 18, 2011

Fall Pumpkin Roll


Fall is finally in the air, which means that it's time to start baking things with all those wonderful fall flavors, such as pumpkin.  I personally, have never been a fan of pumpkin pie, and therefore was afraid to try tasting other items that contained pumpkin.  It was only about a year or so ago that I finally decided to attempt making my first pumpkin roll.  It was intended to be a surprise for my husband, seeing that pumpkin pie was always his favorite fall dessert.  While the roll was baking, the smell of the pumpkin and spices became so intoxicating that once I had the roll assembled I just had to taste it.  To my surprise it was delicious!  In fact........I now seem to enjoy everything I try that is pumpkin flavor, except for pumpkin pie.  Isn't that funny?  For some reason, that I cannot explain, I still can't stand the taste of it. 

Fall Pumpkin Roll
Printer-Friendly Version

Cake:
1 cup sugar
3/4 cup flour
1 tsp. salt
1 tsp. baking soda
¾ tsp. cinnamon
¼ tsp. nutmeg
3 eggs
2/3 cup canned pumpkin (I use Libby’s)
1/2 cup chopped walnuts or pecans (optional)

Filling:
8 ounces cream cheese, softened (I use 1/3 less fat)
1 tablespoon butter, melted
1 teaspoon vanilla
1 cup confectioner’s sugar

Directions:
Preheat oven to 350 degrees.  Grease a 15x10x1 inch jelly roll pan and then line the pan with wax paper leaving about an inch of overhang on each of the shorter sides.  Lightly grease the wax paper (otherwise the roll with stick, trust me).

In a medium bowl mix the sugar, flour, salt, baking soda, cinnamon, nutmeg, eggs, and canned pumpkin.  Once the mixture has been evenly combined pour it over the wax paper.  You may need a spatula to help you spread the mixture out evenly over the pan.  Sprinkle with walnuts/pecans if you choose to do so.  I sprinkled on some extra cinnamon, and it turned out delicious.  Bake for 14-15 minutes, or until the edges slightly pull away from the sides of the pan and the center is done.

On your counter top, lay out a large dish towel (it is best to use one without any texture) and sprinkle on a thick coating of confectioner’s sugar.  When you remove the cake from the oven, turn the pan upside down, onto the towel coated with the confectioner’s sugar, so that the wax paper is facing up (I have not yet found an easy way to do this).  Peeling slowing, remove the wax paper from the inverted cake, being careful not to tear the roll.  Starting at one of the short ends, roll the pumpkin cake up into the paper towel to cool.  I set the wrapped up roll on a wire rack to speed up the cooling process.

While the roll is cooling, mix together the cream cheese, butter, vanilla, and confectioner’s sugar until well combined and creamy in texture.  Refrigerate until ready to use.  Once the roll has completely cooled, unroll the pumpkin cake and evenly spread on the filling.  Re-roll the pumpkin cake without the paper towel this time, cover with plastic wrap, and place in the refrigerator for at least an hour before serving.  Feel free to garnish with a light dusting of a little extra confectioner’s sugar and serve.    

Adapted from: All Recipes

Monday, October 17, 2011

Chicken Tortilla Soup


With the fall weather slowly arriving, nothing sounds better to me than a hot bowl of comforting soup.  With so many different options available out there, it's difficult to settle on just one, but trust me when I say that this soup is worth trying.  Not only is it delicious, filling, and quick/easy to make, but you can also add or subtract any of the ingredients you want.

Chicken Tortilla Soup

Serves 4
Ingredients:
Olive oil
6 cups fat free chicken stock
2 cups cooked, shredded chicken
half an onion, chopped
1 clove garlic, minced
1 teaspoon chili powder
1 teaspoon cumin
1/4 teaspoon chipotle chile powder
juice from 2 large limes
salt and pepper to taste

Additional add-in ideas:
Canned corn (drained)
Black beans (drained)
1 cup chopped zucchini

Directions:
Coat a large saucepan with olive oil over a medium-high heat.  Add in the onion and sauté until tender, about 2-3 minutes.  Now, add in the garlic, chili powder, cumin, chipotle chili powder, salt and pepper, stirring until fragrant, about 30 seconds.  Pour in the chicken stock and bring to a boil.  Add the shredded chicken to the pot, then reduce the heat to medium, and simmer until the chicken is heated through.  Once ready, pour in the juice from the limes and stir around.  Taste for proper seasoning and then ladle into serving bowls.

If adding any of the additional ingredients, combine to the pot at the time the chicken is added.

Garnish Options:
Tortilla strips                             Fresh cilantro                           
Shredded cheese                      Sour Cream
Chopped tomatoes                   Sliced avocado
Crushed chips

Sunday, October 16, 2011

Apple Bread with a Crumb Cinnamon Topping

To me, one of the best things about fall is getting to bake my homemade apple bread.  I know that there are tons of other great fall recipes out there, but nothing quite compares to apple bread.  It's something I bake every year and am always excited for my first loaf of the season. 

Apple bread is kind of a tradition in my family.  My mother use to make it for us every fall, and it was always my favorite.  I hated having to share it though, and would sometimes fight with my sisters over who would get a certain piece (some slices contained more cinnamon than others).  Now that my family is spread out over the country, I only have to fight with my husband over a particular slice. 


A funny story:
As I have mentioned before, I am a completely self taught cook, so the first time that I tried making my own loaf of apple bread I made sure to follow the recipe my mother had provided me step by step.  It instructed me to bake the bread for 45 minutes, but when the timer went off and I opened the oven door it was still a liquid.  I wasn't sure why, so I closed the oven and baked it for about another 30 minutes.  When I checked on it again, the bread was still somewhat liquidity.  I was becoming very frustrated so I called my mom and asked her what I was doing wrong.  She said that she didn't know and wanted me to read her the recipe card she had given to me, so I did.  It was only a matter of moments before she began to laugh and informed me that it wasn't rising because she had forgotten to write down that it needed flour, and I hadn't added any.  How can you make bread without flour?  At the time I didn't know any better.  I guess we all have our moments.

Apple Bread with a Crumb Cinnamon Topping
Printer-Friendly Version

Servings: 1 loaf
Ingredients:
2 cups chopped apples (your choice, I use any type of red apple)
½ cup butter, melted
1 cup sugar
2 eggs
½ tsp. baking soda
1 tsp. baking powder
1 tsp. vanilla
2 Tbsp. milk
1 tsp. cinnamon
¼ tsp. nutmeg
2 cups flour

Topping:
3 Tbsp. butter, melted
3 Tbsp. sugar
2 tsp. cinnamon
3 Tbsp. flour

Directions:
Preheat oven to 350 degrees.  Coat a loaf pan with baking spray; set aside.

Peel apples and puree in the bowl of a food processor.  Add in the melted butter, sugar, eggs, baking soda, baking powder, vanilla, milk, cinnamon and nutmeg.  Mix thoroughly after each ingredient addition.  Lastly, add the flour and mix until combined.

To make the topping:
In a small bowl, place the butter and add the cinnamon.  Stir until well combined.  Add in the sugar, and continue to stir until blended.  Finally, add in the flour and stir until ingredients are well mixed.   

To assemble:
Pour about half of the bread mixture into the loaf pan.  Sprinkle the bread mixture with half of the topping mixture (it won’t sprinkle too easily, because the topping will be more like chunks; so just spread it out with a spoon or your fingers).  Pour in the remaining bread mixture and then sprinkle with the rest of the topping mixture.

Bake for around 45-60 minutes or until an inserted toothpick comes out clean.  Remove the pan from the oven and allow the bread to cool on a wire rack for at least 30 minutes before trying to remove from the pan.  


Sunday, October 2, 2011

Chocolate Peanut Butter Crunch Torte (Cheesecake)

Recently at school, it was my team members birthday and I knew that I wanted to make her something special.  We've worked together for a little over 5 school years now, which is one of the reasons that I know she's a fan of chocolate and peanut butter.  I had a couple of recipes that I was debating between, so I presented them all to her, and this is what she settled on.  I'm glad that she did too, because I've been wanting to try this recipe for awhile now.  There has been only one downside to it.  The torte was pure deliciousness and I already find myself wanting to make it again.


Chocolate Peanut Butter Crunch Torte (Cheesecake)
Printer-Friendly Version

Ingredients:
For the Crust:
34 Oreo cookies, finely processed into crumbs
5 ¾ Tbsp. butter, melted and cooled
dash of salt

For the crunch:
1 ¼ cups lightly salted peanuts, divided
½ cup mini chocolate chips
2 tsp. sugar
½ tsp. espresso powder
¼ tsp. cinnamon
dash of nutmeg

For the filling:
2 cups heavy cream
1 ¼ cup confectioners’ sugar, sifted
12 oz. 1/3 less fat cream cheese, at room temperature
1 ½ cups creamy peanut butter
2 Tbsp. milk (I used skim)

For the Topping:
½ cup heavy cream
4 oz. bittersweet chocolate, finely chopped

Directions:
To make the crust:
Preheat oven to 350 degrees and lightly grease a 9-inch springfoam pan.  In a small bowl, combine the Oreos, butter, and salt.  Stir together with a fork until the Oreos are well moistened.  Press the mixture into a thin layer that completely covers the bottom and the sides of the springfoam pan.  Freeze the crust for 10 minutes.  Transfer the crust from the freezer, to the oven and bake for 10 minutes.  Remove the crust from oven and place on a wire rack until completely cool.  (This is very important, so that the filling will not melt)

To make the crunch:
In a small bowl, combine ½ a cup of the chopped peanuts, mini chocolate chips, sugar, espresso powder, cinnamon, and nutmeg.  Stir together with a fork and then set aside.

To make the filling:
In the bowl of an electric mixer, fitted with the whisk attachment, and set on a medium speed, whip the 2 cups of heavy cream until it holds medium peaks.  Now, beat in ¼ cup of the confectioners’ sugar and continue to whip on medium-high speed until the cream holds firm peaks.  Gently scrape the cream into a separate bowl and refrigerate until needed.

Wipe out the mixing bowl (But DO NOT wash).  Replace the whisk attachment on the electric mixer, with the paddle attachment, and beat the cream cheese with the remaining 1 cup of the confectioners’ sugar on a medium-high speed until it looks satiny smooth.  Once ready, beat in the peanut butter, milk, and ¼ cup chopped peanuts until well blended.

Gently stir in ¼ of the whipped cream mixture, using a large spatula, just so that it lightens the mousse.  Continuing to work with the spatula, stir in the crunchy peanut mixture, and then lightly fold in the remainder of the whipped cream.  Pour the mousse into the crust and spread around using the spatula, making sure the top is nice and smooth.  Refrigerate for 4-5 hours or overnight.  Cover with plastic wrap as soon as the mousse begins to firm up.

To finish:
Place the chopped chocolate in a heat proof bowl.  Using a double broiler, bring ½ cup of heavy cream to a full boil.  Pour over the chopped chocolate and let sit for 2 minutes.  Slowly whisk together until the chocolate is well blended with the cream and it forms a smooth consistency.

Pour the ganache over the torte and spread around with a spatula.  Now, sprinkle the remaining peanuts over the top and chill in the refrigerator for at least 30 minutes.  Once the ganache is firm, remove the torte from the springfoam pan and continue to refrigerate until ready to be enjoyed!  

Very Slightly Adapted from: Annies Eats