RSS

Thursday, May 31, 2012

Mexican Pizza


How can anyone go wrong with homemade pizza?  In my opinion it's absolutely the best!  Homemade pizza not only contains fresher ingredients than a franchise pizza does, but you're also able to control the amount of toppings that are added to it.  Ultimately, this helps make the pizza as healthy, or as unhealthy, as you desire.

Knowing me, I've been going for healthy dinners lately and this particular pizza recipe, which was slightly adapted from Emily Bites, is surprisingly healthy.  I use the word surprisingly, because of how tasty it is.  The pizza itself consists of almost entirely low fat ingredients, and is also baked on a whole wheat crust. You just can't go wrong with this recipe because it is both healthy and delicious!

Mexican Pizza
Printer-FriendlyVersion

Ingredients:
1 lb. 99% fat free ground turkey, or lean ground beef
1 packet reduced sodium taco seasoning
1 tsp. cumin (optional, it will just give it a little extra kick)
1 ½ tsp. chili powder (optional)
Boboli 12” Whole Wheat Thin Pizza Crust
½ cup of your favorite salsa
2 Tbsp. taco sauce
½ a can of fat free refried beans
1 cup cheddar cheese

Garnish Options:
Lettuce
Scallions
Black olives
Black Beans
Guacamole

Directions:

Preheat oven to 450 degrees.  If using a pizza stone to bake on, make sure that it preheats with oven.

In a large skillet over a medium-high heat, brown the turkey, or the beef.  Make sure to break the meat into pieces as it cooks, and drain the excess fat.  Next, return the turkey or beef to the skillet and add in the taco seasoning, and cook according to package directions.  During this time you should also stir in the cumin and chili powder, if using.  Allow to the mixture to simmer, and then set aside.

In a small bowl, combine the salsa and taco sauce.  Stir together.

To assemble:
Spread an even layer of the refried beans over the top of the pizza crust.  Next, add on the salsa/taco sauce mixture, all while making sure to leave about a ½ inch edge around the crust.  Evenly spread on the seasoned turkey/beef.  Top the pizza with the cheddar cheese.  (Feel free to add more cheese if you like and are not worried about calories)  This would also be a good time to add on some of the garnish options such as the black beans, or olives.  I would hold off on the other options though until the pizza is done baking.  This will keep them from becoming soggy.

Once ready, place the pizza on a pan or on a pizza stone and place in the oven and for 8-10 minutes.  Remove the pizza from the oven and top with lettuce and scallions.  Cut into slices and serve warm. 

This pizza is also great reheated!

Source: Adapted from Emily Bites

Monday, May 21, 2012

Personal Mini Fruit Pizzas


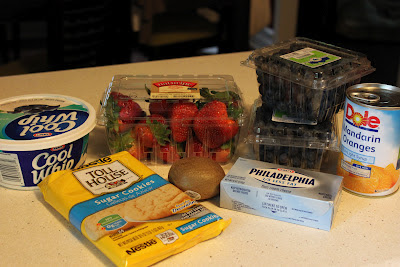
Nothing says it's almost summertime better than a scrumptious dessert made with fresh fruit, and these personal mini fruit pizzas are just that!  Not only is this a light tasting and flavorful dessert, but you also have the opportunity to garnish it with your favorite fruit.

Another wonderful thing about these little, addicting (yes, super addicting) cookies is that they're incredibly quick and very simple to make.  I ended up only having about an hour and a half to get these cookies baked and decorated, due to the fact that I'd been invited over to an impromptu dinner party.  At the time, it didn't seem like it could be done, but in the end, I actually had time to spare.  However, when I make these cookies again (and I definitely will), I think I'll try baking a batch of homemade sugar cookies.

Mini Personal Fruit Pizzas
Printer-FriendlyVersion


Ingredients:
Cookie:
Tollhouse sugar cookies

Cream Cheese Filling:
8 oz. 1/3 less fat cream cheese
1 cup confectioner’s sugar
1 tsp. vanilla extract
8 oz. fat free cool whip

Fruit of your choice:  (Some options include)
·        Strawberries
·        Mandarin oranges
·        Kiwi
·        Blueberries
·        Raspberries
·        Blackberries
·        Bananas
·        Pineapple
·        Etc.

Directions:
Bake the sugar cookies according to package directions and then allow time to completely cool.


Place the cream cheese, confectioner’s sugar and vanilla extract in a medium bowl.  Next, using a hand held mixer beat the ingredients together until well combined and smooth.  Gently fold in the cool whip. 


Once ready, spread the mixture evenly over the cooled sugar cookies.  Top with desired fruit.  Serve immediately, or chill in the refrigerator until ready.

Source: Slightly adapted from Six Sisters' Stuff


Monday, May 14, 2012

Mini Cannoli Cups


I've never tried a cannoli before, but when I was asked to make it for Amanda's bridal shower, I jumped on the opportunity.  Mostly because I'm pretty much obsessed with making desserts, which I'm sure you already know if you follow my blog, and I'm always willing to try new things!  Due to this, I logged onto my trusty computer and started searching for different cannoli recipes, just so that I could make some comparisons.  Needless to say, I found a TON!!  To be honest though, it was almost too overwhelming, mostly because I had no idea what a cannoli was suppose to taste like.

Well......after a lot of searching and comparing, I settled on these mini cannoli cups.  Not only did they turn out delicious, but compared to some of the other recipes I found, they were super, super easy and tasted delicious!  There were quite a few people at the shower who ended up asking for the recipe, so here it is!

Mini Cannoli Cups
Printer-FriendlyVersion

Ingredients:
For the crust:
Flour for dusting work surface
Pillsbury pie dough (2 rolls)
3 Tbsp. Sugar in the Raw
1 tsp. cinnamon (I used more, because I like cinnamon)

For the Filling:
15 oz. container whole milk ricotta cheese
½ cup confectioner’s sugar
2 Tbsp. granulated sugar
1 tsp. vanilla

Garnish:
Mini chocolate chips
Confectioner’s sugar for dusting

Directions:
Preheat oven to 425 degrees.

In the bowl of a stand mixer, combine the ricotta cheese, confectioner’s sugar, granulated sugar, and vanilla.  Mix on a medium-low speed until all the ingredients are well combined.  Cover the filling and place in the refrigerator for at least 30 minutes.  The cream will thicken up slightly during this time.

Gently unroll the pie crusts, one at a time, onto a lightly floured work surface.  Sprinkle the top of the dough with the sugar in the raw and cinnamon.  (Feel free to sprinkle on more, until your desired amount is reached.)  Using a rolling pin, lightly roll over the cinnamon and sugar in order to spread the dough out a little further and press the cinnamon and sugar pieces further into the dough.


Using a round biscuit cutter, or round cookie cutter, cut the dough into small circles and gently press the dough pieces into the bottom of, and slightly up the sides of an ungreased mini cupcake pan.  (I made mine in a regular size cupcake pan, and they turned out great!) 


Bake the crusts for about 10 minutes or until they start to turn a light golden brown.  Remove the pan from the oven and place on a wire rack to cool.  Once the crusts have cooled slightly, remove them from the pan and allow time to cool completely before filling.

Once the crusts have cooled, place the refrigerated filling into a pastry bag fitted with desired tip (or no tip) and pipe about 1 tablespoon of the filling into the crusts.  Garnish with mini chocolate chips and dust with powdered sugar.


Source: Cooking with Sugar

Sunday, May 13, 2012

Kahlua Tiramisu Layer Cake

My 100th Post!!!

I can't believe that this is already my 100th post, and I'm very excited that it happens to be a cake recipe!!!  I absolutely love to make cakes!  Cakes are the whole reason I started cooking more in the first place, and decided to start this food blog.  Therefore, I find this recipe is very fitting for my 100th post.


My friend, co-worker, and team member, Amanda, will be getting married in June, and this particular cake happened to be one I baked for her bridal shower.  (If you want to see more of my cakes, check out my Facebook page, "Savory Sweets by Jamie")  I was honored to be one of the hosts of the shower and we decided to go with an Italian theme.  Sticking to the theme, the menu included, bread, salad, spaghetti, mini canoli cups (which will appear later), and of course, the Kahula tiramisu cake. 

Originally I was going to make the traditional tiramisu, but apparently around here, lady fingers are a seasonal item, which meant that I couldn't find them anywhere.  Therefore, I needed an alternative dessert and suddenly remembered this tiramisu cake I had made a few years back.  With more baking experience under my belt now, I was a little more daring this time around and spiced it up a bit.  The cake was the perfect alternative to traditional tiramisu and received quite a bit of compliments from all those who enjoyed it!  Congratulations again Brian and Amanda!  I can't wait for your wedding this June!

Kahlua Tiramisu Layer Cake
Printer-FriendlyVersion

Ingredients:
For Cake:
1 ½ cups all-purpose flour
1 ½ cups cake flour
1 Tbsp. baking powder
½ tsp. salt
2 sticks butter, at room temperature
1 ¾ cups sugar
4 large eggs
2 tsp. vanilla extract
1 ¼ cup milk (I use skim)
1 tsp. instant coffee powder
¼ cup coffee
1 Tbsp. Kahlua (or any other coffee flavor liquor)

Filling:
1 (8 oz.) container mascarpone cheese
½ cup confectioner’s sugar
2 Tbsp. Kahlua (or any other coffee flavor liquor)

Frosting:
2 cups heavy cream
¼ cup confectioner’s sugar
2 Tbsp. Kahlua

Garnish:
Bittersweet chocolate shavings
Pepperidge Farm – French Vanilla or Cappuccino Pirouette Rolled Wafers

Directions:
For the cakes:
Preheat the oven to 350 degrees and coat 3 8-inch pans with a nonstick cooking spray; set aside.  In a medium bowl whisk together the all-purpose flour, cake flour, baking powder, and salt.  Set aside.

In the bowl of an electric mixer, set on medium-high, beat together the butter and sugar until light and fluffy.  This will take about 3-4 minutes.  Scrape down the sides of the bowl as needed.  Add in the eggs, one at a time, making sure to beat well after each addition.  Mix in the vanilla.  Set the mixer on a low speed and gradually add in the dry ingredients in three additions, making sure to alternate with the milk.  Beat the mixture after each addition, until the batter is just combined.

Divide 2/3 of the batter between two of the prepared pans.  Stir the instant coffee powder into the remaining batter and then pour the batter into the remaining pan.  Bake the cakes in the preheated oven for about 20-25 minutes, or until an inserted toothpick comes out clean.  Remove the pans from the oven and allow the pans to cool on a wire rack for about 10 minutes.  Once the pans are cool enough to touch, flip the cakes out onto the wire rack to cool completely.

While the cakes are cooling, combine the brewed coffee and 1 Tbsp. Kahlua in a small measuring cup; set aside.

For the filling:
In a small bowl, combine the mascarpone cheese, ½ cup confectioner’s sugar, and 2 Tbsp. Kahlua.  Using an electric mixer, set on a low speed, slowly beat the ingredients together until they’re smooth and well combined.  Cover with plastic wrap and refrigerate until ready to be used.

For the Frosting:
In the bowl of an electric mixer, combine the heavy cream, confectioner’s sugar, and Kahlua; then beat on a medium speed until it becomes stiff in appearance.  Once ready, gently fold ½ cup of the frosting mixture into the filling mixture.

To assemble the cake:
Place one of the plain cake layers onto a serving platter, then, using a skewer, or a fork, poke holes into the top.  Pour 1/3 of the coffee/Kahlua mix over the cake, and spread around an even layer of the filling.  Top the prepared cake layer with the coffee flavored cake, making sure to poke holes in this layer as well, and pour over another 1/3 of the coffee/Kahlua mix.  Spread on the remaining filling and then top with the last remaining plain cake.  Poke holes in the top of the last plain cake and pour on the remaining little bit of the coffee/Kahlua mix.  Frost and garnish as desired.

Refrigerate for 30 minutes to an hour before serving.  Any uneaten cake should be stored in the fridge.

Source: Adapted from All Recipes

Tuesday, May 8, 2012

Slow Cooker Hawaiian Turkey Meatballs


I love when I happen to find, or create, a recipe that's quick, easy to make, and inexpensive!  This meal is exactly that!  The recipe itself only requires 4 major ingredients, plus a few additional ones, that you probably already have around the house.  Prep time involves cutting the peppers into chunks and that's all.  After that is done, you just place all the ingredients into the slow cooker (crock pot) and let cook for 3-4 hours.  Your job is done!  It's that easy.

I chose to serve this over a bed of brown rice, and it turned out great!

Slow Cooker Hawaiian Turkey Meatballs
Printer-FriendlyVersion

Ingredients:
32 oz. package of precooked, frozen turkey meatballs
13.5 oz. can of pineapple chunks (set juice aside)
1 large green pepper, cut in chunks
1 cup light brown sugar (I like to use Splenda)

2 Tbsp. cornstarch
2/3 cup of vinegar
2 Tbsp. reduced sodium soy sauce


Directions:
Place the meatballs in the bottom of a slow cooker (crock pot) then add in the pineapple chunks and green peppers.

In a small bowl whisk together the pineapple juice, light brown sugar, cornstarch, vinegar, and soy sauce.  Once combined, pour the sauce over the ingredients in the slow cooker.  Cover and cook on low for 3-4 hours or until the meatballs are cooked through.  Take lid off and stir occasionally throughout the cooking process.

Serve over a bed of warm brown rice!

Source: Six Sisters' Stuff

Sunday, May 6, 2012

Cinnamon French Toast Scones


Breakfast food is definitely the best, or at least in my opinion it is!  Unfortunately, being a teacher, I rarely, if ever have time to make, or even enjoy a well prepared breakfast.  Usually I just end up grabbing something as I run out the front door to get to school.  Protein shakes, granola bars, yogurt, bagels, dry cereal, and coffee tend to be what I end up with.  Lately though, I've been desiring something more.  That's when I decided to make this batch of scones.  I absolutely love making scones, mostly because they're quick, easy (unless you'rE my little sister, sorry Kim!) and hold up well.

Cinnamon French Toast Scones
Printer-FriendlyVersion

Makes about 8 scones
Ingredients:
2 cup all-purpose flour
4 Tbsp. sugar (you could substitute in 1 Tbsp. brown sugar, if desired)
1 Tbsp. baking powder
½ tsp. salt
6 Tbsp. cold, unsalted butter (cut into 6 pieces)
¾ cup Hersey’s cinnamon baking chips
1 tsp. vanilla extract
1 egg, beaten
1 cup heavy whipping cream
¼ cup sugar + 1 ½ tsp. cinnamon, mixed together to form cinnamon sugar mix


Directions:
Preheat oven to 375 degrees and line a baking pan with parchment paper or a silicone baking mat.  Set aside.

In a medium-large bowl whisk together the flour, sugar, baking powder, and salt.  Now, using a pastry blender cut the butter into the flour mixture until pea size pieces form.  Add in the cinnamon baking chips (I add a little more) and stir together.

Next, add in the vanilla, egg, and ½ of the heavy cream.  Using a wooden spoon, stir together.  (If the dough appears too dry, add in more of the heavy cream.  Make sure to only add a little of the cream at a time, and just until the dough looks and feels pliable.)

Remove the dough from the bowl and place onto a floured surface.  Now, shape the dough into a circle until it’s about an inch in thickness.  I find this works best when using your hands.  Cut the dough into 8 triangles and brush the tops with some heavy cream.  Sprinkle the cinnamon sugar mixture over the scones and place onto prepared baking sheet.

Bake for 15-18 minutes or until they appear done; they should be a very light golden color.  Top with your favorite icing.  I used buttercream frosting.

You may store in an airtight container for up to a week.  They taste great reheated in a microwave with a little maple syrup drizzled on top!

Source: Adapted from Go Bold with Butter Originally from Taylor Takes a Taste