RSS

Tuesday, November 26, 2013

Stromboli


Yesterday I shared a delicious recipe for a whole wheat pizza dough, and said that I'd be telling you what I used it for.  So, as promised, here it is......

Very rarely, if ever, do we order a pizza in this household.  I honestly can't even tell you the last time that I ate pizza, which is funny, because it used to be my favorite food.  Usually it's something special that Jeff will get when/if I'm out of town, but even then, he doesn't seem to order it too much anymore.  That's why, every so often, I like to do something special, and make him a homemade pizza, or Italian type meal.

This time around, I decided to make Stromboli instead of a traditional pizza.  For those of you who don't know, Stromboli is pretty much the same thing, but the toppings are encased in the crust.  To me, this is way tastier than a regular pizza because the crust just so happens to be my favorite part anyway.  I can remember, while growing up, my parents would order themselves a pizza every Sunday night (it was their tradition) and I would always ask my mom if she would please cut off her crust and give it to me, which she did.  Thanks mom!  Sadly though, times have changed, and this particular meal was not for me to enjoy.

There's one more thing I'd like to say before I get to the recipe and that is, the great thing about pizza and Stromboli is you can incorporate whatever ingredients you'd like.  This time around, I chose to make a meatlovers Stromboli for Jeff, but you could always add in vegetables or anything else that sounds delicious to you!

Stromboli
Printer-Friendly Version

Ingredients:
Pizza dough
Genoa Salami
Ham
Pepperoni
Mozzarella cheese
Provolone cheese
Olive oil
Egg yolk
Garlic powder

Directions:
Preheat oven to 400 degrees.

On a flat, well-floured surface, roll out the pizza dough into the shape of a rectangle.  Make sure that it is large 
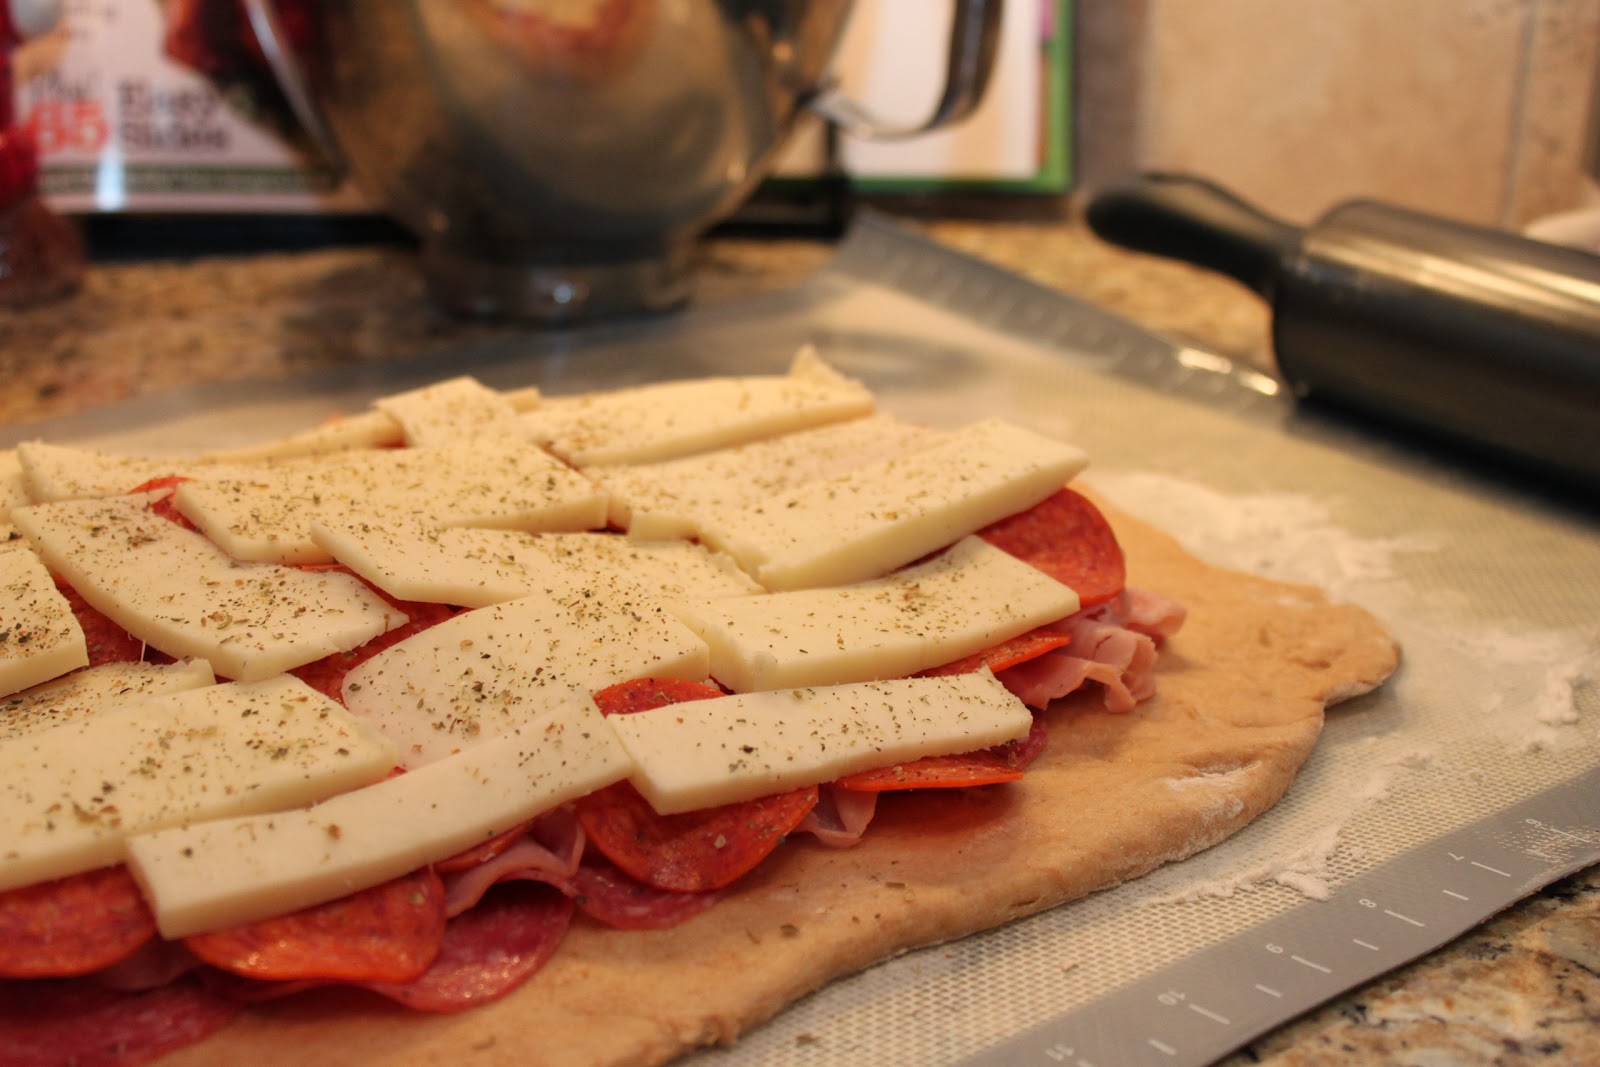
enough so that you may add in your meats and cheeses.  Once the dough is ready, place on the meat layers, in whatever order you’d like, just make sure to leave about 2 inches on each side.  After the meat has been added, layer on the cheeses.  (I have the tendency to stuff mine too full and it makes it difficult to roll up, but is so yummy looking)
 
 
Now, add a little bit of water to your egg yolk and whisk together.  Brush the egg mixture along the edges of the dough.  This will help the dough stick together when you roll it. 

It’s now time…..

Starting on one of the long sides of the dough, begin to slowly roll, making sure to tuck in the ingredients as needed.  Once the dough is rolled up, pinch it together to seal the ingredients in and tuck/fold under the edges.
 
 
Place the now prepared Stromboli, seam side down, onto a baking sheet.  Cover the dough with a thin layer of olive oil and sprinkle on some garlic powder.  You could also sprinkle one some parsley or oregano for a little extra flavor.  Place the prepared Stromboli into the oven for 20-25 minutes.

When done baking, remove the pan from the oven and let cool for about 5 minutes.  Cut the Stromboli and serve with a side of marinara sauce.


Monday, November 25, 2013

Whole Wheat Pizza Dough


Even if I'm not planning to prepare a meal for myself, I'm still always looking for the healthiest alternative possible.  That's why, instead of preparing my usual pizza dough, I opted to try out this healthier version instead.  I've been wanting to make a whole wheat pizza dough for quite some time now, but every recipe that I'd come across seemed to take a lot of preparation; that is, until now.

Today I'm going to share with you how to go about preparing a recipe for whole wheat pizza dough that's quick and super easy to make.  Then, tomorrow, I'll share with you a delicious recipe that you can use the dough for.

So, here we go......

Whole Wheat Pizza Dough
Printer-Friendly Version

Ingredients:
1 ¼ cup white flour
2 ¼ tsp. active dry yeast
½ tsp. salt
2 TBSP. olive oil
1 cup warm water (not boiling)
1 1/3 – 1 ½ cups whole wheat flour (add a little more, if needed)

Directions:
In the bowl of an electric mixer, fitted with a dough hook, combine the white flour, yeast, and salt.  Add in the olive oil and water, and knead on high for about 5-7 minutes (If the dough doesn’t form completely, its ok, it will form when more flour is added).  Next, add in the whole wheat flour and continue to knead, on high, until the dough forms and is somewhat tacky to the touch.  Feel free to add in a little more whole wheat flour as needed.

Once the dough is ready, remove the bowl from the electric mixer, cover with plastic wrap, and set in a warm area for 10-15 minutes.

Now that the dough has had a little bit of time to rise, place it onto a well floured surface and roll it out into whatever shape and thickness you desire.
 
 
Source: Pinch of Yum

Friday, November 22, 2013

Project Time: Our Jigsaw Wall


Today's blog entry is going to be a little bit different than most of my other posts, because it's not about food.  Since I left my job teaching, I've been trying to fill my days with a combination of different activities.  Typically I'd spend most of my time exercising, but, as most of you know, that's still limited for me.  Update though:  Over the past couple of weeks I've noticed that I'm getting better and stronger.  Every day that passes, I'm able to increase my workout intensity a little bit more than what it was the day before.

So.....on to today's post!

Jeff and I have been living in our house for just about a year and half now, and one thing that's bothered me, is the fact that I have this amazing kitchen, with a great big island, but my purse and other items just seem to get tossed onto the counter.  I find this annoying because I'm all about keeping spaces clean and organized, yet I'm the one guilty of putting my purse and keys there.  This is why I finally decided that enough was enough and something had to be done. 

I've been looking at ideas for quite some time now, and thought that maybe we could build some type of locker looking shelves out in the garage.  The only problem with that is I know Jeff has some wonderful ideas for his garage space and I don't want my purse and keys to be kept in the garage overnight, or ever.  And for those of you who caught it, yes, I called the garage "his"; just like I call the kitchen "mine".  It's a mutual, unspoken understanding between the two of us.  Due to those facts, I decided to keep looking.

And sure enough, about two weeks ago, my friend Megan pinned this amazing looking wall off of shanty 2 chic's blog.  I immediately fell in love with it, and started walking around my house to see where I could build it.  When Jeff came home from work that day, I showed him the picture of what I wanted to do, and where I thought we could put it.  One great thing about my husband, other than the fact that he's absolutely amazing, is that he's crafty too and loves to build things.  Plus he loves to use his power tools, so he was definitely down for the challenge!

This past weekend we set to work.  In order to gather all the materials that we would need, to build the wall, we headed out to Home Depot and Lowe's.  Here's a list of what we purchased:

For the wall
Oak Plywood, comes in a 4' X 8' sheet (Cut into 8", 6", and 4" strips.  The man at Home Depot cut it for us)
4 different Stains (You can choose your colors.  We used dark walnut, cherry, red mahogany, and weathered grey)
For the Mantle
4" piece of oak board
8" piece of oak board
Crown Molding
Molding strip
Decorative molding block
Decorative Hooks
White paint

After we had all our materials unloaded, we got to work.

Here's what the wall looked like before:


After measuring the wall one last time, the first thing Jeff and I did was laid the wooden pieces onto the garage floor, in order to determine a width pattern.  Next, I drew lines on the wood to ensure that all the pieces were different lengths and wouldn't line up.  After that, Jeff cut the pieces, using his electric saw, and then we laid them back into place, eventually spacing them out with pennies.


Next, I used a pencil and wrote on the pieces of wood.  I labeled them with their row, placement, and stain color (row 1, #1, cherry, row 3, #2, weathered grey, etc.) This guaranteed that we wouldn't accidentally put colors together and that the pieces of wood wouldn't be placed onto the wall incorrectly.  Plus, the stain was going on the other side of the wood anyway, so the writing didn't make a difference, it was only there as a helpful tool for us.

After we had that done, I stained all the wooden pieces, let them dry, and then applied a second coat of stain. 


Once the wood was stained, and spent a night drying, it was finally time to assemble the wall.  Before we started assembling though, I sanded down the wooden pieces, in order to give them more of a worn appearance.  After that, it was amazing at how easy it was to piece together the wall.  All Jeff and I had to do was align and space out the boards and then use a nail gun (Jeff's favorite toy) to secure them into place. 


Once the wall was fully assembled, it was time to add the mantle.  We first assembled the mantle out in the garage and then brought it inside.   Next, we lined the mantle up, and just like before, we used the nail gun to secure it into place. 


Lastly, we added on the hooks, and this is the final result. 


I absolutely love it!  The plan for this weekend is to build a little bench that will go on the floor in front of the wall.  I'll keep you updated!


Inspired by Shanty 2 Chic


Thursday, November 21, 2013

Cheddar Onion and Beer Bread


One of my all time favorite smells is that of freshly baking bread.  The warm, delectable aroma somehow just seems to escape from the oven and finds a way to seductively creep around from room to room.  And even though I'm not allowed to eat bread, at least for now, that doesn't stop me from baking a loaf for others.  I'm always up for trying new recipes too, but I definitely have my personal favorite; which happens to be apple bread.  However, knowing that I need to stay away from the empty carbs, I've been trying to experiment by incorporating ingredients that I'm not necessarily a big fan of, like beer.

This particular cheddar onion and beer bread is so simple to make, and honestly only takes about 2 minutes to throw together.  The hardest part of the whole process is being patient and waiting for the bread to bake; especially once that wonderful scent  of baking bread fills up your home.

Cheddar Onion Beer Bread
Printer-Friendly Version

Ingredients:
3 cups all-purpose flour
1 TBSP. baking powder
½ tsp. salt
¼ cup granulated sugar
1 cup sharp cheddar cheese, shredded
2 green onions, thinly sliced
12 oz. beer (use your favorite)
Dash of cayenne pepper
¼ cup butter, melted

Directions:
Preheat oven to 375 degrees, and spray a loaf pan with a non-stick cooking spray; set aside.

In a large bowl, combine the flour, baking powder, salt, sugar, cheese, onions, and cayenne pepper.  Whisk together until combined.  Now, slowly pour the beer into the flour mixture, and with as few stirs as possible, mix until the flour is moistened.  (The dough will be lumpy in appearance)

Pour the dough into the prepared loaf pan and evenly distribute the melted butter on top.  Once ready, place the pan into the oven and let bake for 50 minutes.

When the bread is done baking, remove the pan from the oven and let cool on a wire rack for 10-15 minutes.  Now, extract the bread from the pan and let cool completely.  Enjoy!

Source: Slightly adapted from Shugary Sweets

Tuesday, November 19, 2013

Southwest Chicken Tortilla Soup


Thanks to my beyond obsession with Pinterest, it was another productive weekend around our household.  Jeff and I spent the majority of the afternoon, on Saturday, going back and forth between Home Depot and Lowe's.  We were on a mission to buy things that we needed, in order to make a plank wall for our entryway by the garage.  Overall, I'd have to say that our project was a big success!  The wall actually turned out better than I had imagined.  I'll be posting pictures later this week, including the link with step by step instructions.

Needless to say, that due to our busy weekend, I didn't have much time to cook.  Therefore, I needed to think of some dinners that would not be very time consuming.  Even though the temperatures were warm around these parts, I felt that soup would be a perfect choice.  I've always loved a good chicken tortilla soup, and know that I've posted a recipe for one before.   However, the recipe that I made this weekend is slightly different, has more of a kick, and includes more ingredients.  This soup was absolutely delicious, and one that I'll definitely be making again.     

Southwest Chicken Tortilla Soup
Printer-Friendly Version

Ingredients:
1 cup whole wheat elbow pasta, cooked
2 TBSP. extra virgin olive oil
2 garlic cloves, minced
½ yellow onion, chopped
4 cups chicken stock
1 can (15 oz.) tomato sauce
1 can (14.5 oz.) crushed tomatoes
1 can (4 oz.) green chiles, hot
2 tsp. chili powder
1 tsp. cumin
½ tsp. oregano
Dash of cayenne red pepper
Salt and pepper to taste
2 cups cooked, shredded chicken breast
1 cup corn kernels
2 TBSP. fresh cilantro, chopped
1 lime, juiced

Garnish Ideas:
Tortilla strips (I used Texas toast, chili lime flavor)
Avocado, diced
Shredded Cheese

Directions:
Set a Dutch oven, or a large stock pot, over a medium heat and add the olive oil.  After allowing the oil to heat for about a minute or so, add in the garlic and onion.  Sauté together until the onions become translucent in appearance.  Add in the chicken stock, tomato sauce, crushed tomatoes, green chiles, chili powder, cumin, oregano, and cayenne pepper.  Stir everything together and season with a dash of salt and pepper.  Now, place the cover on the pot and reduce the heat to a gently simmer.  Allow the soup to cook and thicken for around 15-20 minutes.

Once the soup is ready, turn the heat back up and add in the pasta, chicken, corn, cilantro, and lime juice.  Stir all the ingredients together and allow to cook for another 5 minutes or until the soup is warmed to your liking!

 
Place the soup into soup bowls and garnish with some fresh, diced avocados, a little cheese, and some tortilla strips.  Enjoy!

Source: Slightly adapted from Damn Delicious

Thursday, November 14, 2013

Restaurant Style Salsa


What is it about chips and salsa that's just so addictive and delicious?  Did you ever notice that when you go out to eat, especially at a Mexican restaurant, the chips and salsa seem to disappear quickly, and it's never very long before the server brings you another dish; even if you didn't want, or ask for them.  Then, that dish seems to disappear just as quickly as the one before.  It's an endless cycle.

The great thing about salsa though, is that you don't have to limit it to just being served with chips.  You can also add it to different recipes for extra spice and flavor, or you can always use salsa as a garnish.  I tend to put it on top of grilled chicken, or scrambled egg whites, because it seems to give the food that kick of flavor I'm looking for.  Plus, I love how healthy it is.

Jeff's been asking me to make salsa for quite some time now, because he's not really a fan of the salsa that comes from a jar.  The main reason that he doesn't like it, is because there are large pieces of tomatoes and onions, and to be honest, I don't really care for jarred salsa either.  That's why I'm kind of surprised that it's been so long since I've made a batch.  The whole process is super easy and isn't time consuming at all.  As an added bonus you can "can" the leftover salsa to serve at a later date.  All you have to do is go buy the vegetables, toss them in a food processor, and voilà!  You have salsa.

The thing that I like best about this particular salsa recipe, compared to some others, is that you decide how mild or hot you would like it, just by adding or subtracting the amount of peppers you add in.  If you follow the recipe as printed below it isn't incredibly hot, however I wouldn't exactly consider it mild either.  At first bite you might not think that the salsa is hot, and then it hits.  Enjoy!


Restaurant Style Salsa
Printer-Friendly Version

Ingredients:
1 can (28 oz.) whole peeled tomatoes with juice
2 cans Rotel tomatoes and green chilies (I use the HOT, but you can use original for a milder version)
½ a large onion, chopped
1 clove garlic, minced
1 whole jalapeno, sliced thin (I left the seeds in for a more spicy salsa)
1 whole habanero pepper, cut into small pieces (I left some of the seeds in)
¼ tsp. sugar
¼ tsp. salt
¼ tsp. ground cumin
½ cup – ¾ cup fresh cilantro (or more, if needed)
½ a lime, juiced

Directions:
Combine all of the ingredients listed in the bowl of a food processor and then pulse together until your desired consistency is reached.  Stop, taste, and then add more of the ingredients you think that it might need. (I didn’t add anymore)

Place the salsa in the refrigerator for at least an hour, in order to let the flavors combine; then serve.
 
 
Slightly adapted from Two Peas & Their Pod

Wednesday, November 13, 2013

Toasted Ravioli


Cooking seriously is such a huge passion of mine, and I'm loving the fact that I actually have time to do it again!  I know that I eventually need to get back out into the working world, and I plan to, but it's not going to stop me from enjoying the free time that I have right now. 

Not only have I been cooking a lot more lately, but I've also been feeling creative and doing other projects too.  I've really been wanting a front table for the entryway of our home, but didn't want to pay a lot, so I finally decided I would just make one.  I originally got the idea for the table, while looking at this picture here, and then followed tips on this helpful website, which provided me step by step directions on how to distress wood.  My finished table only cost $40 dollars to make!  (But I already had the paint leftover from another project, otherwise it would have cost just a little more)


Once the table was done though, I knew that I needed to decorate it, which meant a new project!  As you can see from the pictures, it's still a work in progress.  However, after visiting my sister in Las Vegas, and stealing the idea from her, I decided to make a piece of nail art to display on the bottom shelf.  I settled on an outline of Michigan, with a heart over where Grand Rapids would be, because that's my hometown and where I spent 25 years of my life.  No matter what, a piece of me will always consider it home.


So, that's how I've been spending my time lately.  Anyway....back to today's recipe, Toasted Ravioli.  Not only is this a quick, easy, and healthy meal, but it must be pretty darn good too, because my husband ended up eating the entire batch.  (You may need to double the recipe if you have more than two people you plan to serve)

Toasted Ravioli
Printer-FriendlyVersion

Makes 10-12 Ravioli's
Ingredients:
1 package Buitoni spicy beef and sausage ravioli (any kind would work)
1 egg
1 cup Italian seasoned bread crumbs
Marinara sauce
Parmesan cheese
Parsley (for garnish)

Directions:
Preheat oven to 400 degrees, then place an oven safe rack on top of a baking sheet; set aside.

Using a large pot, cook the ravioli according to the package directions.  Drain the water and set the prepared ravioli’s aside.

Now, get out two small bowls and in one bowl, crack and whisk the egg.  Then, in the other bowl, place the bread crumbs.

After that, you will take a ravioli piece and dip it into the egg mixture until both sides are well coated.  Then, dip it into the bread crumbs, making sure to flip the ravioli over, if needed.  Both sides of the ravioli should be well coated with crumbs before placing it onto the rack of the baking sheet.  Repeat these steps with the remaining ravioli pieces.

Place the baking sheet, with the ravioli’s, into the oven for 3-4 minutes.  Remove the sheet from the oven, flip the ravioli’s over, and cook for another 2-3 minutes.
 
Once the ravioli is done, remove the baking sheet from the oven and sprinkle on a little parmesan cheese and parsley.  Serve with a side of marinara sauce and enjoy!

Adapted from Budget Savvy Diva

Tuesday, November 12, 2013

Healthy Texas Cheese Fries


Ok, to start today's post I'd have to say that I'm not really one who enjoys going out to eat.  Actually, I try to avoid it at all costs, but of course, I know that there are going to be those rare occasions that come up where I'm going to have to go.  The main reason I don't like going out to eat is because everything on the menu always looks and sounds delicious and I can't help but get out my phone to look up the calorie count.  My jaw always drops too and because of that, I usually just end up ordering a side salad with a piece of grilled chicken.  I know what you're thinking......that sounds pretty boring.....but I'm not really someone who feels like eating 2 days worth of calories in just one sitting; especially when I know that I could make a similar recipe at home for only half the fat and calories.

One menu item that always catches my eye though, and that I'm usually tempted by, are the cheese fries.  Yummy potato wedges with bacon, melted cheese, scallions, and dipped in ranch dressing; how could one go wrong?  It even has me drooling a little bit just thinking about them as I'm typing.  I never end up ordering a plate though, because you're typically looking at easily over 1,500 calories per dish.  However, I know that Jeff enjoys cheese fries too, so I decided that I'd lighten the dish up and make a homemade, "healthier" version, just for him. 

If I'm completely honest, I have to say that I might have sampled a bite of a fry myself; but that's ok.  If you look at the recipe that follows, you'll notice that they're really not that bad for you, plus I've been doing so well lately.  I've actually lost 4 lbs. in the past 2 weeks just by changing my diet and I've also been able to slowly add back in some exercises.  My workouts are nothing close to where they were, but that's ok, I know it will take some time and healing.  Eating healthy has definitely helped though and I'm excited to share this recipe with you!

Healthy Texas Cheese Fries
Printer-Friendly Version

Makes 1-2 servings
Ingredients:
1 Extra-large russet or Yukon potato, or 2 medium, washed and skin left on
2 tsp. olive oil
1 tsp. paprika
¼ tsp. chili powder
¼ tsp. onion powder
¼ tsp. cumin
¼ tsp. garlic powder
Dash of ground black pepper and salt (I left the salt out)
1 slice bacon, crumbled (I use turkey bacon)
¼ cup shredded cheddar cheese
Diced scallions
1 Jalapeno pepper, seeded and sliced

Directions:
Preheat oven to 400 degrees and spray a baking sheet with a non-stick cooking spray; set aside
 
Using a sharp knife cut the potato/potatoes in half lengthwise.  After that, cut each half lengthwise again, into ½ inch slices; then cut those slices in half, to form even smaller length fries.  Or you could just cut the potato however you would like, in order to form your fries.

Now, place the cut potato fries into a large bowl and add in the olive oil.  Toss the potatoes around until well coated and then add in all of the seasonings.  Once again toss the potatoes around until the seasonings are evenly coating the fries.
 
 
Next, evenly spread out the fries onto the prepared baking sheet, making sure that they remain in a single layer.  Place them in the oven for 25 minutes, but be sure to flip the fries over halfway through the baking process. (Depending on the thickness of the fries, it could take more or less time to bake, so keep an eye on them; they should be crisp but not burnt)

Remove the fries from the oven and place into an oven safe baking dish, or 2 separate dishes if you don’t feel like sharing (I placed mine in a cast iron skillet).  Top the fries with the cheese, bacon, scallions, and sliced jalapeno peppers.  Then, place the dish in the oven and let cook for about 2-4 minutes, or until the cheese is melted to your liking.  Remove the dish from the oven, serve with a side of ranch, or not, and enjoy!  FYI - Hot sauce also goes great with these fries!


Source: Skinny Taste

Friday, November 8, 2013

Quick and Easy Chicken and Bacon Beer Cheese Soup


It's such another beautiful fall day outside and I absolutely love sitting on my back porch enjoying the wonderful weather.  Seeing that it's November, I can't help but notice that a lot of my Facebook friends are beginning to go day by day listing the things that they're thankful for.  My thanks though, comes in taking the opportunity to appreciate moments like this.  I personally don't feel the need to sit on a computer and type out every single little thing that I'm thankful for, but instead, I believe in showing my appreciation to the people and the moments as they present themselves throughout the year, not just because it's November.  Therefore, what I'll typically do, especially on a splendid day like this, is grab a cup of coffee, a good book and head outside; I'm currently reading "Between Sisters", by Kristen Hannah, who is one of my favorite authors.  If I'm not going to read, I'll usually bring my computer outside to type on; which is actually what I'm doing right now.  Ok....you caught me...the truth is that I'm also watching the colorful fall leaves blow down from the trees.  They're just so pretty right now and sadly are almost gone for the season.

This transitional time of year, especially when there's a chill in the air, always makes me crave warm comforting foods like soup, chili, and casseroles.  The best part about these types of dishes though, is that there are so many wonderful recipes out there to try.  I happened to land on this particular recipe for chicken and bacon beer cheese soup, mostly because it sounded delicious, but I was also drawn to the fact that it didn't take too long to make.  Some soup recipes that I've found need to cook for a few hours, this one only needed about 15-20 minutes, which was perfect and it turned out absolutely delicious! 


Quick and Easy Chicken and Bacon Beer Cheese Soup
Printer-Friendly Version

Makes 4-6 bowls
Ingredients:
6 slices bacon, more for garnish
2 boneless skinless chicken breasts
¼ cup butter
¼ cup flour
2 tsp. garlic powder
2 tsp. cayenne red pepper
1 tsp. paprika
1 tsp. salt
1 tsp. black pepper
1 cup beer, I used a lager
1 cup chicken broth
2 cups half & half, or equal substitute
8 oz. cheddar cheese, shredded
1 tsp. Worcestershire sauce

Garnish:
Croutons
Bacon
Shredded cheese
Scallions

Directions:
Place a skillet over a medium-high heat and cook the bacon.  Once cooked, remove the bacon from the pan, crumble it into bit size pieces, and set aside.  Don’t clean out the skillet, but instead, add the chicken.  Allow the chicken to cook for about 5-7 minutes on each side.  Once ready, remove the chicken from the pan, and using two forks, pull it apart until shredded.  Add the shredded chicken back into the pan and allow it to cook until done.  Now, remove the chicken and set it aside with the bacon.

In an 8 quart pot, over a medium heat, melt the butter.  Add in all the flour and spices and whisk together.  Next, add in and whisk together the beer, chicken broth, and half & half.  Bring to a light bubble, but DO NOT let boil.  Now, add the cheese and whisk together until the mixture is smooth.  Once ready, add in the Worcestershire sauce, chicken, and bacon; then stir around.

Allow the soup to simmer and thicken up until ready to serve.  Garnish with a few or all of the additional toppings and enjoy!

I knew that I wanted a soup that wouldn't take too long to make, yet contained a variety of comforting flavors.  After gathering up some ideas, I settled on this quick and easy bacon beer cheese soup.  Not only does it contain, bacon, beer, and cheese, but it also contains chicken and a variety of spices, all of which sound absolutely divine.  So grab a bowl, and a spoon, and enjoy!

Source: The Slow Roasted Italian

Wednesday, November 6, 2013

Copycat Starbucks Pumpkin Spice Scones


Once again I sadly disappeared for a few days, but it's not entirely my fault.  I'm so over being sick and it's been interfering with my daily routine, which I absolutely hate.  I don't have time to be sick either, which is what I'm sure everybody says, but I really have things that need to get done and a calendar full of workouts to stick to.  Sadly though, the workouts haven't been getting completely accomplished.  However, I have been pushing myself and staying on top of the daily squats.  I just haven't had the energy though to use my treadmill, or completely make it through my posted workout routines.

Today is the first day in over a week, that I actually woke up feeling so much better.  Therefore, I decided to take advantage of it!  I ended up walking for 10 minutes on the treadmill, set at a 30 degree incline, in addition to completing my Wednesday workout routine, plus the 60 squats.  Now, I know what you might be thinking.....10 minutes on the treadmill may not actually sound like very much, but with a fractured pelvis bone, and not being able to workout for about a month, I'll take it.  To me, 10 minutes or not, is definitely progress and a step in the right direction.  In addition to working out, I also managed to get some of my errands run, the house cleaned up a bit, and I even had time to make Jeff these delicious scones!  Hopefully tomorrow I will make it back to the gym!

So, onto the scones.........

Every time that I happen to go into Starbucks (which is A LOT) and see their pumpkin spice scones, I think to myself that I need to try to make them.  Well, I couldn't help but notice that I happened to have some leftover pumpkin puree in the refrigerator from when I made the pumpkin spice protein cookies the other day.  Therefore, I thought to myself what better way to use the leftovers than to create those delicious looking scones!  I immediately grabbed the can out of the refrigerator, and here's the result.  Enjoy!

Copycat Starbucks Pumpkin Spice Scones
Printer-Friendly Version

Makes 8 scones
Ingredients:
For Scones:
2 cups all-purpose flour
¾ cups sugar
1 TBSP. baking powder
½ tsp. salt
½ tsp. ground cinnamon
½ tsp. ground nutmeg
¼ tsp. ground ginger
¼ tsp. ground cloves
½ cup pumpkin puree
3 TBSP. heavy cream or milk
1 large egg
6 TBSP. cold butter, cut into cubes

Plain Glaze:
½ cup confectioner’s sugar
1 TBSP. milk

Spiced Icing:
¾ cup confectioner’s sugar
1 to 2 TBSP. milk
¼ tsp. cinnamon
1/8 tsp. nutmeg
Dash of ginger
Dash of cloves

Directions:
For the Scones:
Preheat oven to 425 degrees and line a baking sheet with parchment paper or a silicone baking mat; set aside.

Now, place all of the dry ingredients into a medium size bowl and whisk together.  Once the dry ingredients have been whisked, proceed by cutting in the butter until small, pebble size pieces form. 

In a smaller bowl, add the egg, pumpkin, and heavy cream.  Whisk together until smooth.  Fold the wet ingredients into the flour mixture until a dough forms, I always start with a wooden spoon and then use my clean hands.  The dough should be a little sticky, but if you feel that it’s too sticky, feel free to add in a little more flour.  Place the dough onto the prepared baking sheet, and shape it into a large circle, about 1 inch thick.  Next, using a knife, or a pizza cutter, cut the circle into 8 triangles and separate.  Bake the scones for 12-15 minutes, or until they look cooked through and are beginning to turn a light golden color.  Remove the baking sheet from the oven and let cool on a wire rack for 5 minutes.  Transfer the scones off the baking sheet and onto the wire rack to cool completely.

For the Plain Glaze:
In a small bowl, combine the confectioner’s sugar and the milk.  Stir together until an icing forms.  Make sure that it is not too thin otherwise the glaze will just roll off the scones.  Once the glaze has been mixed, place it on top of the scones and spread around with a knife, or the back of a spoon.  Allow the glaze to harden.

For the Spiced Icing:
In another small bowl, combine all of the ingredients and whisk together until smooth.  Drizzle the icing over the top of the plain glaze.  Allow time to harden and serve.


 Source: Starbuck's Coffee Home