RSS
Showing posts with label Breads. Show all posts

Monday, November 25, 2013

Whole Wheat Pizza Dough


Even if I'm not planning to prepare a meal for myself, I'm still always looking for the healthiest alternative possible.  That's why, instead of preparing my usual pizza dough, I opted to try out this healthier version instead.  I've been wanting to make a whole wheat pizza dough for quite some time now, but every recipe that I'd come across seemed to take a lot of preparation; that is, until now.

Today I'm going to share with you how to go about preparing a recipe for whole wheat pizza dough that's quick and super easy to make.  Then, tomorrow, I'll share with you a delicious recipe that you can use the dough for.

So, here we go......

Whole Wheat Pizza Dough
Printer-Friendly Version

Ingredients:
1 ¼ cup white flour
2 ¼ tsp. active dry yeast
½ tsp. salt
2 TBSP. olive oil
1 cup warm water (not boiling)
1 1/3 – 1 ½ cups whole wheat flour (add a little more, if needed)

Directions:
In the bowl of an electric mixer, fitted with a dough hook, combine the white flour, yeast, and salt.  Add in the olive oil and water, and knead on high for about 5-7 minutes (If the dough doesn’t form completely, its ok, it will form when more flour is added).  Next, add in the whole wheat flour and continue to knead, on high, until the dough forms and is somewhat tacky to the touch.  Feel free to add in a little more whole wheat flour as needed.

Once the dough is ready, remove the bowl from the electric mixer, cover with plastic wrap, and set in a warm area for 10-15 minutes.

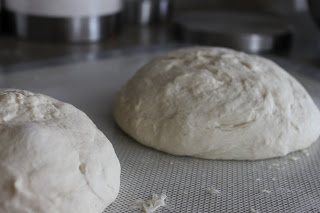
Now that the dough has had a little bit of time to rise, place it onto a well floured surface and roll it out into whatever shape and thickness you desire.
 
 
Source: Pinch of Yum

Thursday, November 21, 2013

Cheddar Onion and Beer Bread


One of my all time favorite smells is that of freshly baking bread.  The warm, delectable aroma somehow just seems to escape from the oven and finds a way to seductively creep around from room to room.  And even though I'm not allowed to eat bread, at least for now, that doesn't stop me from baking a loaf for others.  I'm always up for trying new recipes too, but I definitely have my personal favorite; which happens to be apple bread.  However, knowing that I need to stay away from the empty carbs, I've been trying to experiment by incorporating ingredients that I'm not necessarily a big fan of, like beer.

This particular cheddar onion and beer bread is so simple to make, and honestly only takes about 2 minutes to throw together.  The hardest part of the whole process is being patient and waiting for the bread to bake; especially once that wonderful scent  of baking bread fills up your home.

Cheddar Onion Beer Bread
Printer-Friendly Version

Ingredients:
3 cups all-purpose flour
1 TBSP. baking powder
½ tsp. salt
¼ cup granulated sugar
1 cup sharp cheddar cheese, shredded
2 green onions, thinly sliced
12 oz. beer (use your favorite)
Dash of cayenne pepper
¼ cup butter, melted

Directions:
Preheat oven to 375 degrees, and spray a loaf pan with a non-stick cooking spray; set aside.

In a large bowl, combine the flour, baking powder, salt, sugar, cheese, onions, and cayenne pepper.  Whisk together until combined.  Now, slowly pour the beer into the flour mixture, and with as few stirs as possible, mix until the flour is moistened.  (The dough will be lumpy in appearance)

Pour the dough into the prepared loaf pan and evenly distribute the melted butter on top.  Once ready, place the pan into the oven and let bake for 50 minutes.

When the bread is done baking, remove the pan from the oven and let cool on a wire rack for 10-15 minutes.  Now, extract the bread from the pan and let cool completely.  Enjoy!

Source: Slightly adapted from Shugary Sweets

Sunday, September 22, 2013

Perfect Crusty Bread


So I'd have to say that I consider myself somewhat of a carboholic.  I've really been trying, for quite some time now, to cut empty carbs out of my diet, and have been doing a great job!  Every so often though, I tend to fall off the bandwagon.  In my eyes, no one's perfect and I feel that as long as I don't go too far overboard, it should be ok. Lol.....

Fall is such a tease too, especially for carboholics, mostly due to the fact that it's the perfect time of year for opening windows and baking delectable goodies such as breads, pies, donuts, cakes, etc.  And of course, I naturally have a bunch of those recipes I want to try out!  I'll make them too, knowing that I'll have to be in the right mindset ahead of time in order to ensure that I will have the will power to stop myself from sampling.

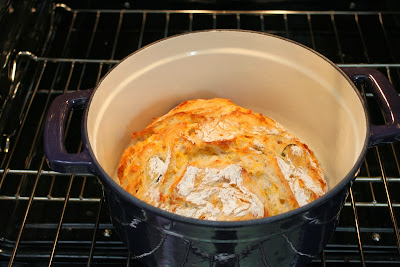
I really can't believe that Fall is already here!  I'm therefore declaring that today officially commences my Fall baking.  The windows are already open, letting in fresh air, and I have a loaf of Jalapeno-Cheddar bread cooling on the counter which is spreading a delectable aroma throughout the house.  

This particular bread was so easy to make, and doesn't require any special electronic kitchen device, other than your own hand.  Another thing that I love about this recipe is the fact that I can add any ingredient to the basic crusty bread recipe that I want.  This time around I chose to add in some cheddar cheese, red pepper flakes, and fresh jalapeno peppers.  However, I can't wait to try out different options! 

This is a recipe that I definitely see myself making again and again!  In fact, my husband has already asked me to make another loaf.  Not only is it great to eat plain, but it is also perfect to make sandwiches with! 

Here's the basic recipe and feel free to add in ingredients of your choosing.....

Perfect Crusty Bread
Printer-Friendly Version

Ingredients:
3 cups all-purpose flour
1 ¾ tsp. salt
½ tsp. rapid rise yeast
1 ½ cups water

Directions:
In a large mixing bowl, add in and whisk together the flour, salt, and yeast (If adding additional ingredients, now would be the time to add those in.  I added in about 1 1/2 cups shredded cheddar cheese, 2 jalapenos - sliced and seeded, and about 1/2 tsp. red pepper flakes).  Next, add the water and stir around with a wooden spoon until a shaggy dough is formed.  Once ready, cover the bowl with plastic wrap (I love to use Glad Press and Seal) and let sit for 12-18 hours.  I let mine sit out overnight.

Once the dough is ready, preheat the oven to 450 degrees.  After the oven is preheated, place a cast iron Dutch oven within and allow it to heat for 30 minutes. 
 
 
While the Dutch oven is preheating pour out the dough out onto a well-floured surface and shape into a ball. 


Place the plastic wrap back over the dough and allow it to sit for 30 minutes while the pot is heating.


After 30 minutes, remove the Dutch oven (be careful because it will be HOT) from the conventional oven and gently place the prepared dough into the pot.  Once this step is done, place the lid back on top, and put the pot back into the oven for another 30 minutes.  When the time has expired remove the lid from the Dutch oven, admire the bread, and let finish cooking, uncovered, for another 15 minutes.


Remove the pot from the oven and let cool for a few minutes.  Now, remove the bread from the pot and let cool completely on a wire rack. 
 
 
Enjoy!


Source: Simply So Good

Sunday, January 27, 2013

Peanut Butter and Chocolate Chip Oatmeal Scones


I've always been an enormous fan of breakfast foods and have even been known to make breakfast for dinner.  Waffles, pancakes, French toast, eggs, you name it, I pretty much enjoy it all!  Over the past year or two though, I'd have to say that scones have slowly crept ahead of the rest, and have become my new favorite breakfast.  For some reason I feel the need to shout, "I absolutely love scones!!!"  Especially when I have a large cup of steaming hot coffee to go with them.  And due to all the different flavor combinations that there are out there, I could never get bored!

However, for this recipe, I chose to stick with the traditional chocolate and peanut butter.  A flavor combination that, in my opinion, can never go wrong!  In the end though, the chocolate and peanut butter is what makes the scone taste more like a dessert than a breakfast food, which is completely ok with me.  So do yourself a favor, and grab a large cup of coffee or a glass of milk and enjoy!

Peanut Butter and Chocolate Chip Oatmeal Scones
Printer-FriendlyVersion

Makes 8 scones
Ingredients:
2 cups all-purpose flour
1 cup old fashioned oats
1/3 cup light brown or dark brown sugar
1 tsp. baking powder
1 tsp. baking soda
¼ tsp. salt
6 Tbsp. butter, cold and cut into small pieces
¾ cup skim milk or heavy cream
1 egg, separated
½ cup peanut butter (creamy or chunky)
1 ¼ cup semi-sweet chocolate chips
Raw sugar for sprinkling
8 oz. semi-sweet chocolate (for drizzle)

Directions:
Preheat the oven to 400 degrees and line a baking sheet with a silicone baking mat or a piece of parchment paper.

In a large bowl combine the flour, oats, sugar, baking powder, baking soda, and salt.  Whisk together until combined.  Next, cut the butter into the flour mixture until pea-size pieces form.  You can do this by using a pastry blender, or your fingertips.

In a small bowl, whisk together the milk and egg yolk.  Create a well in the middle of the flour/oat mixture and pour in the egg milk.  Also, add in the peanut butter.  Now, using a spatula or a wooden spoon, gently fold the ingredients together.  Once they are combined, add in the chocolate chips and continue to knead together, using your hands, until a dough forms.  Be careful not to over knead though.

Place the prepared dough onto the silicone baking mat, or piece of parchment  paper, and pat out until it forms an 8-10 inch round circle.  Lightly whisk the egg white, and then brush it over the top of the prepared scone.  Sprinkle with the raw sugar.

Cut the dough into 8 triangles (only slightly pulling them apart) and bake for 18-20 minutes or until the scones begin to turn a nice golden brown color.  Allow to cool in the pan, on a wire rack, for about 5 minutes and then completely separate the scones and place on a wire rack to cool completely.

Melt the semi-sweet chocolate, in a microwave safe bowl, in 30 second intervals, making sure to stop and stir in between.  Lightly drizzle the melted chocolate over the top of the cooled scones.  Store in an airtight contained.  Best served reheated.

Slightly adapted from Brown-Eyed Baker

Sunday, January 20, 2013

Cheesy Pull Apart Bread on Crack


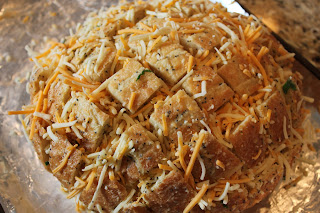
When it comes to writing something interesting for this post, I believe the image pretty much speaks for itself, which means that it doesn't need additional background information.  Therefore, let's just cut to the chase, because honestly, looking at the finished product, what's not to love about this bread?  For one thing it's bread (and who doesn't like bread?), and for another, it's covered in cheesy goodness.  Needless to say it was a huge hit!
 
Cheesy Pull-Apart Bread on Crack
Printer-FriendlyVersion

Ingredients:
1 round Italian loaf
1 stick butter, melted
1/8 cup EVOO (extra virgin olive oil)
1 Tbsp. onion, finely chopped
1 Tbsp. Dijon mustard
1 Tbsp. poppy seeds
3 garlic cloves, minced
3-4 tsp. chopped parsley
10-12 oz. shredded cheese (I used Sargento Artisan Blends – Double Cheddar)

Directions:
Preheat oven to 350 degrees

Cut the bread into cubes (size is up to you), making sure you DO NOT cut all the way through the bottom of the loaf.

In a medium bowl, combine the butter, EVOO, onion, mustard, poppy seeds, garlic, and parsley.

Pour the butter mixture over the loaf, making sure to definitely fill in the cracks using a small spoon, and spreading the mixture across the top.  This may seem time consuming, but it will definitely be worth your trouble.  Now, stuff the cheese down in the cracks.  This will work best if you use your hands.

 
Once the bread is ready, wrap it with aluminum foil, making sure that the sides are properly sealed.  Next, place the prepared loaf on a baking sheet and cook for around 15-20 minutes.  When done, remove the bread from the oven, take off the aluminum foil, and place it back into the oven.  Let the bread cook for another 10 minutes, until the cheese is all melted.

Enjoy!

Source: Food Wanderings in Asia

Sunday, December 30, 2012

Overnight Baked French Toast with a Cinnamon Crumb Topping


I meant to post this recipe sooner, but apparently it got buried and sadly forgotten.  It's a shame too, because this would have made a perfect Christmas morning dish.  Either way, it needs to be shared, so here goes.....

This past weekend (about a month or two ago now) my mother-in-law was in town and I was looking for something quick and easy to make for breakfast.  Of course, the usual thoughts came to mind......French toast, pancakes, oatmeal, eggs, doughnuts, bacon, etc.

After all those thoughts, I finally settled on French toast, because let's be honest.....who doesn't like French toast? 

Overnight Baked French Toast with a Cinnamon Crumb Topping
Printer-FriendlyVersion

Serves 6-10 (depending on size of pieces)
Ingredients:
1 loaf stale challah bread (or your choice)
8 eggs
2 cups milk (I use skim)
½ cup heavy whipping cream
¾ cup granulated sugar
2 Tbsp. vanilla

Topping:
½ cup all-purpose flour
½ cup packed light brown sugar
1 ½ tsp. cinnamon
¼ tsp. salt
1 stick cold butter, cubed

Directions:
Lightly coat a 9x13 inch baking dish with non-stick cooking spray.  Set aside.

Tear the bread into pieces and place them into the prepared baking dish.  In a medium bowl, whisk together the eggs, milk, cream, sugar, and vanilla.  Pour the egg mixture evenly over the bread, cover and refrigerate overnight. 

In another bowl, mix together the flour, light brown sugar, cinnamon and salt.  Next, cut in the butter until the topping begins to come together and little pebble size pieces start to form.  Place in a plastic bag and put in the refrigerator overnight.

The next day:
Preheat the oven to 350 degrees.

Take the baking dish, that contains the egg/bread mixture, and evenly sprinkle on the cinnamon crumb mixture.

Bake for 45 minutes to 1 hour, depending on how soggy or done you like your French toast. 
            *Less time = more soggy

Serve warm with butter or maple syrup!

 
 Adapted from: Lovin from the oven

Saturday, February 11, 2012

Mini Pretzel Bites with Cheese Sauce


You can never go wrong with mini soft pretzel bites and cheese.  I just love soft pretzels!  The only sad thing was, I ran out of pretzel salt, so the pretzel bites in the above image look a little naked.  Oh well, at least there's always next time.  And there definitely will be a next time.  I always forget how easy homemade soft pretzels are to make!

A while back I posted my recipe for Large Soft Pretzels and I consider this post to be a delicious follow up.  The actual recipe for the pretzels stays the same, the only difference is that this time, instead of creating larger shaped pretzels, you break the dough into smaller bite size pieces before you bake it and I'm also adding on an addicting cheese sauce. 

Mini Soft Pretzel Bites with Cheese Sauce
Printer-Friendly Version

Ingredients:
For the dough:
1 ½ cups warm water
1 Tbsp. sugar
2 tsp. salt
2 ¼ tsp. instant yeast
about 4 ½ cups all purpose flour
4 Tbsp. unsalted butter, melted
Vegetable oil, for greasing the bowl

For Finishing:
Cooking spray
10 cups water
2/3 cup baking soda
1 egg yolk, beaten with 1 Tbsp. of water, or melted butter
Pretzel or kosher salt

Cheese Sauce:
2 Tbsp. butter
2 Tbsp. all purpose flour
1 cup milk
8 oz. extra sharp cheddar cheese, best if you shred your own
salt to taste

Directions:
In order to make the dough you will need to combine the water, sugar, salt and yeast in the bowl of an electric mixer fitted with the paddle attachment. Mix on low speed until the yeast is dissolved. Let sit for 1 minute. Now, gently pour in the flour and melted butter and mix just until the dough begins to come together. Switch from the paddle attachment to the dough hook and knead on medium speed until the dough is smooth and clears the sides of the bowl (this should take about 5 minutes). Transfer the dough to a bowl that has been lightly greased with vegetable oil, turning once to coat. Cover the bowl with plastic wrap and let rise in a warm place for about 1 hour, or until doubled in bulk.

To Bake:
Preheat oven to 425 degrees F. Prepare two baking sheets by lining them with parchment paper, spraying them with cooking spray and then placing aside for later use. Bring the water and baking soda to a boil in a large saucepan or stockpot. While you are waiting for the water to boil, divide the dough into 8 equal pieces. Working with one ball of dough at a time, roll it out into a 24-inch long rope. Slice each rope into 1 inch pieces. Repeat with the remaining pieces of dough.  As you are working, make sure to cover the bites with a damp paper towel, so that the pieces don’t dry out.

Gently set the pretzel bites into the boiling water, 10 or so at a time, for 30 seconds. Remove pretzel bites from the water with a slotted skimmer and place onto the prepared baking sheets. Once all the pretzel bites have been removed from the water, lightly brush the tops of them with the egg wash (or melted butter) and sprinkle with salt. Bake in preheated oven until they turn a nice golden brown. This should take about 10-12 minutes. Transfer to a wire rack for cooling.

While the pretzels are cooling it’s time to make the cheese sauce!

For the Cheese Sauce:
Melt the butter in a small saucepan, over medium heat.  Whisk in the flour and cook for about 30 seconds making sure to whisk constantly.

Slowly whisk in the milk until no more lumps of flour remain.  Bring the milk to a simmer over medium-low heat until it begins to thicken.  Make sure to stir constantly.  This should take about 3-5 minutes.  Remove the pan from the heat and stir in the shredded cheese until melted.  Add salt to taste.  Serve warm.  If the cheese begins to harden, place in the microwave for 30 second increments.  You may store leftovers in an airtight container in the refrigerator.   


Source: Cheese Sauce from Smells Like Home

Tuesday, February 7, 2012

Cornbread with Homemade Honey-Butter


One great thing about living in the South, other than the beautiful weather, is that I'm constantly surrounded by wonderful Southern cooking.  Not only can you find great food within local restaurants, but many people down here are truly fantastic cooks!  Some even have their own homemade recipes that have been passed down throughout generations.  

In addition, have you ever noticed how incredibly comforting Southern cooking can be?  It just seems that a variety of great tasting dishes have originated in the South.  Due to this, there are many dishes I want to try out, but sadly have not (mostly due to time).  Once summer rolls around though, I plan to spend a lot of time in the kitchen, but for now, I've at least been experimenting and searching for the perfect cornbread recipe.  Oh boy, do I ever enjoy a slice or two of well-made cornbread!  It also seems to make a great side item for numerous Southern meals! 

After a few attempts at different cornbread recipes, I finally feel confident that I've found one worth sharing.  I'll definitely be using this recipe from now on!  The cornbread turned out both incredibly moist and delicious.  This made it very difficult not to eat all at once, especially with a side of the scrumptious homemade honey butter!

Cornbread with Homemade Honey Butter
Printer-Friendly Version

Ingredients:
For the Cornbread-
½ cup cornmeal
1 ½ cup flour
2/3 cup sugar
1 Tbsp. baking powder
½ tsp. salt
1/3 cup vegetable oil
3 Tbsp. butter, melted
2 eggs, beaten
1 ¼ cup milk (I used skim)

For the Honey Butter-
2 sticks butter, softened
½ cup honey
½ cup marshmallow fluff

Directions:
Preheat the oven to 350 degrees and coat an 8” square pan with cooking spray.  In a medium size bowl, add the cornmeal, flour, sugar, baking powder, and salt.  Whisk together until well combined.  Make a well in the center of the dry ingredients.  Add the oil, butter, eggs, and milk.  Stir together with a wooden spoon until just mixed.  (The batter will be very runny.  Don’t worry; it’s supposed to look like this.)  Pour the batter into the prepared pan and bake for 35 minutes, or until a toothpick inserted in the middle comes out clean.  Let cool on a wire rack.

In order to make the honey butter, add the softened butter, honey, and marshmallow fluff to a medium bowl and whip all together.  Serve at room temperature, but store in the refrigerator until ready to use.

Source: Mel's Kitchen Cafe

Wednesday, January 18, 2012

Peanut Butter Banana Bread with Mini Reese's Peanut Butter Cups

Lately I've been going a little crazy with my recipes.  Ok, not really so much crazy, but rather having fun experimenting with some of my favorite foods. 


A few weeks ago, a neighbor of mine gave birth to an adorable baby boy named Landon, and ever since then I've been wanting to go over and visit with her.  Things have just been very busy for me lately and I knew that when I went, I couldn't go empty handed.

This past Monday happened to be a holiday for me though, so I immediately planned my visit and began thinking about what I could take with me.  I went back and fourth between, cookies, cakes, pasta dishes, etc.  I'm not really sure why, but I was having a difficult time deciding.  I just had so many great sounding recipes pouring through my mind that I wanted to make them all.

That's when I remembered that she was a fan of the chocolate/peanut butter combination, just like me!  Now that I had it narrowed down a little further, I continued to think......cupcakes.....muffins.....bread.  Yes!!!  That was it!!  Bread.  Bread kept popping into my mind.  Not just any bread though, if she was really like me in her tastes, then she'd most likely like banana bread.  I'm not just talking about any plain old banana bread though, banana bread with peanut butter and mini Reese's Peanut Butter Cups!!!  How could it get any better than that???

The only thing I might do differently the next time I make this, is melt some chocolate to drizzle on top.  YUM!!!!

Peanut Butter Banana Bread with Mini Reese’s Peanut Butter Cups
Printer-Friendly Version

Ingredients:
3 very ripe bananas, mashed
½ cup creamy peanut butter
¼ cup vegetable oil or unsweetened applesauce
1 egg
½ cup sugar
¼ cup brown sugar, packed
1 ½ cups all purpose flour
½ tsp. baking soda
1 ½ tsp. baking powder
½ tsp. salt
8 oz. bag of mini Reese’s Peanut Butter Cups

Directions:
Preheat oven to 350 degrees and spray a loaf pan with non-stick cooking spray, such as PAM.  Set aside.

In a medium bowl, combine the flour, baking soda, baking powder, and salt.  Whisk together and then set aside.

In a large bowl, add in the bananas, peanut butter, oil (or applesauce), egg, and sugars.
 

Stir together until everything is well blended and smooth.


Pour the flour mixture into the peanut butter banana mixture and stir until just combined.  The batter should appear lumpy.

Gently fold in the mini Reese’s Peanut Butter Cups.......


then pour the batter into the prepared loaf pan.  You may need to use a spoon or a spatula to evenly spread the batter around.

Bake for 45 minutes to 1 hour.  Check to make sure the bread is done by inserting a knife or toothpick into the middle.  If the device comes out clean, than you know the bread is done. 

Remove the pan from the oven and let cool on a wire rack for 10-15 minutes.  After that, gently run a knife along the edge of the pan.  This will help loosen the bread so that it may easily be removed.  Place the bread back on the wire rack until it’s had the chance to complete cool.

Serve with a big glass of milk and enjoy!!!

FYI:  If the top of the bread seems to be browning too quickly then turn the oven temperature down to 325 degrees.

Source: Slightly adapted from Cookies and Cups

Saturday, October 29, 2011

Parmesan and Cheddar Cheese Bread


There is nothing better than a terrific homemade loaf of bread.  Except for maybe a homemade loaf of bread that is filled and topped with melted cheese.  Ever since I got back from Michigan this past summer, I've been motivated to try making a delicious cheese bread.  While I was there, my best friend Christina, introduced me to this great local bakery, where we picked up a fresh loaf of cheddar jalapeno bread.  Ever since then, I've been craving more.  Unfortunately, I have not found any bakeries quite as good around me, which is why I decided to do the next best thing.....make it myself! 

I know that making homemade bread can sometimes be intimidating, because there are so many steps in the process.  It can also be quite time consuming, due to the fact that you have to wait for the yeast to rise.  However, this specific quick-bread recipe does not call for any yeast, meaning it couldn't be simpler to make!  In addition, it doesn't take long to assemble, which means that you have scrumptious bread in no time!

Parmesan and Cheddar Cheese Bread
Printer-Friendly Version

Ingredients:
3 ounces Parmesan cheese, shredded on the large holes of a box grater (about 1 cup)
3 cups all-purpose flour
1 Tbsp. baking powder
1/4 tsp. cayenne pepper
1 tsp. salt
1/8 tsp. ground black pepper
4 oz. extra-sharp cheddar, cut into 1/2-inch cubes (about 1 cup)
1 1/4 cups whole milk
3 Tbsp. unsalted butter, melted
1 large egg, lightly beaten
3/4 cup sour cream


Directions:
Move an oven rack to the center of the oven and preheat to 350 degrees.  Spray a 9x5 inch loaf pan with cooking spray and then sprinkle ½ the parmesan cheese evenly across the bottom.  Set aside.

In a large bowl, combine the flour, baking powder, cayenne pepper, salt and pepper.  Whisk together until well blended.  Add in the cubed cheddar squares and stir around, with a rubber spatula, until the cheese is well coated with flour.  (Make sure to break apart any clumps of cheese that stick together)  In a medium bowl, combine the milk, butter, egg, and sour cream.  Whisk the ingredients together, until well blended.  Using your rubber spatula, gently mix or fold the wet ingredients into the dry, until just combined.  It is important to make sure that you do not over mix!  The batter should appear thick.  Using your spatula, lightly scrape the batter into the loaf pan, making sure to level out the top.  Sprinkle the remaining parmesan cheese over the top of the bread.


Place the loaf pan in the oven for about 45-50 minutes, or until a toothpick inserted comes out clean and the bread has a deep golden brown color to it.  Cool in the pan, on a wire rack for about 10 minutes, and then turn the bread out of the pan and continue to let cool completely.

Cut, serve, and enjoy!  This bread is even better toasted!


Sunday, October 16, 2011

Apple Bread with a Crumb Cinnamon Topping

To me, one of the best things about fall is getting to bake my homemade apple bread.  I know that there are tons of other great fall recipes out there, but nothing quite compares to apple bread.  It's something I bake every year and am always excited for my first loaf of the season. 

Apple bread is kind of a tradition in my family.  My mother use to make it for us every fall, and it was always my favorite.  I hated having to share it though, and would sometimes fight with my sisters over who would get a certain piece (some slices contained more cinnamon than others).  Now that my family is spread out over the country, I only have to fight with my husband over a particular slice. 


A funny story:
As I have mentioned before, I am a completely self taught cook, so the first time that I tried making my own loaf of apple bread I made sure to follow the recipe my mother had provided me step by step.  It instructed me to bake the bread for 45 minutes, but when the timer went off and I opened the oven door it was still a liquid.  I wasn't sure why, so I closed the oven and baked it for about another 30 minutes.  When I checked on it again, the bread was still somewhat liquidity.  I was becoming very frustrated so I called my mom and asked her what I was doing wrong.  She said that she didn't know and wanted me to read her the recipe card she had given to me, so I did.  It was only a matter of moments before she began to laugh and informed me that it wasn't rising because she had forgotten to write down that it needed flour, and I hadn't added any.  How can you make bread without flour?  At the time I didn't know any better.  I guess we all have our moments.

Apple Bread with a Crumb Cinnamon Topping
Printer-Friendly Version

Servings: 1 loaf
Ingredients:
2 cups chopped apples (your choice, I use any type of red apple)
½ cup butter, melted
1 cup sugar
2 eggs
½ tsp. baking soda
1 tsp. baking powder
1 tsp. vanilla
2 Tbsp. milk
1 tsp. cinnamon
¼ tsp. nutmeg
2 cups flour

Topping:
3 Tbsp. butter, melted
3 Tbsp. sugar
2 tsp. cinnamon
3 Tbsp. flour

Directions:
Preheat oven to 350 degrees.  Coat a loaf pan with baking spray; set aside.

Peel apples and puree in the bowl of a food processor.  Add in the melted butter, sugar, eggs, baking soda, baking powder, vanilla, milk, cinnamon and nutmeg.  Mix thoroughly after each ingredient addition.  Lastly, add the flour and mix until combined.

To make the topping:
In a small bowl, place the butter and add the cinnamon.  Stir until well combined.  Add in the sugar, and continue to stir until blended.  Finally, add in the flour and stir until ingredients are well mixed.   

To assemble:
Pour about half of the bread mixture into the loaf pan.  Sprinkle the bread mixture with half of the topping mixture (it won’t sprinkle too easily, because the topping will be more like chunks; so just spread it out with a spoon or your fingers).  Pour in the remaining bread mixture and then sprinkle with the rest of the topping mixture.

Bake for around 45-60 minutes or until an inserted toothpick comes out clean.  Remove the pan from the oven and allow the bread to cool on a wire rack for at least 30 minutes before trying to remove from the pan.  


Sunday, August 14, 2011

How to Make Delicious Pizza Dough


If you ask people to name their favorite food, most will likely reply with the word "pizza".  There just seems to be something truly addicting about a circle of crispy dough, covered with warm marinara sauce, melty cheese, and all the different toppings you desire.

For me, the best part of any pizza has always been, and will always be, the delicious crust.  I can still remember the times I use to sit downstairs, on Sunday evenings, with my parents, after they had just ordered themselves a pizza.  I use to beg my mom to please let me have her crust, which being the great mother she is, would then cut off and give to me. 

That's how I knew I needed to find just the right dough recipe before I could even consider making my own pizza.  I will be the first to admit that I'm kind of a "crust" snob.  I like my pizza crust to be crispy on the outside, but also soft on the inside.  So, after many months of searching the internet and experimenting, I'm happy to announce that I've finally found it!  Now that I have, I want to share the recipe with all of you, so that you may also enjoy your own homemade pizza! 

Part of the process though is knowing how to properly bake a pizza.  That's why I've decided to provide this helpful tutorial.

Simple to make Pizza Dough
Printer-Friendly Version

Servings: Enough dough for 2 medium size pizzas or about 4 calzones
Ingredients:
½ cup warm water
2 ¼ tsp. (1 package) instant yeast
4 cups (22 oz.) bread flour, plus more for dusting work surface
1 ½ tsp. salt
1 ¼ cup water, room temperature
2 Tbsp. EVOO (extra-virgin olive oil)

Directions:
In a 2 cup liquid measuring cup, measure the warm water.  Sprinkle the yeast on top of the warm water and let sit for about 5 minutes. 

Combine the bread flour and salt in the bowl of an electric mixer, fitted with the paddle attachment, and mix briefly to blend.  Pour the room temperature water and olive oil into the measuring cup with the yeast-water mixture; stir around.  Now, with the mixer on a low speed, pour all of the yeast-water mixture into the bowl containing the dry ingredients.  Mix together until the ingredients start to form a dough-like substance. 


Now, switch the electric mixers' attachment to the dough hook.  Knead on a low setting until the dough is smooth, elastic, and pulls away from the sides of the bowl, about 5-7 minutes.  If needed, add a little more bread flour, tablespoons at a time. 


Transfer the dough to a lightly oiled bowl.  Cover with plastic wrap and set in a warm place to let rise until double its’ original size.  This should take 1 ½ -2 hours.


Once the dough has risen, gently press down with your fingers to deflate and then transfer to lightly floured work surface.  Next, divide the dough into two equal pieces and roll each piece into a smooth, ball shape. 


(If freezing the dough, to use at a later date, wrap in plastic wrap, place in a freezer safe bag, and put in the freezer.)  If using right away, cover with a damp cloth to let the dough “relax” for 10 minutes, but no longer then 30 minutes before you use.

You are now set to make your own pizza, so be creative!

Preheat your oven to 500 degrees with the pizza stone already inside.  (Preheating the pizza stone with your oven will give the dough a nice crispy texture on the outside, but will allow it to stay soft on the inside.)  Transfer the dough to a piece of parchment paper that has been lightly dusted with cornmeal.  Shape the dough using your hands.  (Sometimes it helps if you lightly cover your hands with flour.)  Once the dough is shaped, lightly brush the outer edge with olive oil. 


Add your toppings and place the pizza (still on the parchment paper) onto the pizza stone and bake until the crust is a golden brown color, and the cheese is bubbling.  This should take around 8-12 minutes.  


*You may need to use a cutting board to help you get the pizza onto the pizza stone, as the parchment paper alone will not hold up to the weight of the pizza.*      

Source: Annie's Eats; originally adapted from Baking Illustrated

Sunday, July 3, 2011

Large Soft Pretzels

Besides shopping, one of the best things at the mall is walking past Auntie Anne's Pretzels.  I can always tell when I am getting close too, because the aroma of hot, buttery pretzels just lingers about in the air.  Sometimes I have to give into my cravings and stop to pick one up, but it is always difficult to just walk by. 

Not too long ago though, I was having a serious craving for a soft pretzel and didn't want to drive all the way down to the mall.  Instead I decided to try to make my own.  So I immediately got online, looked around and found a recipe.  With so many different recipes out there, I was a little nervous which one to try.  I ended up settling on this one and am glad that I did!  The pretzels turned out great!  I do not even need to look for a different recipe, because this is the one!  I will definitely be making these again.  Although next time, I might try to make little soft pretzel sticks, so be on the look out for another post. 


Large Soft Pretzels
Printer-Friendly Version

Ingredients:
For the dough:
1 ½ cups warm water
1 Tbsp. sugar
2 tsp. salt
2 ¼ tsp. instant yeast
about 4 ½ cups all purpose flour
4 Tbsp. unsalted butter, melted
Vegetable oil, for greasing the bowl

For Finishing:
Cooking spray
10 cups water
2/3 cup baking soda
1 egg yolk, beaten with 1 Tbsp. of water
Pretzel or kosher salt

Directions:
In order to make the dough you will need to combine the water, sugar, salt and yeast in the bowl of an electric mixer fitted with the paddle attachment.  Mix on low speed until the yeast is dissolved.  Let sit for 1 minute.  Now, gently pour in the flour and melted butter and mix just until the dough begins to come together.  Switch from the paddle attachment to the dough hook and knead on medium speed until the dough is smooth and clears the sides of the bowl (this should take about 5 minutes).  Transfer the dough to a bowl that has been lightly greased with vegetable oil, turning once to coat.  Cover the bowl with plastic wrap and let rise in a warm place for about 1 hour, or until doubled in bulk.

To Bake:
Preheat oven to 450 degrees F.  Prepare two baking sheets by lining them with parchment paper, spraying them with cooking spray and then placing aside for later use.  Bring the water and baking soda to a boil in a large saucepan or stockpot.  While you are waiting for the water to boil, divide the dough into 8 equal pieces.  Working with one ball of dough at a time, roll it out into a 24-inch long rope.  Now, make a U-shape with the rope and while you are holding the ends of the rope cross them over each other twice and onto the bottom of the U-shape, thus providing the pretzel shape.  Repeat with the remaining pieces of dough.

Gently set the pretzels into the boiling water, 1 or 2 at a time, for 30 seconds.  Remove pretzels from the water with a slotted skimmer and place on prepared baking sheets.  Once all the pretzels had been removed from the water, lightly brush the tops of them with the egg wash and sprinkle with salt.  Bake in preheated oven until the turn a nice golden brown.  This should take about 12-14 minutes.  Transfer to a wire rack for cooling and then enjoy!

Sources: Annie's Eats; originally from Alton Brown at Food Network