RSS

Sunday, February 12, 2012

Peanut Butter Granola


As I've mentioned before, I've kind of been on a granola kick lately!  Recently I've been experimenting with many different flavor combinations and ingredients, and have finally found another one I feel I cannot deprive you of.  Peanut butter and granola!  Holy smokes, is this ever delicious!  I honestly believe I could eat the whole batch right now.  Once you taste it you'll never want store bought granola again!  The best part is, it's so incredibly easy to throw together, and by making it yourself, you're in control of the ingredients, therefore you know exactly what it is you're eating.

Peanut Butter Granola
Printer-Friendly Version

Ingredients:
3 cups rolled oats
3 cups puffed rice cereal (Rice Krispies)
½ cup unsweetened applesauce
½ cup + 4 Tbsp. creamy peanut butter
2 Tbsp. canola oil
4 Tbsp. granulated sugar
4 Tbsp. maple syrup (I used sugar free)
1 tsp. vanilla extract
Dash of salt
2-4 Tbsp. ground flaxseed
1 cup unsalted dry-roasted peanuts
1 bag Reese’s peanut butter baking chips

Directions:
Preheat oven to 325 degrees and line a baking pan with parchment paper or a silicone baking mat.

Pour the oats and rice cereal in a large bowl and set aside.  Add the applesauce, peanut butter, canola oil, sugar, maple syrup, vanilla extract, salt, and ground flaxseed in a medium bowl and whisk together until well combined.  Pour the wet ingredients over the oats and rice cereal and mix with a wooden spoon until everything is very well blended. 

Spread the mixture in an even layer, completely covering the bottom of the prepared baking mat.  Bake for 15 minutes, then remove the pan, stir in the peanuts, spread the mixture back out (so that it’s evenly coating the bottom of the pan), and return the pan to the oven for another 10-15 minutes, or until the granola is crisp and golden.  Remove the pan from the oven and place on a wire rack to let cool completely.  Once cooled, stir in the Reese’s peanut butter baking chips and store in an airtight container.

Source: Adapted from Healty Food for Living

Saturday, February 11, 2012

Mini Pretzel Bites with Cheese Sauce


You can never go wrong with mini soft pretzel bites and cheese.  I just love soft pretzels!  The only sad thing was, I ran out of pretzel salt, so the pretzel bites in the above image look a little naked.  Oh well, at least there's always next time.  And there definitely will be a next time.  I always forget how easy homemade soft pretzels are to make!

A while back I posted my recipe for Large Soft Pretzels and I consider this post to be a delicious follow up.  The actual recipe for the pretzels stays the same, the only difference is that this time, instead of creating larger shaped pretzels, you break the dough into smaller bite size pieces before you bake it and I'm also adding on an addicting cheese sauce. 

Mini Soft Pretzel Bites with Cheese Sauce
Printer-Friendly Version

Ingredients:
For the dough:
1 ½ cups warm water
1 Tbsp. sugar
2 tsp. salt
2 ¼ tsp. instant yeast
about 4 ½ cups all purpose flour
4 Tbsp. unsalted butter, melted
Vegetable oil, for greasing the bowl

For Finishing:
Cooking spray
10 cups water
2/3 cup baking soda
1 egg yolk, beaten with 1 Tbsp. of water, or melted butter
Pretzel or kosher salt

Cheese Sauce:
2 Tbsp. butter
2 Tbsp. all purpose flour
1 cup milk
8 oz. extra sharp cheddar cheese, best if you shred your own
salt to taste

Directions:
In order to make the dough you will need to combine the water, sugar, salt and yeast in the bowl of an electric mixer fitted with the paddle attachment. Mix on low speed until the yeast is dissolved. Let sit for 1 minute. Now, gently pour in the flour and melted butter and mix just until the dough begins to come together. Switch from the paddle attachment to the dough hook and knead on medium speed until the dough is smooth and clears the sides of the bowl (this should take about 5 minutes). Transfer the dough to a bowl that has been lightly greased with vegetable oil, turning once to coat. Cover the bowl with plastic wrap and let rise in a warm place for about 1 hour, or until doubled in bulk.

To Bake:
Preheat oven to 425 degrees F. Prepare two baking sheets by lining them with parchment paper, spraying them with cooking spray and then placing aside for later use. Bring the water and baking soda to a boil in a large saucepan or stockpot. While you are waiting for the water to boil, divide the dough into 8 equal pieces. Working with one ball of dough at a time, roll it out into a 24-inch long rope. Slice each rope into 1 inch pieces. Repeat with the remaining pieces of dough.  As you are working, make sure to cover the bites with a damp paper towel, so that the pieces don’t dry out.

Gently set the pretzel bites into the boiling water, 10 or so at a time, for 30 seconds. Remove pretzel bites from the water with a slotted skimmer and place onto the prepared baking sheets. Once all the pretzel bites have been removed from the water, lightly brush the tops of them with the egg wash (or melted butter) and sprinkle with salt. Bake in preheated oven until they turn a nice golden brown. This should take about 10-12 minutes. Transfer to a wire rack for cooling.

While the pretzels are cooling it’s time to make the cheese sauce!

For the Cheese Sauce:
Melt the butter in a small saucepan, over medium heat.  Whisk in the flour and cook for about 30 seconds making sure to whisk constantly.

Slowly whisk in the milk until no more lumps of flour remain.  Bring the milk to a simmer over medium-low heat until it begins to thicken.  Make sure to stir constantly.  This should take about 3-5 minutes.  Remove the pan from the heat and stir in the shredded cheese until melted.  Add salt to taste.  Serve warm.  If the cheese begins to harden, place in the microwave for 30 second increments.  You may store leftovers in an airtight container in the refrigerator.   


Source: Cheese Sauce from Smells Like Home

Friday, February 10, 2012

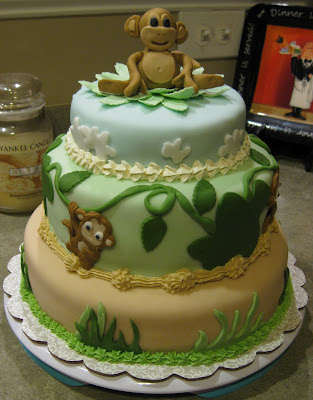
Cakes, Cakes, and more Cakes........


Today's post is going to be a little different than my others.  I say this because I'm not including individual recipes of things that you need to make, but rather, I'll be sharing with you some pictures of my true passion.  Don't get me wrong though, I love experimenting with all different types of foods and flavor combinations, it's just that my heart really lies here; with baking and decorating cakes, cupcakes, and cookies!

With Valentine's Day and other special occasions coming at you throughout the year, it's time to think creatively and learn how to do it yourself!  For me, it all stemmed from summer boredom.  I know.....I know.....bored during summer?  Being a teacher though, I find that sometimes I have nothing to do, mostly because afternoon TVs just not for me.  Due to this, I decided I'd make my husband Jeff a birthday cake.  After experimenting with the cake, I was hooked, and everything else that I've done, both cooking and baking related, started that day.  I keep telling myself that one day I will take a cooking/cake decorating class, but for now I'll just stick to reading other people's food blogs and watch youtube.  This always seems to help whenever I might need it.

Here are some of my favorite cakes that I've made:

 Yellow cake, filled with a whipped chocolate ganache and then topped with ganache and chocolate covered strawberries

Strawberry Minnie Mouse birthday cake and cupcakes

Triceratops birthday cake

Strawberry daiquiri Victoria's Secret bachelorette cake

Fun zebra cake!

My personal favorite

Raspberry Lemonade cupcakes

Fireman hat

Fun floral cake

These are just a few highlights of the different cakes I've made.  I you want to see more, please feel free to check out and like my facebook page, "savory sweets by Jamie."

Enjoy!

Thursday, February 9, 2012

Irresistible Peanut Butter & Chocolate Chip Cookies


Oh......my......goodness.......Is it even legal for someone to enjoy a cookie this much?

These cookies are just the perfect combination of ingredients.  To call them "irresistible" is an understatement.  In fact, I can't think of any word/words that could possibly do them justice. 

I happened to make these cookies as a quick, spur of the moment, easy dessert for the Superbowl party that we hosted, and before the end of the night even rolled around, they were gone.  I even had a few friends ask for the recipe after they took their first bite.  So, here it is.....Enjoy!  (Just try not to eat them all at once though.)

Irresistible Peanut Butter & Chocolate Chip Cookies
Printer-Friendly Version

Ingredients:
8 Tbsp. butter
1/3 cup creamy peanut butter (may add a little more, if you like)
1 cup packed brown sugar
½ cup granulated sugar
1 egg + 1 egg yolk
2 tsp. vanilla extract
2 cups all purpose flour
½ tsp baking soda
½ tsp. salt
1 ¼ cup chocolate chips

Directions:
Preheat the oven to 325 degrees and line a baking pan with parchment paper or a silicone baking mat; set aside.

In a microwave safe bowl, melt together the butter and peanut butter until it appears mostly melted.  Remove the bowl from the microwave and stir around until the butter has melted and blended in with the peanut butter.  The mixture should be completely smooth.  Set aside and let cool. 

In a small to medium bowl, whisk together the flour, baking soda, and salt.  Set aside

In the bowl of an electric mixer, fitted with the paddle attachment, blend together the peanut butter mixture, brown sugar, and granulated sugar until well combined.  Next, beat in the egg, yolk, and vanilla until all the ingredients are well blended.  With the mixer now set on a low-medium speed, slowly add the flour mixture into the peanut butter sugar mixture and continue to beat together until a dough forms.  Once the dough is ready, use a spatula and gently fold in the chocolate chips.

Using your hands, roll the dough into balls just a little larger than the size of a ping-pong ball and place onto the prepared baking pan, about an inch or so apart.  Bake the cookies for 10-12 minutes, or until the edges start to turn a little golden.  Make sure to rotate the pan halfway through baking.  It is very important not to over bake!  Remove from the oven and allow the cookies to cool on the baking sheet for about 5 minutes, and then transfer to a wire rack to cool completely. 

Source: Slightly adapted from Pennies on a Platter

Tuesday, February 7, 2012

Cornbread with Homemade Honey-Butter


One great thing about living in the South, other than the beautiful weather, is that I'm constantly surrounded by wonderful Southern cooking.  Not only can you find great food within local restaurants, but many people down here are truly fantastic cooks!  Some even have their own homemade recipes that have been passed down throughout generations.  

In addition, have you ever noticed how incredibly comforting Southern cooking can be?  It just seems that a variety of great tasting dishes have originated in the South.  Due to this, there are many dishes I want to try out, but sadly have not (mostly due to time).  Once summer rolls around though, I plan to spend a lot of time in the kitchen, but for now, I've at least been experimenting and searching for the perfect cornbread recipe.  Oh boy, do I ever enjoy a slice or two of well-made cornbread!  It also seems to make a great side item for numerous Southern meals! 

After a few attempts at different cornbread recipes, I finally feel confident that I've found one worth sharing.  I'll definitely be using this recipe from now on!  The cornbread turned out both incredibly moist and delicious.  This made it very difficult not to eat all at once, especially with a side of the scrumptious homemade honey butter!

Cornbread with Homemade Honey Butter
Printer-Friendly Version

Ingredients:
For the Cornbread-
½ cup cornmeal
1 ½ cup flour
2/3 cup sugar
1 Tbsp. baking powder
½ tsp. salt
1/3 cup vegetable oil
3 Tbsp. butter, melted
2 eggs, beaten
1 ¼ cup milk (I used skim)

For the Honey Butter-
2 sticks butter, softened
½ cup honey
½ cup marshmallow fluff

Directions:
Preheat the oven to 350 degrees and coat an 8” square pan with cooking spray.  In a medium size bowl, add the cornmeal, flour, sugar, baking powder, and salt.  Whisk together until well combined.  Make a well in the center of the dry ingredients.  Add the oil, butter, eggs, and milk.  Stir together with a wooden spoon until just mixed.  (The batter will be very runny.  Don’t worry; it’s supposed to look like this.)  Pour the batter into the prepared pan and bake for 35 minutes, or until a toothpick inserted in the middle comes out clean.  Let cool on a wire rack.

In order to make the honey butter, add the softened butter, honey, and marshmallow fluff to a medium bowl and whip all together.  Serve at room temperature, but store in the refrigerator until ready to use.

Source: Mel's Kitchen Cafe

Saturday, February 4, 2012

Reese's Peanut Butter Cup Cheesecake Squares


As with most people, I'm pretty much addicted to Pinterest right now.  If I'm not scanning the categories on my computer, then you can usually find me scanning them on my cell phone.  I'll be the first to admit that I may have a problem.  If you personally have not had the chance to explore the site yet, I definitely recommend checking it out.  My two favorite categories to explore are of course, food and fitness.  That's actually where I discovered this particular recipe, and the minute I did, I knew I needed to sample it!

I didn't really have a particular reason to make the dessert though, other than I wanted too, so after I made sure to share one of the cheesecake squares with my husband, I ended up taking the rest to work with me.  Once there I generously shared it with friends/co-workers and before I knew it, it was gone.  The cheesecake was definitely a big hit, and some people even told me that it was the best dessert I've made.   

Reese's Peanut Butter Cup Cheesecake Squares
Printer-Friendly Version

Makes about 16 squares
Ingredients:
Crust:
8 whole graham crackers, broken into 1-inch pieces
6 tbsp (3/4 stick) unsalted butter, melted and cooled
3 tbsp brown sugar
2 tbsp all-purpose flour
1 ½ tsp. creamy peanut butter
1/8 tsp salt

Filling:
2 (8 oz. each) packages cream cheese, softened
2/3 cup granulated sugar
2 large eggs
1/4 cup sour cream
1 tsp vanilla extract
12 Reese’s peanut butter cups (0.75 oz each), divided, cut into 6 pieces each

2 oz. bittersweet chocolate, chopped

Directions:
Preheat oven to 325 degrees.  Line an 8 inch baking pan with aluminum foil, making sure to leave 2-3 inches draped over the sides.


For the Crust:
Place the graham crackers in the bowl of a food processor or blender and pulse until the crackers form fine crumbs. 


Add in the butter, brown sugar, flour, peanut butter, and salt.  Pulse together until all the ingredients are well combined.  As needed, make sure to stop and scrape down the sides of the processor.  Once ready, add the crust mixture into the prepared baking pan and using your hands, or the bottom of a measuring cup, press evenly into the bottom of the pan to help pack it down.


Bake the crust bake for 12-15 minutes, or until it begins to brown.  Cool completely on a wire rack.

For the Filling:
In the bowl of an electric mixer, set on a medium-high speed, beat the cream cheese until it’s smooth, this will take about 3-5 minutes.  Scrape the sides of the bowl frequently.  With the mixer on a low-medium speed, slowly beat in the granulated sugar until it’s well incorporated.  This will take 1-2 minutes.  Next, beat in the eggs one at a time, making sure to beat the mixture well after each addition.  Add in the sour cream and vanilla and beat until everything is well combined.  This should take about 1 minute.

Cut 9 Reese’s peanut butter cups into 6 pieces.  (It helps if you put them in the refrigerator to harden a little before trying to cut) 


Once cut, place the pieces in the freezer for about 30 minutes.  This will keep them from melting a lot while they’re baking.  Using a rubber spatula, gently fold the frozen Reese’s peanut butter cup pieces into the cheesecake mixture.  Scrape the cheesecake mixture over the crust and spread around until even.


Place the prepared cheesecake into the oven and bake for 35 to 40 minutes, or until the edges are set but the middle still appears to jiggle.

Place on a wire rack to cool for about 2 hours.  Once cool, cover with aluminum foil and place in the refrigerator overnight.

Using the overhanging foil, remove the cheesecake from the pan and pull off the tin foil.  Now, cut the cheesecake into 16 squares and place the squares on a wire rack that's set up over tin foil.

Place the bittersweet chocolate into a small bowl and place in the microwave for 45 seconds.  Stir around and then place back in the microwave to continue cooking in 15 second intervals, making sure to stop and stir around until the chocolate reaches the proper consistency.  Drizzle the chocolate over the bars and top each bar with a small piece of a Reese’s peanut butter cup. 

     
Serve and enjoy!!!  If you plan to save these bars for later though, store in an airtight container in the refrigerator.


Source: Adapted from Cookin' Canuck

Thursday, February 2, 2012

Baked Spaghetti with a Cream Cheese Tomato Sauce & French-Fried Onions


I'm a little ashamed to admit that so far this year I've not been planning out my dinner menu as well as I have in the past.  Hopefully it'll get back to normal soon, but for now things have been pretty busy around my house; or should I say, soon to be ex-house?  The reason I say this is because Jeff and I are currently in the process of packing up boxes to move.  We decided a while back that we wanted to build a new home, so in the meantime we've sold ours and are going to have to rent a place for a few months.  I'm a little nervous about the in between time, but it'll definitely be an adventure.  I'm just curious to see where we're going to store all the baking items I have, that are currently overflowing from our cabinets.  The good news though, is that my new kitchen will be rather large and I'll have plenty of space for everything once we move in! 

Seeing that things have been chaotic, I wanted to prepare a meal that would be quick, easy, tasty, and last us for a few days.  This spaghetti recipe worked out perfect!  In fact, spaghetti type dishes have kind of become my "fall back on" recipes lately, especially when I'm short on time.  I find that one of the best parts about this particular recipe though is that you can use the meat of your choice.  I chose to go the healthy route and used 99% fat free ground turkey and turkey bacon.  It turned out fantastic.  The next time I make this though, I may add in some fresh baby spinach leaves.  Not that the recipes wasn't good as is, but I'm currently in love with spinach.

Baked Spaghetti with a Cream Cheese Tomato Sauce & French-Fried Onions
Printer-Friendly Version

Serves: 8-12
Ingredients
10 oz. uncooked spaghetti
1 pound ground turkey (or meat of choice)
1 tsp. Oregano
½ tsp. parsley
5-8 strips of turkey bacon, cooked and crumbled
1 (24 oz.) jar spaghetti sauce (I use Prego, flavored with meat)
1 Tbsp. butter
1/3 small onion, chopped
2 cloves garlic, minced
8 ounces 1/3 less fat cream cheese, softened
1/3 cup water
Salt and pepper, to taste
1 cup shredded mozzarella cheese
1/2 cup fresh grated Parmesan cheese
French Fried Onions (small can)

Directions:
Preheat oven to 350 degrees.  Spray a 9x13” baking dish with non-stick cooking spray and set aside.  Cook spaghetti according to package directions, then drain and set aside.

Melt the butter in a large skillet, over medium heat.  Next, add in the ground turkey, onion, oregano, parsley, and garlic and cook until the turkey is no longer pink.  Place the cream cheese, precooked bacon, and water into the skillet, stirring around until the cheese is melted and well combined with the ground turkey.  Next, add in the jar of spaghetti sauce and stir around.  Then, allow the mixture to slowly heat through.   Once ready, season the sauce with salt and pepper.

To assemble:
Pour a thin layer of the sauce mixture onto the bottom of the prepared baking dish.  Add all the cooked spaghetti noodles on top, making sure to arrange it so that the noodles are spread evenly over the mixture.  Pour the remainder of the spaghetti sauce evenly over the noodles.  You may need to use a wooden spoon or spatula to help you spread it out.  Top with the mozzarella and Parmesan cheeses.  Bake uncovered for 25-30 minutes.  Remove the pan from the oven and sprinkle the French fried onions over the top of the melted cheeses.  Place the dish back in the oven and continue to bake for 5 more minutes. 

Serve with a slice of garlic bread, or a nice side salad!  Enjoy!


Source: Inspired by and adapted from Let's Dish