RSS
Showing posts with label Cheese. Show all posts

Sunday, February 2, 2014

Beer Cheese Dip


Super Bowl Sunday is officially here, and it's never too late to run out and get some last minute ingredients for those tasty party snacks.  For those of you having people over, I know exactly how it goes, because this is the first Super Bowl in the past few years, that we've not thrown a party.  To be honest, I'm kind of excited about it, although I also find it to be bittersweet.  I really do enjoy having friends over because it's always a good time, but with being out of town this week, and then coming home to make a cake, I'm pretty beat and am actually looking forward to a quiet and relaxing Sunday.

However, if I were hosting a party, I'd definitely be making this addicting and delicious beer cheese dip.  Not only is it a quick and easy recipe to follow, but it's also flavorful and is guaranteed to be a hit.  This dip went very quickly when I originally made it back in December (for our ugly sweater Christmas party) and I even ended up passing out the recipe to a few friends.

It goes great with mini pretzels, but you could also dip chips in it as well, or spread it on crackers.

Beer Cheese Dip
Printer-Friendly Version

Ingredients:
ngredients:ndly Version
4-8 oz. packages cream cheese, softened (I used 1/3 less fat and it was still delicious)
2/3 cup beer (I used Yuengling)
2 envelopes Hidden Valley Original Ranch packets
4 cups shredded cheddar cheese

To Dip:
Pretzels
Crackers
Chips

Directions:
In a large bowl, beat together the cream cheese, beer, and ranch packets until smooth and creamy in appearance.

After that, stir in the cheese.  I turned the hand held mixer to a lower speed and combined it that way.


You could serve the dip right away, but its best if you cover the bowl and refrigerate for at least 1-2 hours.  That way the flavors have time to combine.  You could also make this dip a day or so ahead of time.


Monday, January 13, 2014

Buffalo Chicken Wonton Cups and Birthdays!

(Please ignore the x-mas napkin)

I can't believe it's already a new week again, what happened to the weekend?  I'm not complaining though, because I honestly like Monday's and this isn't any ordinary Monday either.  It's January 13th, which means it's my older sister Shannon's birthday!  "Happy Birthday Shanny!" 

I really wish I could be with her to help celebrate; but she's been sailing around Hawaii and French Polynesia for the past 30 days (If I sound jealous, I am, which is why I wish I could be there too to help celebrate).  Today also happens to be my friend Brad's birthday, "Happy Birthday Brad!"

On that note, birthdays seem to be popping up everywhere; January is a busy month!  I actually made two birthday cakes over the weekend, for two different parties that were going on.


In addition to baking birthday cakes, I also prepared some buffalo chicken wonton cups to take as a little appetizer to yet another birthday party.  These personalized little cups are always a huge hit and super easy to make!  Enjoy!

Buffalo Chicken Wonton Cups
Printer-Friendly Version

Makes about 18 cups
Ingredients:
2 large cans chunk chicken
2 blocks 1/3 less fat cream cheese
3 TBSP. Hidden Valley Ranch Dressing
3 cups shredded cheddar cheese, divided
½ - 1 cup Franks Red Hot Sauce
1 package wonton shells

Directions:
Preheat oven to 375 degrees and spray a muffin tin with a nonstick cooking spray; set aside.

In a large skillet, over a medium heat, add in the chunk chicken and breaking apart into bite size pieces and stirring around.  Continue to cook until just warm, 2-4 minutes.  Add in the blocks of cream cheese and stir around, with the chicken, until melted and mixed together.  When ready, pour in the ranch dressing, Frank’s Red Hot sauce, and 1 ½ cups of the cheese.  Stir those ingredients around until the cheese is melted and everything is nicely combined.

To assemble:
Begin by placing a wonton shell into the bottom of each well of the muffin tin.  After that, add on about a TBSP. of the chicken mixture and top with a little cheese.  Next, place over the chicken and cheese another wonton shell, making sure to press it down around the filling (almost so that it looks like a piece of ravioli).  Now, place on top of the wonton another TBSP. of the buffalo chicken mixture and then sprinkle on some more cheese.

When ready, place the tin into the oven and bake for 10-12 minutes, or until the edges of the wonton wrappers start to turn a nice brownish color.

Optional Garnish Ideas:
Blue Cheese or Feta crumbles
A slice of celery

Thursday, November 21, 2013

Cheddar Onion and Beer Bread


One of my all time favorite smells is that of freshly baking bread.  The warm, delectable aroma somehow just seems to escape from the oven and finds a way to seductively creep around from room to room.  And even though I'm not allowed to eat bread, at least for now, that doesn't stop me from baking a loaf for others.  I'm always up for trying new recipes too, but I definitely have my personal favorite; which happens to be apple bread.  However, knowing that I need to stay away from the empty carbs, I've been trying to experiment by incorporating ingredients that I'm not necessarily a big fan of, like beer.

This particular cheddar onion and beer bread is so simple to make, and honestly only takes about 2 minutes to throw together.  The hardest part of the whole process is being patient and waiting for the bread to bake; especially once that wonderful scent  of baking bread fills up your home.

Cheddar Onion Beer Bread
Printer-Friendly Version

Ingredients:
3 cups all-purpose flour
1 TBSP. baking powder
½ tsp. salt
¼ cup granulated sugar
1 cup sharp cheddar cheese, shredded
2 green onions, thinly sliced
12 oz. beer (use your favorite)
Dash of cayenne pepper
¼ cup butter, melted

Directions:
Preheat oven to 375 degrees, and spray a loaf pan with a non-stick cooking spray; set aside.

In a large bowl, combine the flour, baking powder, salt, sugar, cheese, onions, and cayenne pepper.  Whisk together until combined.  Now, slowly pour the beer into the flour mixture, and with as few stirs as possible, mix until the flour is moistened.  (The dough will be lumpy in appearance)

Pour the dough into the prepared loaf pan and evenly distribute the melted butter on top.  Once ready, place the pan into the oven and let bake for 50 minutes.

When the bread is done baking, remove the pan from the oven and let cool on a wire rack for 10-15 minutes.  Now, extract the bread from the pan and let cool completely.  Enjoy!

Source: Slightly adapted from Shugary Sweets

Tuesday, November 12, 2013

Healthy Texas Cheese Fries


Ok, to start today's post I'd have to say that I'm not really one who enjoys going out to eat.  Actually, I try to avoid it at all costs, but of course, I know that there are going to be those rare occasions that come up where I'm going to have to go.  The main reason I don't like going out to eat is because everything on the menu always looks and sounds delicious and I can't help but get out my phone to look up the calorie count.  My jaw always drops too and because of that, I usually just end up ordering a side salad with a piece of grilled chicken.  I know what you're thinking......that sounds pretty boring.....but I'm not really someone who feels like eating 2 days worth of calories in just one sitting; especially when I know that I could make a similar recipe at home for only half the fat and calories.

One menu item that always catches my eye though, and that I'm usually tempted by, are the cheese fries.  Yummy potato wedges with bacon, melted cheese, scallions, and dipped in ranch dressing; how could one go wrong?  It even has me drooling a little bit just thinking about them as I'm typing.  I never end up ordering a plate though, because you're typically looking at easily over 1,500 calories per dish.  However, I know that Jeff enjoys cheese fries too, so I decided that I'd lighten the dish up and make a homemade, "healthier" version, just for him. 

If I'm completely honest, I have to say that I might have sampled a bite of a fry myself; but that's ok.  If you look at the recipe that follows, you'll notice that they're really not that bad for you, plus I've been doing so well lately.  I've actually lost 4 lbs. in the past 2 weeks just by changing my diet and I've also been able to slowly add back in some exercises.  My workouts are nothing close to where they were, but that's ok, I know it will take some time and healing.  Eating healthy has definitely helped though and I'm excited to share this recipe with you!

Healthy Texas Cheese Fries
Printer-Friendly Version

Makes 1-2 servings
Ingredients:
1 Extra-large russet or Yukon potato, or 2 medium, washed and skin left on
2 tsp. olive oil
1 tsp. paprika
¼ tsp. chili powder
¼ tsp. onion powder
¼ tsp. cumin
¼ tsp. garlic powder
Dash of ground black pepper and salt (I left the salt out)
1 slice bacon, crumbled (I use turkey bacon)
¼ cup shredded cheddar cheese
Diced scallions
1 Jalapeno pepper, seeded and sliced

Directions:
Preheat oven to 400 degrees and spray a baking sheet with a non-stick cooking spray; set aside
 
Using a sharp knife cut the potato/potatoes in half lengthwise.  After that, cut each half lengthwise again, into ½ inch slices; then cut those slices in half, to form even smaller length fries.  Or you could just cut the potato however you would like, in order to form your fries.

Now, place the cut potato fries into a large bowl and add in the olive oil.  Toss the potatoes around until well coated and then add in all of the seasonings.  Once again toss the potatoes around until the seasonings are evenly coating the fries.
 
 
Next, evenly spread out the fries onto the prepared baking sheet, making sure that they remain in a single layer.  Place them in the oven for 25 minutes, but be sure to flip the fries over halfway through the baking process. (Depending on the thickness of the fries, it could take more or less time to bake, so keep an eye on them; they should be crisp but not burnt)

Remove the fries from the oven and place into an oven safe baking dish, or 2 separate dishes if you don’t feel like sharing (I placed mine in a cast iron skillet).  Top the fries with the cheese, bacon, scallions, and sliced jalapeno peppers.  Then, place the dish in the oven and let cook for about 2-4 minutes, or until the cheese is melted to your liking.  Remove the dish from the oven, serve with a side of ranch, or not, and enjoy!  FYI - Hot sauce also goes great with these fries!


Source: Skinny Taste

Friday, October 18, 2013

Three Cheese Tortellini Bake

 
Bring on the cheese!

My first reaction to this recipe was, 'shut the front door, that looks like heaven'.  If you are anything like me then you absolutely love cheese!  I definitely try my hardest to cut it out of my life, I just can't.  Cheese and I have a secret love affair, and I'm not picky when it comes to what type.....except maybe Swiss, yeah....I'm not a big fan.  Now for my sad confession....I can easily go through a bag of cheese a week, and I'm not talking about the little bags, I'm actually talking about the large ones, which makes me fear what my arteries might look like.  I honestly think I may need a cheese support group.

Anyway.....time to get back on track, because who really wants to read this?  I know your type, you're more interested in the recipe itself, so let me just say this last thing....This three cheese tortellini bake is absolutely delicious!  The meal turns out warm, creamy, and very flavorful. 

Recommendation: It would go great paired with a mini side salad, or a piece of garlic bread.

Three Cheese Tortellini Bake
Printer-Friendly Version

Ingredients:
1 bag (19-20 oz.) of frozen, 3 cheese tortellini
1 jar (15 oz.) alfredo sauce (I use Classico light)
½ jar marinara sauce
Shredded Mozzarella cheese
Grated Parmesan cheese
Dash of red pepper flakes

Directions:
Preheat oven to 350 degrees and spray an 8x8” baking pan with a nonstick cooking spray.

Cook the tortellini following the directions on the package.  Drain, and add in the marinara and alfredo sauces.  Also sprinkle in some red pepper flakes and then toss the ingredients together until the pasta is evenly coated.  Now, pour the prepared tortellini into the baking dish, and top with your desired amount or mozzarella and Parmesan cheese.

Place the dish in the oven and bake for 15 minutes.  Once the cheese has melted, broil the dish for about 3-5 more minutes, or until the cheese starts to turn a light golden brown.  Remove the dish from the oven and allow to cool slightly before serving.


Source: Slightly adapted from Key Ingredient

Thursday, May 9, 2013

Macaroni and Cheese Lasagna

Who can honestly say that they don't like macaroni and cheese?  I mean think about it for just a minute........you have pasta, and CHEESE.....how could you go wrong?  Personally, I've always been a fan.  Actually.....if I think back to my teenage years, I'd have to admit that Kraft macaroni and cheese would probably have to be one of the first things I could actually "cook" myself, without messing up.  It's also a meal that I enjoyed quite frequently in college, other than Ramen noodles or Hamburger Helper of course. (Don't judge....money was tight) 

Therefore, I've been wanting, and meaning to post this macaroni and cheese lasagna recipe for quite some time now.  It's definitely a meal that goes above and beyond just your ordinary mac and cheese, which in my mind, makes it a 'grown-up' version of a classic.  I original got the idea idea from a friend of mine and I knew right away that it'd be something Jeff and I would enjoy! (mostly because we are both fans of macaroni and cheese, plus lasagna)

Another bonus about this particular recipe is the fact that it's pretty adaptable.  (I myself heavily adapted it from the original)  What this means is that you could use whatever macaroni and cheese you like, (I prefer spirals) add in any additional ingredients/seasonings, or even take out some of the seasonings that I chose to add in.  I also believe that adding a layer of fresh spinach or some freshly chopped onions would be divine!  Unfortunately though, Jeff wouldn't eat it if I added those things, so I'll just stick to the recipe that follows.


Macaroni and Cheese Lasagna
Printer-Friendly Version

Ingredients:
2 boxes Kraft spiral macaroni and cheese (cooked according to package)
1 lb. lean ground beef
1 (23 oz.) jar Prego sauce (I use Three Cheese, however you could use whichever flavor you enjoy most)
1 tsp. garlic powder
1 garlic clove, minced
2 tsp. red pepper flakes (I may use more, we like hot)
2 tsp. oregano
1 cup Cheddar cheese
2 cups Mozzarella cheese

Directions:
In a large skillet, over a medium heat, begin to brown the lean ground beef.  Once the beef starts turning slightly brown, add in the garlic powder, garlic clove, red pepper flakes, and oregano.  Mix around until well combined and then continue to cook the beef until it is completely brown.  Drain the excess grease. (I do this by lining a colander with paper towel, so as not to lose any of the seasoning)  Return to beef to the skillet and set over a low heat.  Pour in the Prego sauce and stir around until the beef is completely coated with the sauce.  Allow to cook on low, until the sauce is warm.
 
In the meantime, cook the macaroni and cheese according to package directions.

To Assemble:
Coat an 8x8 baking pan with PAM cooking spray.  On the bottom of the dish, evenly layer on half the macaroni and cheese.  Top the mac and cheese layer with a little cheddar cheese, then add on half of the meat/sauce mixture and finish with a layer of mozzarella.  Repeat the layers one more time.

Place the dish in the oven at 375 degrees for about 10-12 minutes, or until the cheese is melted.  Switch the oven to broil and cook for about 2 more minutes or until the top of the cheese starts to turn that nice golden brown color.  Remove from the oven and allow to cool for a few minutes.  Serve warm.
 
 
Inspired by Kraft

Saturday, February 23, 2013

Cheesy Cheese Bombs


How can a recipe ever go wrong when cheese is involved?  Well that's simple......it can't.  There's just something about the gooey texture of warm, melted cheese that's incredibly addicting.  And don't even get me started on how wonderful burnt cheese is......yummmmm......burnt cheese...........Ok, ok, I just need a minute to wipe the drool from the corner of my mouth and then I'll continue.

So where was I?  Oh yes....cheese bombs. 

These cheese bombs are super easy to make, especially when you're short on time and looking for a little snack, a good appetizer, or even a meal.  In addition to being easy, cheese bombs don't require a lot of ingredients.  However, you could choose to stuff the bombs with other ingredients, ultimately making them your very own.  Ingredient ideas that I plan to try out one day are: chopped green and red peppers, ham, sausage, etc.  The possibilities really are endless. 

Cheese Bombs
Printer-Friendly Version

Ingredients:
1 container Pillsbury Grands Flaky Layers Biscuits
1 package mozzarella cheese, cut into about 2” cubes
Olive oil (for brushing)
Grated Parmesan cheese, for garnish
Oregano/Italian seasoning, for garnish

Directions:
Preheat oven to 350 degrees.

While the oven is preheating, pop open the biscuits and flatten them out slightly, on a clean work surface.

Once the biscuit is flattened, place about 2-3 pieces of the cheese onto the center. 
 
 
Next, fold the sides of the biscuit up and over the cheese, until completely sealed.  Once the cheese bombs are ready, place them seam side down onto a baking pan.

Brush the tops of the bombs with a little olive oil and sprinkle on the Parmesan cheese, and oregano or Italian seasoning.  They are now ready to bake.
 
 
Place the cheese bombs in the oven for 15-20 minutes or until just until they start to turn a nice golden color.  Allow a few minutes to cool and then serve!

Source: Oh, Bite It

Saturday, February 9, 2013

Bacon Cheeseburger Soup


If the weather keeps warming up down here in North Carolina, it'll almost be time to stop making soup.  I guess that means I'd better take full advantage of what little time I have left.

With that being said, today's soup was inspired by a recipe that I happened to find while scrolling through Pinterest.  (And yes, my husband likes to inform me that the site is becoming a major addiction of mine; but at least he's the one reaping all the benefits)  Jeff and I have always been big fans of hamburgers on the grill, so when I first spotted the idea for a cheeseburger soup, I knew right away that it was something we needed to try! 

I did end up altering the recipe a little, and still think it could be altered some more, based on ones taste.  For example, I would have loved to add some ketchup and mustard to the beef as it was browning, or stir in some dill pickle relish, but I knew if I did that Jeff wouldn't have eaten it.  (He can be pretty picky when it comes to certain things, but I can't say too much because I know I'm the exact same way).  None the less, the soup turned out great!

Recommendation: Garnish with a little extra bacon bits, some shredded cheese, scallions, a a dash of Frank's Red Hot Sauce!

Bacon Cheeseburger Soup
Printer-FriendlyVersion

Ingredients:
1 lb. lean ground beef
3 tsp. season salt
1 tsp. garlic powder
1 tsp. dried onion flakes
¼ tsp. black pepper
1 tsp. Worchester sauce
1 (32 oz.) package reduced sodium chicken broth
28 oz. Velveeta Cheese
4 oz. Jalapeno Velveeta Cheese
1-2 cups, shredded Cheddar Cheese
1 package Philadelphia Cooking Crème
1 package Ore-Ida Hash Browns
1 package Turkey Bacon, cooked and crumbled


Directions:
In a medium to large skillet, over a medium heat, brown the ground beef.  While the beef is browning, add into the skillet the season salt, garlic powder, onion flakes, black pepper, and Worchester sauce.  Continue to brown the beef with the seasonings.  Once ready, drain the excess grease.

Now generously spray your slow cooker with a nonstick cooking spray and add in the chicken broth, seasoned beef, almost all the bacon crumbles (save some for garnish), the Velveeta cheeses, the cheddar cheese, Philadelphia cooking crème, and the hash browns.  Stir around until the ingredients are combined and then set the slow cooker to high and cook for 4-5 hours.  Be sure to periodically stir around.

 
Once the soup is ready, place it in a serving dish and garnish with a little extra shredded cheese, some bacon crumbles, scallions, and a little Frank’s Red Hot Sauce for some extra kick!  Enjoy!


 Adapted from Living Life of Riley

Sunday, January 20, 2013

Cheesy Pull Apart Bread on Crack


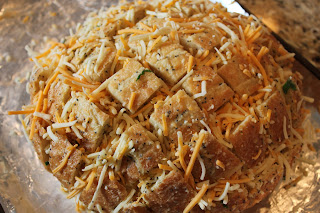
When it comes to writing something interesting for this post, I believe the image pretty much speaks for itself, which means that it doesn't need additional background information.  Therefore, let's just cut to the chase, because honestly, looking at the finished product, what's not to love about this bread?  For one thing it's bread (and who doesn't like bread?), and for another, it's covered in cheesy goodness.  Needless to say it was a huge hit!
 
Cheesy Pull-Apart Bread on Crack
Printer-FriendlyVersion

Ingredients:
1 round Italian loaf
1 stick butter, melted
1/8 cup EVOO (extra virgin olive oil)
1 Tbsp. onion, finely chopped
1 Tbsp. Dijon mustard
1 Tbsp. poppy seeds
3 garlic cloves, minced
3-4 tsp. chopped parsley
10-12 oz. shredded cheese (I used Sargento Artisan Blends – Double Cheddar)

Directions:
Preheat oven to 350 degrees

Cut the bread into cubes (size is up to you), making sure you DO NOT cut all the way through the bottom of the loaf.

In a medium bowl, combine the butter, EVOO, onion, mustard, poppy seeds, garlic, and parsley.

Pour the butter mixture over the loaf, making sure to definitely fill in the cracks using a small spoon, and spreading the mixture across the top.  This may seem time consuming, but it will definitely be worth your trouble.  Now, stuff the cheese down in the cracks.  This will work best if you use your hands.

 
Once the bread is ready, wrap it with aluminum foil, making sure that the sides are properly sealed.  Next, place the prepared loaf on a baking sheet and cook for around 15-20 minutes.  When done, remove the bread from the oven, take off the aluminum foil, and place it back into the oven.  Let the bread cook for another 10 minutes, until the cheese is all melted.

Enjoy!

Source: Food Wanderings in Asia

Sunday, January 6, 2013

Jalapeno-Cheddar Ale Soup


There's nothing quite as comforting on a cold winter's night as a bowl of warm, soothing, and delicious soup.  Wait a minute........on second thought, I might have to take that back.......A tall mug of hot chocolate, topped with whip cream, or mini marshmallows, might just be equally as comforting, but that's really not what this post is suppose to be about now, is it???  Therefore, let's get back on topic.

I originally discovered this recipe on Pinterest and knew right away that I'd have to try it out.  Mostly due to the fact that the soup consisted of a combination of too many wonderful ingredients!  When I first informed Jeff what I'd be making us for dinner, his response was instantaneous and was, "Yes please!" and once the soup was done cooking, he ended up eating over half the batch (makes about 4 servings).  I guess that means it must be pretty good and something I'll definitely be making again!  However, the next time I make this soup, I think I'll try adding some cut up potato squares.

Enjoy!

Bacon and Jalapeno-Cheddar Ale Soup
Printer-FriendlyVersion

Ingredients:
1 package bacon, cooked and crumbled into 1 inch strips
1 Tbsp. canola oil
1 onion, diced
2+ jalapeno peppers, diced
2 cloves garlic, minced
1 tsp. dried thyme
2 Tbsp. butter
¼ cup flour
1 (12 oz.) bottle/can ale
2 cups chicken broth
½ cup heavy cream
1 tsp. Dijon mustard
1 Tbsp. Worcestershire sauce
2 ½ cups cheddar cheese, shredded
¼ tsp. cayenne pepper or more depending on taste
Salt and pepper to taste

Directions:
In a medium sauce pan, set over a medium heat, add 1 Tbsp. canola oil, onion, and the jalapeno peppers.  Saute the ingredients together until tender and the onions appear slightly golden and transparent.  This will take a few minutes.

Add in the garlic and the thyme, and continue to sauté until slightly fragrant.  This will take about 30 seconds.

Next, add in the butter and let melt, but be sure to continue stirring.  Once the butter starts to bubble pour in the flour and stir around until combined.  Continue to stir for about 1-2 minutes or until the mixture starts to turn golden.  (Lots of stirring going on)

Now, add in the ale, and the broth, and stir around until the buttered flour begins to dissolve.  This may take 3-5 minutes.  Once the mixture starts to become smooth and looks blended, add in the bacon pieces and let cook for about 10 minutes.  Occasionally continue to stir around the mixture.

After about 10 minutes or so, add in the heavy cream, mustard, Worcestershire sauce, and cheddar cheese.  Stir around until well combined and until all the cheese has completely melted. 

Sprinkle with cayenne pepper, salt, and black pepper to taste.  Garnish with a little bacon, cheddar cheese, and a few jalapeno slices.

Adapted from Closet Cooking

Saturday, January 5, 2013

Crabbies (A.K.A. English Muffin Crab Cakes)


Around my house it's never officially Thanksgiving or Christmas without serving crabbies.  Even if Jeff and I end up traveling somewhere for the holidays, I'll typically make them as my item to bring along.  Due to this, I've ended up sharing the recipe with numerous family members and friends, which is just one of the reasons why I felt, this year, I'd share it with everyone.

FYI - Something that I find especially great about crabbies, other than the fact that they're completely addicting, is that they're so simple to make, and incredibly easy to transport.  Another great thing about crabbies is that this recipe can be made ahead of time and left in the freezer until it's time to serve them, which is always helpful if you're short on time.

Crabbies (A.K.A. English Muffin Crab Cakes)
Printer-FriendlyVersion

Ingredients: Makes 12 muffins
1 can Bumble Bee Fancy White crab meat
1 container Kraft Old English cheese spread
1 stick butter, softened
¾ tsp. Lowry’s seasoning
½ tsp. garlic salt
1 Tbsp. mayonnaise
1 package English Muffins (I use Bay’s Multi-Grain)

Directions:
Place the first 6 ingredients in a medium size bowl and beat together, with a hand mixer, until well blended. 

Separate the English muffins in half and lay them out on a flat work surface.

Next, spread some of the prepared crab/cheese mixture onto each of the English muffin half’s.  Once ready, wrap the crabbies up in tin foil, and place them in the freezer for 4 hours, or until you are ready to serve.  (I’ve left mine in the freezer for days/weeks, and they still turned out fine)   

When ready to serve, set the oven to broil, remove the crabbies from the freezer, and place them on a baking sheet.  Place the crabbies into the oven for about 8 minutes or until the cheese mixture starts to turn a nice golden brown color and appears bubbly.  Keep an eye on them while baking, because this can happen fast.  Once ready, remove the baking sheet from the oven and allow a few minutes to cool.  Finally, cut each English muffin into 4 or 6 small triangles and serve.  (I find using a pizza cutter especially helpful when it comes to cutting the crabbies)

Friday, December 14, 2012

Roasted Jalapeno, Bacon, and Cheddar Grilled Cheese


Let me preface this post by informing everyone that I'm always on the lookout for new and intriguing foods to include when I make a grilled cheese sandwich.  Ever since I was a little girl, I've been a huge fan of the original.  Mostly due to the fact that it was easy, made a quick meal, contained cheese (I can't live without that!), and we always seemed have the ingredients on hand.  Nowadays though, I find that I feel a bit more creative when it comes to making a grilled cheese sandwich.

Let that be your warning then.....This recipe is not for your typical grilled cheese sandwich.  In fact, it takes the idea of the original to an entirely new, exciting, and spicy level! 

"How?" you might ask. 

Well, first you use 2 thick slices of sourdough bread, then you add on a layer of the cream cheese mixture, followed by some roasted jalapeno peppers, bacon crumbles, and finally you top it off with a slice of cheddar cheese.  Absolute perfection on toasted bread!  What could be better?

Roasted Jalapeno, Bacon, and Cheddar Grilled Cheese
Printer-FriendlyVersion

Makes 1 sandwich, but feel free to double ingredients for more
Ingredients:
2 slices sourdough bread (or any bread)
2 oz. cream cheese, softened (I use 1/3 less fat)
1/8 tsp. chili powder
2-3 slices cooked bacon, crumbled
1 jalapeno pepper, sliced
Butter

Directions:
To Roast the Peppers
Set the oven to broil and then place the jalapeno slices onto a baking sheet.  Place in the oven and bake until the skins start to blacken.  Keep a close eye on them so they don’t burn.  Once ready, remove the jalapenos from the oven and immediately place into a zip lock bag allowing them to steam until cool to the touch.

To Make the Cream Cheese Mixture –
Place the cream cheese into a small bowl and add in the chili powder.  Using a hand mixer beat the mixture until smooth.

To Make the Grilled Cheese –
First, you will need to take one of the two slices of sourdough bread and spread the cream cheese mixture evenly onto a side.  Next, on top of the cream cheese spread, you will need to place a layer of bacon, followed by some jalapeno peppers, and finally a slice of cheddar cheese.  Now, just spread some more of the cream cheese mixture onto one side of the other slice of bread and place it on the sandwich, cream cheese side down.  Once the sandwich has been put together, gently butter each side of the bread. Lastly, place the sandwich into a skillet, set over medium heat, and allow to toast until the bread turns that nice golden brown you long for. This should take about 2-4 minutes per side.

Source: Adapted from Basil

Sunday, September 30, 2012

Cheesy Chicken and Rotel Spaghetti


A few years back a co-worker, and friend, introduced me to an absolutely addicting and easy to make appetizer/snack.  In fact, it's so simple that it only requires two ingredients: half a brick of Velveeta cheese and one can of Rotel.  Melt the two together ingredients together in the microwave, for 5 minutes, stirring halfway through, and you have the BEST chip dip ever!  Seriously......it's beyond addicting.

This weekend however, I decided to take the dip to a whole new level and incorporate it into a meal.  Looking back now, it was probably a mistake on my part, only because it turned out fantastic and is just as addicting as the dip itself.  I easily see this meal becoming a regular addition to our dinner menu.

Cheesy Chicken and Rotel Spaghetti
Printer-FriendlyVersion

Ingredients:
1 1/2 lb. chicken breasts, cubed
1 can (10 ¾ oz.) cream of chicken soup
1 can (10 oz) Rotel diced tomatoes and green chilies (I use HOT)
1 garlic clove, minced and ¼ tsp. garlic powder
½ tsp. onion powder
16 oz. Velveeta cheese, cubed
1 package spaghetti noodles
Cheddar cheese, shredded (optional)

Directions:
Preheat oven to 350 degrees.

Cook spaghetti according to package directions, drain and set aside.

Spray a 9x13” baking dish with nonstick cooking spray and set aside.

In a large skillet, set over medium-high heat, add the cubed chicken pieces, garlic, and onion powder.  Cook until the chicken is no longer pink.  Reduce the heat to low and add in the soup, cheese, and Rotel.  Continuously stir around until the cheese has completely melted and all the ingredients are well combined. 


Once the chicken and cheese sauce is ready, pour it over the spaghetti noodles and toss together.  Transfer the prepared spaghetti to the 9x13” baking dish and top with some cheddar cheese, if desired. 


Bake for about 30 minutes or until heated through and cheese is melted.
 
Source: Adapted from Plain Chicken