If you ask people to name their favorite food, most will likely reply with the word "pizza". There just seems to be something truly addicting about a circle of crispy dough, covered with warm marinara sauce, melty cheese, and all the different toppings you desire.
For me, the best part of any pizza has always been, and will always be, the delicious crust. I can still remember the times I use to sit downstairs, on Sunday evenings, with my parents, after they had just ordered themselves a pizza. I use to beg my mom to please let me have her crust, which being the great mother she is, would then cut off and give to me.
That's how I knew I needed to find just the right dough recipe before I could even consider making my own pizza. I will be the first to admit that I'm kind of a "crust" snob. I like my pizza crust to be crispy on the outside, but also soft on the inside. So, after many months of searching the internet and experimenting, I'm happy to announce that I've finally found it! Now that I have, I want to share the recipe with all of you, so that you may also enjoy your own homemade pizza!
Part of the process though is knowing how to properly bake a pizza. That's why I've decided to provide this helpful tutorial.
Simple to make Pizza Dough
Printer-Friendly Version
Servings: Enough dough for 2 medium size pizzas or about 4 calzones
Ingredients:½ cup warm water
2 ¼ tsp. (1 package) instant yeast
4 cups (22 oz.) bread flour, plus more for dusting work surface
1 ½ tsp. salt
1 ¼ cup water, room temperature
2 Tbsp. EVOO (extra-virgin olive oil)
Directions:
In a 2 cup liquid measuring cup, measure the warm water. Sprinkle the yeast on top of the warm water and let sit for about 5 minutes. Combine the bread flour and salt in the bowl of an electric mixer, fitted with the paddle attachment, and mix briefly to blend. Pour the room temperature water and olive oil into the measuring cup with the yeast-water mixture; stir around. Now, with the mixer on a low speed, pour all of the yeast-water mixture into the bowl containing the dry ingredients. Mix together until the ingredients start to form a dough-like substance.
Now, switch the electric mixers' attachment to the dough hook. Knead on a low setting until the dough is smooth, elastic, and pulls away from the sides of the bowl, about 5-7 minutes. If needed, add a little more bread flour, tablespoons at a time.
Transfer the dough to a lightly oiled bowl. Cover with plastic wrap and set in a warm place to let rise until double its’ original size. This should take 1 ½ -2 hours.
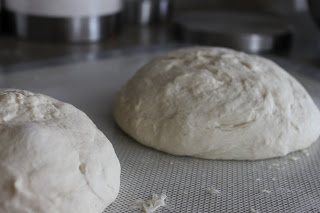
Once the dough has risen, gently press down with your fingers to deflate and then transfer to lightly floured work surface. Next, divide the dough into two equal pieces and roll each piece into a smooth, ball shape.
(If freezing the dough, to use at a later date, wrap in plastic wrap, place in a freezer safe bag, and put in the freezer.) If using right away, cover with a damp cloth to let the dough “relax” for 10 minutes, but no longer then 30 minutes before you use.
You are now set to make your own pizza, so be creative!
Preheat your oven to 500 degrees with the pizza stone already inside. (Preheating the pizza stone with your oven will give the dough a nice crispy texture on the outside, but will allow it to stay soft on the inside.) Transfer the dough to a piece of parchment paper that has been lightly dusted with cornmeal. Shape the dough using your hands. (Sometimes it helps if you lightly cover your hands with flour.) Once the dough is shaped, lightly brush the outer edge with olive oil.
Add your toppings and place the pizza (still on the parchment paper) onto the pizza stone and bake until the crust is a golden brown color, and the cheese is bubbling. This should take around 8-12 minutes.
Add your toppings and place the pizza (still on the parchment paper) onto the pizza stone and bake until the crust is a golden brown color, and the cheese is bubbling. This should take around 8-12 minutes.
*You may need to use a cutting board to help you get the pizza onto the pizza stone, as the parchment paper alone will not hold up to the weight of the pizza.*
Source: Annie's Eats; originally adapted from Baking Illustrated


0 comments:
Post a Comment