RSS

Sunday, January 27, 2013

Peanut Butter and Chocolate Chip Oatmeal Scones


I've always been an enormous fan of breakfast foods and have even been known to make breakfast for dinner.  Waffles, pancakes, French toast, eggs, you name it, I pretty much enjoy it all!  Over the past year or two though, I'd have to say that scones have slowly crept ahead of the rest, and have become my new favorite breakfast.  For some reason I feel the need to shout, "I absolutely love scones!!!"  Especially when I have a large cup of steaming hot coffee to go with them.  And due to all the different flavor combinations that there are out there, I could never get bored!

However, for this recipe, I chose to stick with the traditional chocolate and peanut butter.  A flavor combination that, in my opinion, can never go wrong!  In the end though, the chocolate and peanut butter is what makes the scone taste more like a dessert than a breakfast food, which is completely ok with me.  So do yourself a favor, and grab a large cup of coffee or a glass of milk and enjoy!

Peanut Butter and Chocolate Chip Oatmeal Scones
Printer-FriendlyVersion

Makes 8 scones
Ingredients:
2 cups all-purpose flour
1 cup old fashioned oats
1/3 cup light brown or dark brown sugar
1 tsp. baking powder
1 tsp. baking soda
¼ tsp. salt
6 Tbsp. butter, cold and cut into small pieces
¾ cup skim milk or heavy cream
1 egg, separated
½ cup peanut butter (creamy or chunky)
1 ¼ cup semi-sweet chocolate chips
Raw sugar for sprinkling
8 oz. semi-sweet chocolate (for drizzle)

Directions:
Preheat the oven to 400 degrees and line a baking sheet with a silicone baking mat or a piece of parchment paper.

In a large bowl combine the flour, oats, sugar, baking powder, baking soda, and salt.  Whisk together until combined.  Next, cut the butter into the flour mixture until pea-size pieces form.  You can do this by using a pastry blender, or your fingertips.

In a small bowl, whisk together the milk and egg yolk.  Create a well in the middle of the flour/oat mixture and pour in the egg milk.  Also, add in the peanut butter.  Now, using a spatula or a wooden spoon, gently fold the ingredients together.  Once they are combined, add in the chocolate chips and continue to knead together, using your hands, until a dough forms.  Be careful not to over knead though.

Place the prepared dough onto the silicone baking mat, or piece of parchment  paper, and pat out until it forms an 8-10 inch round circle.  Lightly whisk the egg white, and then brush it over the top of the prepared scone.  Sprinkle with the raw sugar.

Cut the dough into 8 triangles (only slightly pulling them apart) and bake for 18-20 minutes or until the scones begin to turn a nice golden brown color.  Allow to cool in the pan, on a wire rack, for about 5 minutes and then completely separate the scones and place on a wire rack to cool completely.

Melt the semi-sweet chocolate, in a microwave safe bowl, in 30 second intervals, making sure to stop and stir in between.  Lightly drizzle the melted chocolate over the top of the cooled scones.  Store in an airtight contained.  Best served reheated.

Slightly adapted from Brown-Eyed Baker

Monday, January 21, 2013

Cheese and Spicy Sausage Casserole


It seems that lately I've been trying to make dinners that will last for a few days.  This is mostly because time just seems to get away from me, especially this month.  As most people did, I too set some personal goals for myself, the main one being to run/walk 150 miles between my treadmill and the open road.  As of this moment I'm sitting at 135.62 miles.  Based on my numbers, I definitely plan to exceed my 150 goal!  Needless to say, this goal has kept me very busy, which is why I've been stretching out dinners.

But enough about personal goals.......let's get back to food!

Let me just start by saying that this recipe is absolutely delicious, and oh my gosh......when this casserole was cooking it spread such a sensational aroma throughout the whole house, and of course, it did not disappoint!  Jeff and I are not shy at all when it comes to spicy food though (in fact, the spicier the better), so if you want to tone down the spiciness level, feel free to add a can of the original Rotel instead of the hot version.  Either way, I'm positive that it will be scrumptious!

Cheese and Spicy Sausage Casserole
Printer-FriendlyVersion

Ingredients:
1 Tbsp. olive oil
1 package Eckrich Angus Beef smoked sausage (cut in ¼ inch round pieces)
2 Tbsp. dried minced onion flakes
1 tsp. garlic powder
2 cups low-sodium chicken broth
1 (10 oz can) Hot Rotel tomatoes with Habaneros
½ cup skim milk
¼ tsp. salt
½ tsp. black pepper
11 oz. penne pasta (half cooked)
1 cup shredded Monterey Jack cheese
1 ½ cup shredded pepperjack/cheddar cheese mixture
Garnish with scallions

Directions:
Heat the olive oil in a large skillet and add in the smoked sausage rounds.  Allow to cook until lightly browned on both sides.

Next, add into the skillet the onion flakes, garlic powder, chicken broth, Rotel, milk, salt, pepper, and pasta.  Let the ingredients come to a boil, then reduce the heat to a simmer, cover, and let sit for 15-20 minutes or until the pasta is ready.

Remove the skillet from the heat and stir in half the cheese.

Spray a 9 x 13 inch baking dish with a non-stick cooking spray, and then evenly pour in and distribute the ingredients from the skillet.  Cover the pasta mixture with the remaining cheese and place in the oven, on broil, until the cheese is melted and turns golden.  (Make sure to keep an eye on your oven.  It only took about 5 minutes for mine casserole to bake, but all ovens are different)

Slightly Adapted from Plain Chicken

Sunday, January 20, 2013

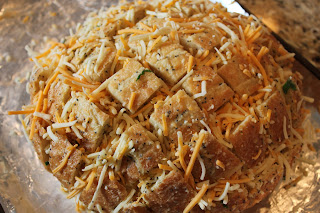
Cheesy Pull Apart Bread on Crack


When it comes to writing something interesting for this post, I believe the image pretty much speaks for itself, which means that it doesn't need additional background information.  Therefore, let's just cut to the chase, because honestly, looking at the finished product, what's not to love about this bread?  For one thing it's bread (and who doesn't like bread?), and for another, it's covered in cheesy goodness.  Needless to say it was a huge hit!
 
Cheesy Pull-Apart Bread on Crack
Printer-FriendlyVersion

Ingredients:
1 round Italian loaf
1 stick butter, melted
1/8 cup EVOO (extra virgin olive oil)
1 Tbsp. onion, finely chopped
1 Tbsp. Dijon mustard
1 Tbsp. poppy seeds
3 garlic cloves, minced
3-4 tsp. chopped parsley
10-12 oz. shredded cheese (I used Sargento Artisan Blends – Double Cheddar)

Directions:
Preheat oven to 350 degrees

Cut the bread into cubes (size is up to you), making sure you DO NOT cut all the way through the bottom of the loaf.

In a medium bowl, combine the butter, EVOO, onion, mustard, poppy seeds, garlic, and parsley.

Pour the butter mixture over the loaf, making sure to definitely fill in the cracks using a small spoon, and spreading the mixture across the top.  This may seem time consuming, but it will definitely be worth your trouble.  Now, stuff the cheese down in the cracks.  This will work best if you use your hands.

 
Once the bread is ready, wrap it with aluminum foil, making sure that the sides are properly sealed.  Next, place the prepared loaf on a baking sheet and cook for around 15-20 minutes.  When done, remove the bread from the oven, take off the aluminum foil, and place it back into the oven.  Let the bread cook for another 10 minutes, until the cheese is all melted.

Enjoy!

Source: Food Wanderings in Asia

Sunday, January 6, 2013

Jalapeno-Cheddar Ale Soup


There's nothing quite as comforting on a cold winter's night as a bowl of warm, soothing, and delicious soup.  Wait a minute........on second thought, I might have to take that back.......A tall mug of hot chocolate, topped with whip cream, or mini marshmallows, might just be equally as comforting, but that's really not what this post is suppose to be about now, is it???  Therefore, let's get back on topic.

I originally discovered this recipe on Pinterest and knew right away that I'd have to try it out.  Mostly due to the fact that the soup consisted of a combination of too many wonderful ingredients!  When I first informed Jeff what I'd be making us for dinner, his response was instantaneous and was, "Yes please!" and once the soup was done cooking, he ended up eating over half the batch (makes about 4 servings).  I guess that means it must be pretty good and something I'll definitely be making again!  However, the next time I make this soup, I think I'll try adding some cut up potato squares.

Enjoy!

Bacon and Jalapeno-Cheddar Ale Soup
Printer-FriendlyVersion

Ingredients:
1 package bacon, cooked and crumbled into 1 inch strips
1 Tbsp. canola oil
1 onion, diced
2+ jalapeno peppers, diced
2 cloves garlic, minced
1 tsp. dried thyme
2 Tbsp. butter
¼ cup flour
1 (12 oz.) bottle/can ale
2 cups chicken broth
½ cup heavy cream
1 tsp. Dijon mustard
1 Tbsp. Worcestershire sauce
2 ½ cups cheddar cheese, shredded
¼ tsp. cayenne pepper or more depending on taste
Salt and pepper to taste

Directions:
In a medium sauce pan, set over a medium heat, add 1 Tbsp. canola oil, onion, and the jalapeno peppers.  Saute the ingredients together until tender and the onions appear slightly golden and transparent.  This will take a few minutes.

Add in the garlic and the thyme, and continue to sauté until slightly fragrant.  This will take about 30 seconds.

Next, add in the butter and let melt, but be sure to continue stirring.  Once the butter starts to bubble pour in the flour and stir around until combined.  Continue to stir for about 1-2 minutes or until the mixture starts to turn golden.  (Lots of stirring going on)

Now, add in the ale, and the broth, and stir around until the buttered flour begins to dissolve.  This may take 3-5 minutes.  Once the mixture starts to become smooth and looks blended, add in the bacon pieces and let cook for about 10 minutes.  Occasionally continue to stir around the mixture.

After about 10 minutes or so, add in the heavy cream, mustard, Worcestershire sauce, and cheddar cheese.  Stir around until well combined and until all the cheese has completely melted. 

Sprinkle with cayenne pepper, salt, and black pepper to taste.  Garnish with a little bacon, cheddar cheese, and a few jalapeno slices.

Adapted from Closet Cooking

Saturday, January 5, 2013

Crabbies (A.K.A. English Muffin Crab Cakes)


Around my house it's never officially Thanksgiving or Christmas without serving crabbies.  Even if Jeff and I end up traveling somewhere for the holidays, I'll typically make them as my item to bring along.  Due to this, I've ended up sharing the recipe with numerous family members and friends, which is just one of the reasons why I felt, this year, I'd share it with everyone.

FYI - Something that I find especially great about crabbies, other than the fact that they're completely addicting, is that they're so simple to make, and incredibly easy to transport.  Another great thing about crabbies is that this recipe can be made ahead of time and left in the freezer until it's time to serve them, which is always helpful if you're short on time.

Crabbies (A.K.A. English Muffin Crab Cakes)
Printer-FriendlyVersion

Ingredients: Makes 12 muffins
1 can Bumble Bee Fancy White crab meat
1 container Kraft Old English cheese spread
1 stick butter, softened
¾ tsp. Lowry’s seasoning
½ tsp. garlic salt
1 Tbsp. mayonnaise
1 package English Muffins (I use Bay’s Multi-Grain)

Directions:
Place the first 6 ingredients in a medium size bowl and beat together, with a hand mixer, until well blended. 

Separate the English muffins in half and lay them out on a flat work surface.

Next, spread some of the prepared crab/cheese mixture onto each of the English muffin half’s.  Once ready, wrap the crabbies up in tin foil, and place them in the freezer for 4 hours, or until you are ready to serve.  (I’ve left mine in the freezer for days/weeks, and they still turned out fine)   

When ready to serve, set the oven to broil, remove the crabbies from the freezer, and place them on a baking sheet.  Place the crabbies into the oven for about 8 minutes or until the cheese mixture starts to turn a nice golden brown color and appears bubbly.  Keep an eye on them while baking, because this can happen fast.  Once ready, remove the baking sheet from the oven and allow a few minutes to cool.  Finally, cut each English muffin into 4 or 6 small triangles and serve.  (I find using a pizza cutter especially helpful when it comes to cutting the crabbies)