RSS

Wednesday, March 21, 2012

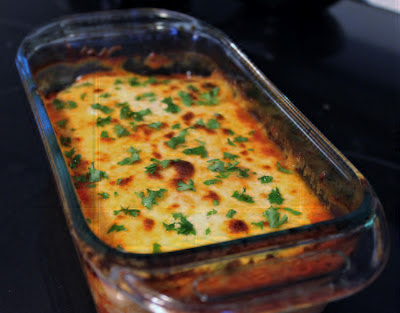
Chicken Parmesan Meatloaf


I'm a huge fan of Chicken Parmesan, so when I happened to discover this recipe for Chicken Parmesan Meatloaf I knew it was something I needed to try.  You see, before today I'd never tasted meatloaf; mostly because the thought of it completely grossed me out (even though I honestly couldn't tell you why).  After today though, I arrived at the conclusion that I shouldn't have avoided it for so long.  I guess we all make mistakes at some point in our lives.  I am aware however, that this recipe does not follow the traditional version of meatloaf, but I'm more likely to give that a try now.  This dish was definitely addicting!

Chicken Parmesan Meatloaf
Printer-FriendlyVersion

Ingredients:
1 lb. ground chicken (I use reduced fat)
1 egg
¼ cup Panko bread crumbs
½ tsp. dried basil
½ tsp. dried thyme
½ tsp. dried oregano
2 cloves garlic, minced
1 small onion, grated
½ tsp. salt
¼ tsp. black pepper
½ cup Parmesan cheese
½ cup pasta sauce (I use Prego flavored with meat)
½ cup – 1 cup shredded Italian cheese blend
Garnish: minced parsley

Directions:
Preheat the oven to 350 degrees and lightly coat a loaf pan with cooking spray.

In a medium bowl combine the chicken, egg, bread crumbs, basil, thyme, oregano, garlic, onion, salt, pepper, and the Parmesan cheese.  Using your hands mix the ingredients together until well blended.  Scoop the mixture into the loaf pan and spread evenly across the bottom until a loaf is formed.  Top the meatloaf with the pasta sauce.

Place the pan into the preheated oven and bake for 40-45 minutes.  Remove the meatloaf from the oven and top with the Italian cheese blend.  Place the meatloaf back in the oven and continue baking for 10-15 or until the cheese has melted.  Turn the oven onto broil and continue cooking for about 2 minutes or until the cheese has reached a desired consistency.  (I like mine a little crispy).  Remove the pan from the oven and allow it to cool for 5-10 minutes.  Garnish with the minced parsley.


Sunday, March 18, 2012

Black Bean Soup with a Kick


To be quite honest, I'm not a fan of black beans, but I'm going to share this soup recipe anyway, because my husband Jeff informs me that it's quite possibly his new favorite.  In fact, Jeff ate almost half the recipe the first night I made it, although I'm probably not suppose to share that information.  Oh well..........

A great thing about this soup recipe, is that it's super easy to make, and once the ingredients are prepared, it only takes around 15-20 minutes to cook.  If you decided to place the soup into a regular blender though, instead of using an immersion blender, be careful and mix in two batches, filling only half full and really using your hand to press down on the lid.  If not, you might face a mess.  It's like I'm speaking from experience.  Enjoy!

Black Bean Soup with a Kick
Printer-Friendly Version

Ingredients:
2 Tbsp. Olive oil
1 medium yellow onion, chopped
1 red pepper, seeded and chopped
1 carrot chopped
3 cloves garlic, minced
1 jalapeno, seeded and chopped
2 cups chicken broth
2 (15 oz.) cans black beans
1 (14.5 oz.) can diced tomatoes with green chilies (Rotel)
1 bay leaf
1 tsp. cumin
1 tsp. chipotle powder
1 tsp. salt
¼ tsp. cayenne pepper

Garnish as desired.  Some options are: tortilla chips, salsa, cheese, sour cream, cilantro, etc.

Directions:
In a large saucepan over a medium-high heat, heat the olive oil.  Add the onion and cook for 3-4 minutes.  Next, add in the red pepper, carrot, garlic, and jalapeno pepper and cook for another 5-7 minutes or until the onion is translucent.  Make sure to stir around periodically.  Now add in the chicken broth, black beans, diced tomatoes/green chilies, bay leaf, cumin, chipotle powder, salt, and cayenne pepper.  Stir the ingredients together until well blended, and then bring the soup to a boil.  After that, reduce the heat to medium-low and allow it to simmer for 10 minutes.

If you like chunky soup, feel free to serve it as is, or you may use an immersion blender or a regular blender to puree the soup.  Once again, if you use a regular blender, make sure you puree it in small batches.  Serve warm and garnish as desired. 

Source: Gimme Some Oven

Monday, March 12, 2012

Jalapeno Buffalo Chicken Bites


Buffalo chicken is kind of a secret obsession of mine, mostly because I absolutely love the flavor combination!  I find that I'm always on the lookout for an excuse to make buffalo chicken dip, so when I happened to stumble upon a recipe for buffalo chicken bites, I knew right away that I needed to try it.  As a bonus, I already had most of the ingredients on hand, except for the corn flakes, which of course I immediately went out to purchase. 

These little round bites are like a gift from heaven, and definitely something I see myself making time and time again.

Jalapeno Buffalo Chicken Bites
Printer-FriendlyVersion

Ingredients:
3 cups chicken, shredded (or canned)
1/2 cup hot sauce, (I use Frank’s Original Red Hot Sauce)
3 ½ oz., 1/3 less fat cream cheese, softened
1 ¾ cup sharp cheddar cheese, shredded
1-2 jalapeno peppers, finely chopped
1 cup all-purpose flour
4 eggs, lightly beaten
3-4 cups corn flake cereal, crushed

Directions:
Preheat oven to 350 degrees and line a baking sheet with parchment paper.  Place the flour in a shallow dish, place the eggs in a small bowl, and place the crushed corn flakes in yet another shallow dish, then set aside.

In a large bowl, add in the shredded chicken, hot sauce, cream cheese, cheddar cheese, and jalapeno peppers.  Mix together, until well combined, with either a wooden spoon or a hand held mixer, set to a medium speed. 

Roll about a tablespoon, or so, of the mixture into a 1 ½ inch ball and set aside.  Continue this process until the remaining mixture has been all used.  Once the buffalo chicken balls are ready, dip each one first into the flour, then into the egg, and end by coating with the corn flakes.  Place onto prepared baking sheet and place into the oven for 20-25 minutes.

Remove from oven and serve warm.  Goes great with a side of ranch dressing!


Source: Adapted from Sweet Pea's Kitchen

Sunday, March 11, 2012

Eclair Cake


Desserts are pretty much my favorite food item to make, therefore whenever we go over to a friend's house, I always volunteer (and am often asked) to bring the dessert.  However, this particular time I didn't have much notice and needed something that would be quick and easy.  I immediately started browsing through my saved recipes and that's when I came upon this recipe for eclair cake.  I've had the opportunity to sample eclair cake before and always enjoyed it, which made it pretty easy to settle on.

Not only was this recipe quick and easy, but it also made for one tasty dessert!  As a bonus, you can make it as healthy or unhealthy as you want.  I tend to take the healthy route when it's for me and use sugar free pudding, reduced fat whipped cream, and reduced fat graham crackers.  I think it tastes the same!

Éclair Cake
Printer-Friendly Version

Ingredients:
2 (3.5 oz) packages instant vanilla pudding mix (I use sugar free)
1 (8 oz) container whipped topping, thawed (I use Kraft fat free)
3 cups milk (I use skim)
1 (16 oz) package graham crackers (I use reduced fat)
Chocolate frosting, homemade or store-bought

Chocolate Frosting Ingredients:
2 sticks butter, softened
¾ cup unsweetened cocoa powder
1 tsp. vanilla extract
4 cups powdered sugar, sifted
3-4 Tbsp. milk

Directions:
For the Filling:
In a medium size bowl, with a hand mixer, thoroughly mix the pudding, whipped topping, and the milk.

For the Chocolate Frosting:
In the bowl of an electric mixer, fitted with a whisk attachment, cream the butter.  Add in the cocoa powder and vanilla extract.  Mix until just combined.  With the mixer on a medium speed, gradually add in the powdered sugar, one cup at a time, beating well after each addition and scraping down the sides of the bowl as needed.  When all the powdered sugar has been added in the frosting will appear dry.  (If not, you may need to add in a little more powdered sugar as needed)  Now, add in the milk and beat on a medium speed until the frosting becomes light and fluffy.

To Assemble:
Place a single layer of graham crackers on the bottom of a 9x13 inch baking dish and then evenly spread on half of the vanilla pudding mixture.  Add on another layer of graham crackers and top with the remaining vanilla pudding mixture.  Finish off with a final layer of graham crackers and top with the chocolate frosting.

Place in the refrigerator for 4 hours or overnight.  The graham crackers need time to soften.


(Hint:)  If you are short on time, place the graham crackers in some milk before placing them in the dish.  This will help them soften much faster.

Source: Cake from All Recipes, frosting from Wilton

Saturday, March 10, 2012

Turkey Stuffed Red Peppers


The other day, while I was busy making my way around the grocery store, I happened to notice some fantastic looking red peppers.  I couldn't help but hear them calling my name, so without thinking too much about it, I purchased a few.  At the time, I figured that even if I didn't incorporate them into a meal, I'd at least cut them up to have as a healthy snack, with some hummus.

When I arrived home though, and looked in the freezer, I noticed I had some ground turkey.  I immediately decided that I would use the turkey to make stuffed red peppers, because it's something I've been wanting to try for awhile now.  Here's the result!  

Turkey Stuffed Red Peppers           
Printer-FriendlyVersion

Ingredients:
2 tsp. olive oil
1-1 ½ lb. 99% fat free ground turkey
1 small onion, finely chopped                                                  
2 garlic cloves, minced
2 tsp. oregano
¼ cup fresh baby spinach, chopped (I find it easiest to rip into small pieces)
¾ (24 oz. jar) Prego Roasted Garlic Parmesan
Dash of black pepper
Dash of garlic powder
4-6 red peppers cut in half and seeded
Kraft shredded Parmesan cheese
Mozzarella cheese

Directions:
Preheat the oven to 400 degrees.  In a medium or large skillet, over medium heat, add the olive oil and the onion.  Continue to sauté the onion until it becomes translucent in appearance, this will take about 3-4 minutes.  Next, add in the garlic and stir around until fragrant, about 30 seconds.  After that, add in the ground turkey and sprinkle with the oregano.  Continue by browning the turkey, making sure to periodically stir around while it cooks.

While the turkey is browning, cut the red peppers in half and seed them.  Set aside.

Once the turkey is no longer pink, drain any excess juices, then add in the chopped spinach, dash of pepper, dash of garlic powder, and the Prego Roasted Garlic Parmesan (I also added in a little Parmesan cheese here).  Stir the ingredients together, until well combined, and then allow the mixture to simmer for 10 minutes.

Once ready, scoop the mixture into the hollowed out red peppers and sprinkle some mozzarella and Parmesan cheese on top.  Place the stuffed peppers onto a baking sheet and place in the oven for about 15-20 minutes, or until the cheese begins to turn a nice golden brown and the peppers look soft.

Serve warm!

Source: Bowl of Creativity original 

Monday, March 5, 2012

Mudslide Cupcakes (Kahlua and Bailey's Irish Cream)


I know that it's been quite awhile since my last post, but things have been very hectic around here, both good and bad, and time has just slipped away.  The good news though, is that Jeff and I sold our home and we're currently living in a rental house.  This is only temporary though, because we're currently in the process of building a brand new home!  I'm very excited about it too, mostly because "our" new kitchen will be amazing!  We'll also have a really nice outdoor living area where we'll be able to entertain family and friends!

Now that the transition into the rental house is complete, I'm happy to announce that I finally have time to start posting again!!!  I've really missed being able to post recipes over the last couple of weeks, mostly because I've made many delicious meals and tasty treats I want to share!  I have just the one to start with too!  Mudslide cupcakes!!!  I love a good mudslide and these cupcakes are truly FANTASTIC!  In fact, my husband informed me that they might just be his new favorite.

The main reason I made the cupcakes was because a coworker of mine asked if I'd be willing to make something for a bachelorette party she'd be throwing.  Of course I said yes, as I LOVE to bake, and we decided on something that I could incoporate some liquor in.  Originally I was going to make margarita cupcakes, and still plan too at some point, but with the move and all, I was unable to locate the box I packed the tequila in.  Therefore, I had to improvise and started to dig through boxes.  It just so happened that I had some Bailey's Irish Cream and Kahlua on hand, two of my personal favorites.  I thought for a bit about what I could make with one, or both of them, and here's the result.........

P.S. - These would make a great addition for a St. Paddy's Day Party!

Mudslide Cupcakes (Kahlua and Bailey’s Irish Cream)
Printer-Friendly Version

Servings: About 24 cupcakes
Ingredients:
For the cupcakes:
3 eggs, separated and at room temperature
3/4 cup granulated sugar
1/2 cup (1 stick) butter, softened
1 cup light brown sugar, packed
2 and 1/4 cups all-purpose flour
1/2 cup unsweetened cocoa powder
1 1/2 teaspoons baking soda
3/4 cup strong cold coffee
3/4 cup Kahlua

For the Kahlua Buttercream:
16 Tbsp. butter, softened
3 cups (or more, if needed) powdered sugar
3 Tbsp. unsweetened cocoa powder
4 Tbsp. Kahlua
3 Tbsp. hot coffee

For the Bailey’s Irish Cream Buttercream:
16 Tbsp. butter, softened
3 cups powdered sugar
2 tsp. vanilla extract
4 Tbsp. Bailey’s Irish Cream

Directions:
For the cupcakes:
Preheat oven to 350 degrees and prepare your cupcake pan with liners.

Beat the egg whites until foamy, on a high speed, in the bowl of an electric mixer, fitted with the whisk attachment.  With the mixer still running, add the granulated sugar and continue to beat until the mixture is thick, stiff, and glossy in appearance.  Now, gently place the egg white mixture into another bowl and set aside.  Be sure to thoroughly clean out the bowl of the electric mixer and then reattach.

In the clean mixing bowl, add the butter and brown sugar and mix together on a medium speed until light and fluffy.  Next, add in the egg yolks, one at a time, making sure to mix well after each addition. 

In a separate bowl, whisk together the flour, cocoa powder, and baking soda.

With the mixer set to a low speed, slowly pour in the flour mixture, coffee, and Kahlua, while making sure to alternate between the three, ending with the flour mixture.  Once combined, stop the mixer and using a rubber spatula gently fold in the egg whites.  Once the batter is well mixed, fill the cupcakes liners about two-thirds full.

Bake the cupcakes for around 18-22 minutes, or until an inserted toothpick comes out clean.  Remove the pan(s) from the oven and allow them to cool completely on a wire rack.

Kahlua Buttercream:
Combine the butter and powdered sugar in the bowl of an electric mixer, fitted with the paddle attachment.  Then, beat on a low-medium speed until smooth and creamy in texture.  Now, add in the cocoa powder, Kahlua, and coffee and mix until well combined.  If needed, add in more powdered sugar.

Set aside and clean out the bowl of the mixer.

Bailey’s Irish Cream Buttercream:
Once again, beat together the butter and powdered sugar, on a low-medium speed, in the bowl of an electric mixer, fitted with a paddle attachment.  Once ready, the mixture should appear smooth and creamy in texture.  Now, add in the vanilla extract and Bailey’s Irish Cream, mixing well until combined. 

Frost the cupcakes however you would like, and garnish with some shaved chocolate!